Setting Up Calendar Synchronization via CalDAV
Setting Up Calendar Synchronization via CalDAV
Gone are the days when you had to log in to the CRM every time you wanted to check your work schedule for the day. You can now receive alerts about the next staff meeting on your iPhone or even your Apple Watch, without having to log into the CRM!
The CRM supports Calendar synchronization with any iOS device (iPhone, iPad, MacBook as well as Apple Watch) via CalDAV configuration. The result – any event that you create in the CRM will be synchronized with your iOS Calendar and vice versa.
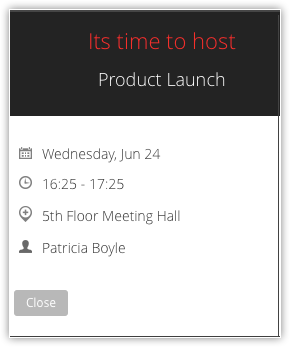
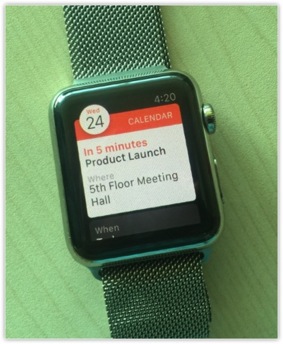
Here, an event called “Product Launch” created on an iPhone seamlessly synchronizes with the CRM as well as the Apple Watch. Here are some screenshots of alerts on the iPhone, Apple Watch as well as the CRM.

Manage events efficiently
By enabling CalDAV configuration on your iOS device, you can manage all your events efficiently. Let’s say CalDAV pushes events from the CRM to your iPhone. This way you can see both personal events as well as your business events on your iPhone Calendar. If you find that a lunch date overlaps with a staff meeting, you can quickly reschedule the events from the iPhone based on your priorities. You don’t have to log back into the CRM to edit an event.
CalDAV for multiple iOS devices
You can configure CalDAV on more than one iOS device including the iPhone, iPad, MacBook and iPod Touch. As for the Apple Watch, there is no separate configuration involved. Pairing the Watch with an iOS device would be sufficient to get the alerts on your Apple Watch. The events will be synchronized between the CRM and all the devices in which the CalDAV configuration has been enabled. So perhaps the next time you are driving and unable to check your iPhone, all you have to do is tilt your wrist to know the day’s schedule from the Apple Watch!
Work offline
What’s more, you can also create or edit events on the phone when you are offline. When you are back online, your events are automatically synchronized in the CRM.
In order to start using Calendar Synchronization via CalDAV in your iOS devices, you must first
- Enable CalDAV access in the CRM
- Configure CalDAV account in your iOS device.
Enable CalDAV Access in the CRM
Only if you enable CalDAV Access in the CRM, will you be able to configure your CalDAV account on your iOS device.
To enable CalDAV Access in the CRM
- Log in to your CRM account.
- Click the Calendar icon, and then click Day, Week or Month to view your calendar.
- Click Options > Preferences.
- In the Preferences popup, under the CalDAV Access section, select Status as Enable.
The CalDAV configuration details are displayed.
(Note that, the sever URL for EU will be displayed as crm.XXX.eu)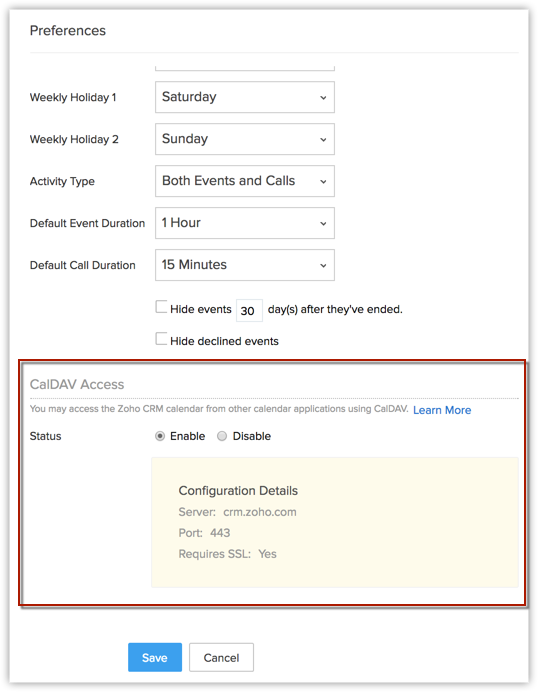
- Click Save.
Configure CalDAV Account in an iOS Device
This CalDAV Calendar Synchronization is currently compatible only with iOS devices. This includes the iPhone, iPad, iPod Touch, Apple Watch and MacBook. Note that the CalDAV configuration has to be enabled on each iOS device separately, except on the Apple Watch.
As for the Apple Watch, it has to be only paired with the iPhone for calendar synchronization. You will be able to receive event alerts on the Apple Watch and not create/edit events in the Apple Watch.
The procedure to configure CalDAV is the same for all iOS devices. The instructions for CalDAV configuration on the iPhone are mentioned below.
To configure CalDAV on an iPhone
- Tap Settings on your iPhone.
- In the Settings page, select Passwords & Accounts.
- In the Passwords & Accounts page, under the Accounts section, tap Add Account.
- In the Add Account page, tap Other.
- In the Other page, under the Calendars section, tap Add CalDAV Account.
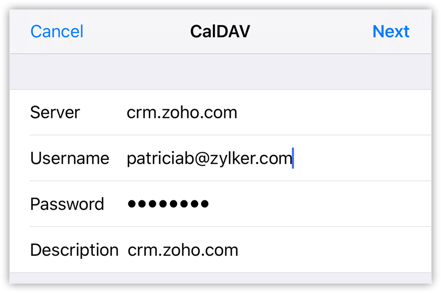
- In the CalDAV configuration page, enter the following values.
- Server: crm.zoho.com
- Username: Email address
- Password: CRM password
- Description: Your choice of Application Name
- Your CalDAV configuration will be verified and enabled on your iPhone.

- Make sure that you use your email address and NOT your username. If you use the username, the configuration will not work.
- If Two-Factor Authentication is enabled for your account, use your App-specific password for the CalDAV configuration.
- To generate the app specific password
- Visit https://accounts.zoho.com/u/h#home
- Click Settings > Two-Factor Authentication > Manage Application Specific Passwords.
- In the Application Specific Passwords popup, enter required details and click Generate.
The password thus generated is your application specific password and must be used for the CalDAV configuration in your iOS device.
- This CalDAV Configuration settings are applicable only when you setup CalDAV on iOS devices and not Android or Windows devices.
- If you wish to set up Calendar synchronization via CalDAV for your Android or Windows devices, please use third party apps to do so. When you use third party apps, please note that the Server address will differ. In such a case, please contact our Support team for the correct configuration settings.
Delete CalDAV Account
If you do not want to have the CalDAV account in your iOS device any more, you can delete the account. You can delete the CalDAV account in two ways.
- Disable CalDAV Access in the CRM
- Delete CalDAV Account on your iOS Device
To disable CalDAV Access in the CRM
- Log in to your CRM account.
- Click the Calendar icon, and then click Day, Week or Month to view your calendar.
- Click Options > Preferences.
- In the Preferences popup, under the CalDAV Access section, select Status as Disable.
- Click Save.
To delete the CalDAV account on your iPhone (or any iOS Device)
- Tap Settings on your iPhone.
- In the Settings page, tap Passwords & Accounts.
- In the Passwords & Accounts page, tap CalDAV.
- In the CalDAV page, tap Delete Account.
- Tap Delete from My iPhone.
- On deleting the CalDAV account, all events created and synchronized in the iOS device under the associated CalDAV category will be removed.
- Events created and synchronized in the CRM will remain intact.
- If you require CalDAV again, you can configure it once again in your iOS device.
Related Articles
Using Calendar Synchronization via CalDAV
Using Calendar Synchronization via CalDAV Create and View Synchronization of Events Once you have enabled CalDAV Access in the CRM and configured the CalDAV account in your iOS device, the events you create in the CRM Calendar will synchronize with ...Calendar Booking
Calendar Booking Calendar booking comes in handy for the customer to book a meeting almost instantly. It allows customers to see when the support agents are available and enables them to schedule an event or call independently. For example, Travis ...Managing Calendar in the CRM
Managing Calendar in the CRM Planning and scheduling is important when it comes to business events. A well conceived plan goes a long way in bringing positive results whereas, properly scheduled events can complement your planning.Businesses attend ...Setting up Social Tab
Setting up Social Tab Create Brand in CRM Add Facebook Page Add Twitter Handle Remove Twitter/Facebook Company Profile In order for you to start using Social tab, your CRM account must be configured with any or all of your organisation's Facebook ...Setting up Web Forms
Setting up Web Forms Creating a web form involves three steps Building the form - Drag and drop fields to build a form and format it easily with the WYSIWYG editor. Specifying the form details - Add details such as form name, landing page URL ...