Using Custom Buttons
Using Custom Buttons
Customisation is the most powerful way to build a flexible CRM system. In the CRM, you can customise modules, fields, pages, links, and a lot of other elements. In addition to these elements, the CRM now allows you to create new button actions with the help of an advanced feature called Custom Buttons.
The CRM has standard buttons that are used to execute various predefined actions. For example, Convert is a standard button used to convert a Lead to Contact, Account or Potential. Similarly, Clone is another standard button that is used to clone any record within your CRM account. Likewise, CRM Administrators can create new buttons and define a set of actions based on their requirements. Custom Buttons in the CRM can be used to connect your CRM with third party applications, connect different CRM modules or connect with other applications.

- Custom Buttons are restricted based on profile permissions. Administrators can share each custom button with different profiles and users in those respective profiles can only access it.
- Custom Button is available for all predefined and custom modules except the Activities module.
Create Custom Button
To create a custom button
- Log in to the CRM with administrative privileges.
- Go to Setup > Customisation > Modules and Fields.
- From the List of Modules, select the required module.
- In the Links & Buttons tab, click Create New Button.
- In the Create Your Button page, do the following:
- Enter the name of the button.
The button name should not exceed 30 characters. - Click the Add Description link and specify the details of your custom button.
The description should not exceed 250 characters. - Choose the location of your custom button from the drop-down list.
Custom buttons can be placed in 6 different places in your CRM account - Create/Clone page, Edit page, View page, List View page, a button to each record in the list view and Related Lists Page.
Note that you can create up to 50 buttons for each module.
- Choose an action to be executed when a user clicks the custom button. You can either choose a predefined action from the gallery or an existing action that was already created by users in your organisation. Also define your own action by writing a custom function, open a new web tab or invoke a URL based on your needs.
It is mandatory to choose the button action.
- Enter the name of the button.
- Click Save.
Once the custom button is associated with an action, CRM Administrators can manage permissions by assigning only specific profiles to view and access the custom button.
- You are allowed to create up to 50 custom buttons for each module in the CRM.

- If you have placed the custom button in a List View page, make sure you select at least one record before you execute the button action.
- From list view, you can also choose multiple records to perform the button action. In case when multiple records are selected and the button action is a custom function, then the values of the records passed will be ||| (three pipe symbols) separated.
Define Button Action
Every custom button should be associated with an action when a user clicks the button. You can define your button action in any of the following ways:
- From gallery
- From existing actions
- Write your own custom functions (powered by Deluge Script Editor)
- Invoke a URL
- Open a web tab
1. Choose your button action from gallery
The CRM offers you a few ready-to-deploy button actions in the gallery, which can be associated with a custom button for different business scenarios whenever required.
Consider the following scenario:
Recurring Potential: For example, you may require to repeat a potential for one year. Create a custom button that clones a particular potential record information for the next one year.
To associate Gallery function with a custom button
- Create a custom button and choose your button action as From Gallery from the drop-down list.
Ready to use actions will be listed in the gallery. - Click Configure for the corresponding action that you want to use.
For example: Recurring Potential
- In the Configure Custom Function dialog box, specify the values for the Argument mapping and click Save.For example:
- potentialId: Choose "potentialId" from the list of fields.
- billingCycle: Click "Specify custom value" and specify the value as MONTHLY or HALF_YEARLY or QUARTERLY based on your organisation's billing cycle.
- authToken - Click "Specify custom value" and enter your authToken created for CRM service.

- potentialId: Choose "potentialId" from the list of fields.
- Select the profiles to which you want to provide access to this newly created button.

- Click Save.
Your custom button will be created successfully.
For example: in the Potentials module, whenever a user clicks the button "Recurring Potential" in the record's details page, the particular potential will be cloned for the selected period of time.
2. Choose your button action from existing action
Existing actions are predefined button actions created by users in your organisation. This option will be available only when you have already created custom functions for custom buttons in your CRM account. These actions can be reused with different custom buttons whenever required.
3. Define your own button action
You can define your own button action in the following ways:
- writing custom function or
- invoking a URL
- open a web tab
Write your own custom function
Using our Deluge Script Editor, you can start defining your own button action by writing a new custom function.
To write your own custom function
- Create a custom button and choose your button action as Writing Custom Function from the drop-down list.
- In the Customised functions page, do the following:
- Specify the Name and Description to your function and click the Edit Arguments link.

- In the Edit Arguments box, specify the method name and map the argument with field name or specify custom value in CRM module.

- Click Done.
- Specify the Name and Description to your function and click the Edit Arguments link.
- Write your required function in Deluge Script Editor.
- Click Save and Execute Script to validate your code.
If there are no errors, your script is ready to associate with the custom button.
- Click Save.
The script will be associated with the custom button. Choose different user profiles to check who can access the custom button and click Save in the Create Your Button page. Whenever you click on the custom button, the associated function will be triggered and the required action will be performed in one click.
Custom Functions Limits:
The overall custom functions usage limits is shown below. This limit is applicable for the custom functions used for workflow automation, custom buttons and custom related lists.
Integration Tasks - 25000 API calls/day using deluge.
Get Data - 25000 calls/day
Post Data - 25000 calls/day
Send Email - 1000 emails/day
- Workflow rules can also be triggered through the custom function executed from custom button by using the CRM API integration tasks inside Deluge Scripting.
Invoke a URL
The following is an example that shows how you can invoke a URL using a custom button.
Visit Company profiles of your Leads in the CRM: All the contacts in your account can have a field where you specify the Company Name. By creating a URL that is associated with a particular company, you can directly go to the account's company profile by just clicking the custom button (This custom button can be placed while creating, cloning or viewing a record based on your requirements). For example: The link can be: http://techcrunch.com/topic/company/$%7BAccounts.Company}
- The content of the URL can be dynamic and you can merge the URL with module fields. In case of List view, the merge fields should be comma separated.
- The "Invoke URL" option of the button actions only opens a URL in a new tab.
- However, if you require a business logic to be executed along with the opening of the URL, you can use the "openURL" method available in the Functions editor. Write your function and use the open URL method in it to open the URL after processing the business logic.
To invoke a URL in a click of a button
- Create a custom button and choose your button action as Invoke a URL from the drop-down list.

- Enter the value to construct the URL.
The URL length should not exceed 3000 characters. - Select the Fields from the drop-down list. This will insert the field variable as part of the URL.

- Choose where you want to show the button action.
- Select the profile to which the custom button needs to be accessible.
- Click Save.
Open a Web Tab
Choose Open a web tab as your button action that allows to open a web tab in a new tab along with the associated merge fields in just a click of a button. You can either create a new web tab or choose from the list of web tabs that have been created already and associate to your custom button.
To open a new web tab
- Create a custom button and choose your button action as Open a web tab from the drop-down list.
- You can either create a new web tab or choose one from the available list.
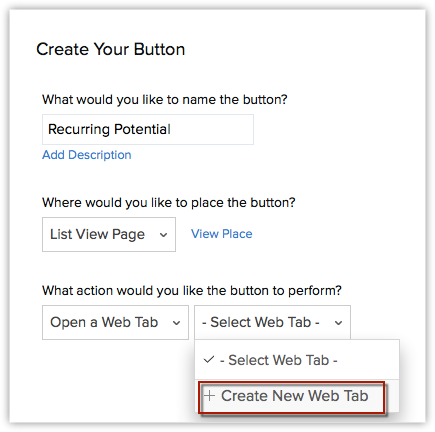
- Now create a new web tab and associate it with your custom button.
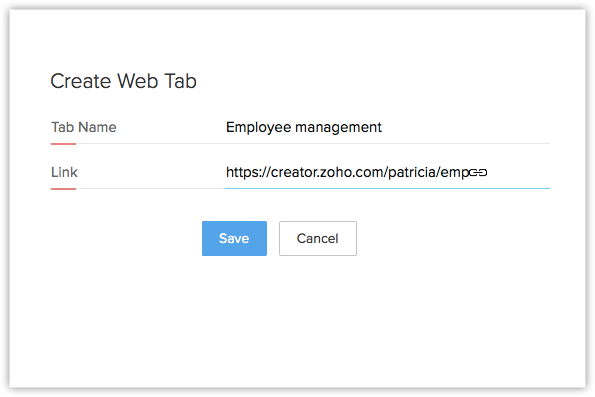
- The web tab URL will be displayed. You can add merge fields as per your requirements. Click Save.
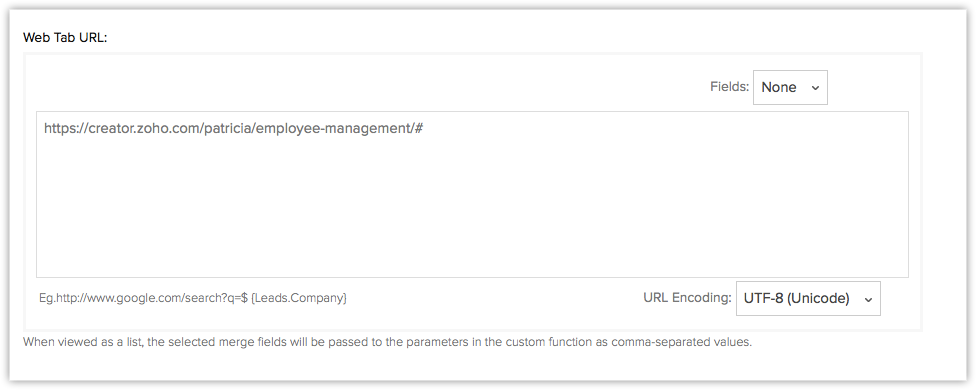
Therefore, the web tab along with the associated merge fields will be opened, whenever you click the custom button.
Edit Custom Button
You can edit the existing custom buttons whenever required. Only the Administrator of the CRM account can edit the custom buttons.
To edit a custom button
- Go to Setup > Customisation > Modules and Fields > [Select Module] > Links & Buttons.
Under the Links & Buttons tab, all the existing custom buttons will be listed. - Choose the required button that you want to edit and click the Edit
 icon.
icon. - In the Edit Your Button page, edit the button name, button action, etc. as per your requirements.
Sort Custom Buttons
You can now sort the order in which the buttons are visible in the module/record. Let's say you've created 5 buttons, each having its unique usage. 2 buttons that are used frequently can be placed at the top of the list and the 3 which are used moderately can be placed lower.
To sort a custom button
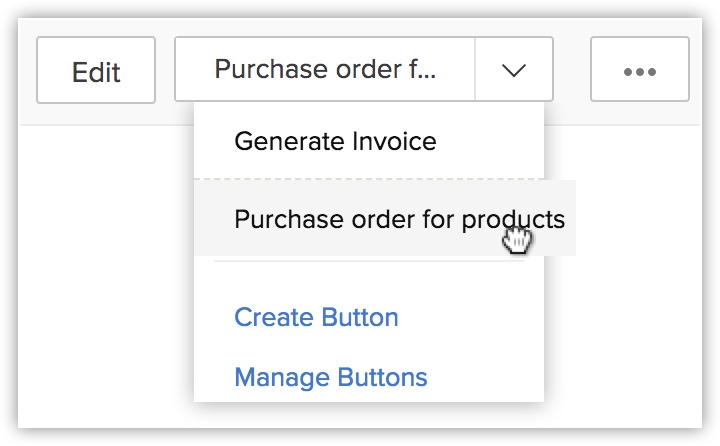
- Go to the module in which you created the button.
- Click the down arrow near the custom button to view the list of buttons.
- Drag and drop the buttons to sort them in the required order.
Delete Custom Button
The CRM Administrator can delete the custom button anytime.
To delete a custom button
- Go to Setup > Customisation > Modules and Fields > [Select Module] > Links & Buttons.
Under the Links & Buttons page, all the existing custom buttons will be listed. - Choose the required button that you want to delete and click the Delete
 icon.
icon.
Related Articles
Using Organisation Email Address
Using Organisation Email Address Add an organization email address Confirm an organization email address Decide who can use the organization email address Update Organization Email Address Delete an organization email address View mails sent from/to ...Links and Buttons - An Overview
Links and Buttons - An Overview The CRM offers several out-of-the-box features to extend business logic into CRM, which includes the ability to build custom fields, forms, modules, and pages to cater the unique needs of your business. In addition to ...Working with Custom Fields
Working with Custom Fields Custom Fields Custom Field Limits Custom Field Settings Add Custom Fields Edit Custom Fields Set Field Permission Mark a Field as Required Mark a Field as Unique Remove/Delete Custom Fields Map Dependency Fields In the CRM, ...Types of Custom Fields
Types of Custom Fields Create Currency Fields Add/Rename Pick List Values Replace Pick List Values Add Multi-Select Pick List Values Create Lookup Field Create Multi-Select Lookup Field Create Auto Number Field Create User Field Add Record Image ...Using Gmail API
Using Gmail API The CRM provides a variety of emailing options that users can choose based on their requirements. One such option is the Mail Add-on. With the Mail Add-on, you can configure your email client within the CRM using either one of the two ...