Tab Settings
Tab Settings
Tabs represent the different modules that are offered in the CRM. There are 18 modules, each representing a set of functions. You can customise the CRM user interface according to your organisation-wide business (sales, marketing, support, and inventory management) process. These tab settings are organisation specific and so only Users with Administrator privileges can do the customisation.
Organise Modules
The option to organise tabs allows organisations to display only the relevant number of modules and hide the unwanted ones. For instance, an educational organisation using the CRM might not require the Quotes or Invoices, so these modules can be hidden. You can also change the order of the modules by moving them up or down on the list.
Users with the Administrator profile can access this feature.
To organise tabs
- Log in to the CRM with administrative privileges.
- Go to Setup > Customisation > Modules and Fields.
- In the List of Modules page, click Organise Modules.
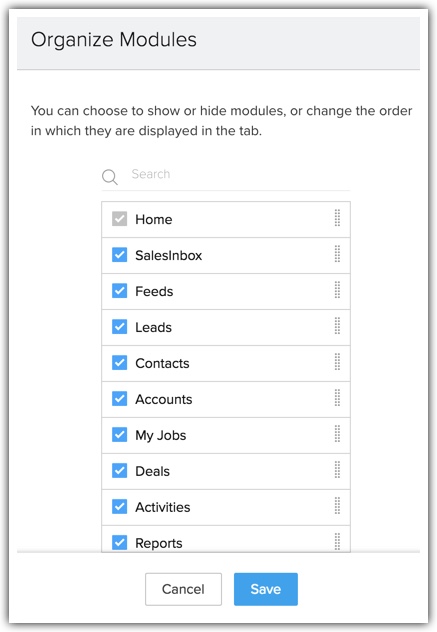
- Select the modules you want to be displayed on the tab. Clear the ones you wish to hide.
You can also move around the module strips to rearrange the order in which the module names are displayed. - Click Save.

- The Home tab cannot be hidden.
- Irrespective of the profiles, hidden modules are not displayed to any user.
Rename Modules
The CRM provides an option to rename tab names according to the industry-specific terminologies. For example, the “Leads” tab can be renamed to “Candidates” in an educational institute. Users with Administrator privileges can change the tab names. These changes are reflected in all the standard pages of the user interface except for custom reports and dashboards.
The table below displays the industry specific tab names comparing them to the standard CRM tabs:
| CRM | Ad Agency | IT Firm | School |
| Leads | Leads | Leads | Candidates |
| Accounts | Clients | Accounts | Parents |
| Contacts | Advertisers | Contacts | Students |
| Products | Media Type | Services | Courses |
To rename tabs
- Log in to the CRM with administrative privileges.
- Go to Setup > Customisation > Modules and Fields.
- Move the mouse pointer to the module that you want to rename.
- Click on the More icon, and then click Rename.
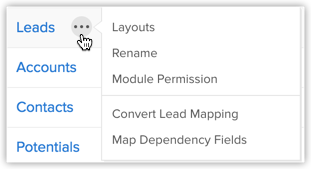
- Enter the singular and plural forms of the module's name in the respective text boxes.
- Select the profile(s). Users in the selected profiles will have access to the module.
- Click Save.
- New tab names will not be reflected on the Page Layout, Reports, and Dashboards modules. Standard names are always displayed.
- All the fields' names will also change according to the new name. For example, if you change the "Account" tab to "Client", the "Account Name" field will be changed to "Client Name".
- If you change a tab name to plural form with the suffix "-ies", the singular form will be suffixed with "y". For example, if you change "Deals" to "Opportunities", in all the places the singular form of "Deal" is changed to "Opportunity".
- While changing the tab name you can add singular and plural names for the tab, eg: Leads vs. Lead.
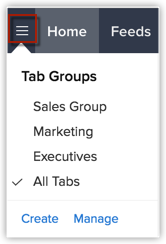
Group Modules
The different departments in your organisation may use different modules (tabs) in the CRM. Tab groups let you organise the tabs available in your CRM account. You can group the Sales, Marketing, Support and Inventory related tabs and share the tab groups with users of the corresponding profiles in CRM.
For instance, the Sales group may use only the Leads, Contacts, Accounts, Deals, Reports and Dashboards tabs. So you can create a Sales Tabs group and provide accessibility only to the Sales profile. Please note that the users will be able to access the tabs in a Tab Group based on the Module-level Permissions in their profile.
Users with the Administrator profile can create tab groups.
To create tab groups
- Go to Setup > Customisation > Modules and Fields > Tab Groups.
- Click Create Tab Group.
- In the Tab Group pop-up, do the following:
- Enter a Name for the tab group
- Select the tabs from the list.
- Select the profiles from the list.
Users from the selected profiles will have access to the tab group.
- Enter a Name for the tab group
- Click Save.
- Users can create a maximum of 25 tab groups with any number of tabs in each group.
- For a given profile, only the tabs in the tab group will be accessible. The users will be able to access the tabs in a group based on the Module-level Permissions in their profile.
- The tab groups that you create can be deleted. Go to Setup > Customisation > Modules and Fields > Tab Groups and click on the Delete icon for the corresponding tab group that you want to delete.
Related Articles
Setting up Social Tab
Setting up Social Tab Create Brand in CRM Add Facebook Page Add Twitter Handle Remove Twitter/Facebook Company Profile In order for you to start using Social tab, your CRM account must be configured with any or all of your organisation's Facebook ...Working with the Social Tab
Working with the Social Tab Dashboard Monitor Post Activity Log Add a Lead/Contact/Account from Facebook/Twitter Automate Lead Generation via Social Media View Social Interactions Integrating your CRM account with Social media, fosters communication ...Configure Settings for the CRM (Android)
Configure Settings for the CRM (Android) Change Theme To change the color theme for your CRM app on your Android device In your CRM app, go to Settings. On the Settings page, under Themes, select the desired colour theme. The chosen theme is applied ...Configure the CRM Settings in iPhone
Configure the CRM Settings in iPhone Change Theme To change the color theme for your CRM app on your iOS device In your CRM app, go to Settings. On the Settings page, under Themes, select the desired colour theme. The chosen theme is applied across ...Managing CRM Account Settings
Managing CRM Account Setting Change Personal Information Add Social Information Change Locale Information Change Name Format & Preferences Use Signature Once you sign up for the CRM and have your own account, you can personalise your CRM account. ...