Setting Scoring Rules
Setting Scoring Rules
Scoring rules help you prioritise leads, contacts, accounts, and deals based on record properties like fields, and customer touch points such as calls, emails, social signals, etc. You can assign positive and negative points to each property while defining a scoring rule. These individual points add up dynamically to a total score when a record is created or modified.
- Leads from the health care industry or leads with an annual revenue of over $100,000 are your prime prospects. You can prioritise these leads by scoring them higher based on the corresponding fields.
- When a contact opens your email and clicks the links or follows you on Facebook, it is evident that they are interested in what you are offering. You can make sure to keep them on top of all your other deals by scoring them based on such actions.
- You can also attribute negative scores to records based on certain actions. For example: when a contact leaves a bad feedback or when the email you send gets bounced.
Supported Modules
- Leads
- Accounts
- Contacts
- Deals
Set up Scoring Rules
To set up a scoring rule
- Navigate to Setup > Automation > Scoring Rules .
- Select a module from the drop-down list for which you want to set scoring rules.
- Under [Module] Fields click +Add .
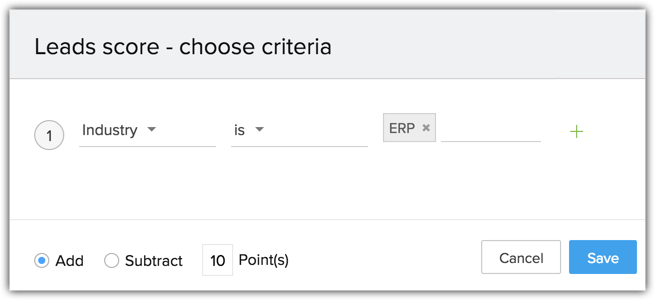
- In the [Module] Score - Choose Criteria pop-up, select the desired combination.
- Select Add or Subtract and specify the number of points that you want added to or subtracted from the record when the record satisfies the above chosen criteria. You can also click + for AND rule combinations.
- Click Save and repeat the steps to add more rules under the [Module] Fields .

- Select Add or Subtract and specify the number of points that you want added to or subtracted from the record when the record satisfies the above chosen criteria. You can also click + for AND rule combinations.
- Under Emails, click +Add to add scores based on email actions.
- In the Email Insights score - choose criteria pop-up, select the checkbox to add your preferred criteria.
- Select Add or Subtract from the drop-down list and specify the number of points that you want added to or subtracted from the record when the record satisfies the criteria. You can select one or more entries and modify score points to be added or subtracted from the list of predefined criteria.
- Click Save .
- Select Add or Subtract from the drop-down list and specify the number of points that you want added to or subtracted from the record when the record satisfies the criteria. You can select one or more entries and modify score points to be added or subtracted from the list of predefined criteria.
- Repeat the same steps for Calls to add criteria for scores based on call actions.
- Under Social-Facebook , choose the right page for which you would like to set criteria and click +Add .
- In the Facebook Score - Choose Criteria pop-up, select the checkbox to select your preferred criteria.
- Select Add or Subtract from the drop-down list and specify the points that you want to be added to the record when the record satisfies the criteria. You can select one or more entries and modify them from the list of predefined criteria.
- Click Save .

- Select Add or Subtract from the drop-down list and specify the points that you want to be added to the record when the record satisfies the criteria. You can select one or more entries and modify them from the list of predefined criteria.
- Repeat the same steps for Social-Twitter , Survey , Campaign and Support .
Once you have set the scoring rules, they will be applied automatically for all the records in your CRM account going forward. Click Run Scoring Rules for all Records button to apply these rules for all the records that were previously added.

- While setting up a scoring rule, the options: Emails, Calls, Social, Survey, Campaigns and Support are listed only if the respective integrations are enabled. For example, you can set scoring rules based on Calls only if the Telephony integration is enabled. Similarly, you can set scoring rules for Facebook or Twitter based actions only if the Social integration is enabled.
- Under Module [Fields], you can not set scoring rules based on Multi-select Pick list fields.
- You can set up to 25 rule entries for each rule under [Module] Fields.
- You can add or subtract 1-10 points in each rule.
View Scores
Once you have set your scoring rules, each record's scores can be viewed in the record details page.
Score Summary Section
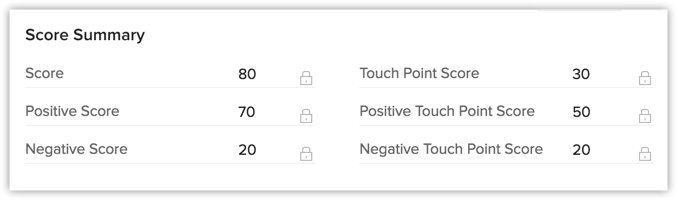
A new section called Score Summary is added with a detailed summary of the record's score. This section includes fields like Score, Positive Score, Negative Score, Touchpoint Score, Positive Touchpoint Score and Negative Touchpoint Score. While the Touchpoint Score fields display the scores based on customer interactions (SalesSignals) such as calls, emails, survey, social, etc., the Score fields display the sum total of all the record properties including the record fields and customer interactions.
The fields in this section cannot be modified.
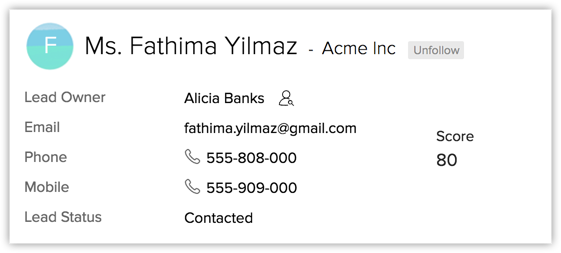
Scores in business card view
You can view score alongside the business card view of the record details and also customise your list view to include the scores of the records. That way, you can have a quick glance at the score and prioritise your tasks accordingly.
Positive and negative scores
Each score is a combination of positive and negative score points. Viewing the total score can help you with an overall understanding of the record's priority, however looking at the score summary individually is equally important. While the total scores could be similar, what really makes up to these scores make all the difference in your interactions. Let's look at an example.
Here are two contacts with very similar Scores.
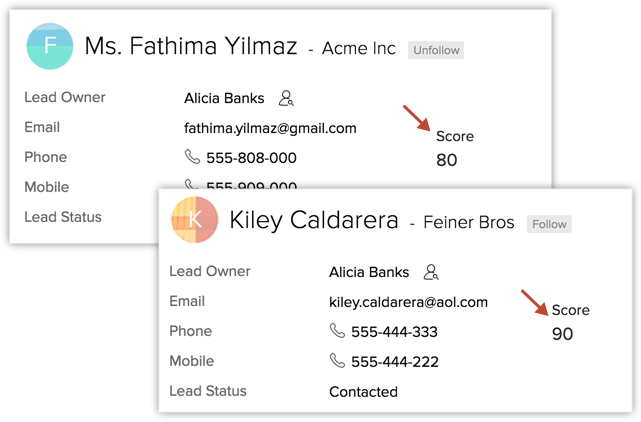
In this case, Kiley could be a little trickier to handle. Let's see why.
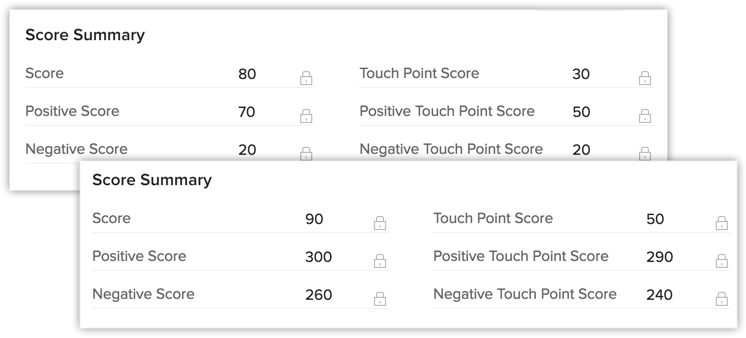
A higher Positive Score may mean that the contact is really into your business or is a very hot prospect. Yet an equally higher negative Touchpoint Score might mean that she is annoyed at not getting prompt responses for her emails and calls. Either that or she could have left a bad feedback.
Checking the positive and negative touchpoint scores would give you a heads-up so that you can prepare to interact with the customer accordingly.
Delete Scoring Rules
If all the scoring rules for a particular module is deleted, the score based fields for the respective module will be automatically removed.
To delete a scoring rule
- Go to Setup > Automation > Scoring Rules.
- Hover your mouse pointer to the rule that you want to delete, and click on the Delete icon.
Related Articles
Setting Case Escalation Rules
Setting Case Escalation Rules Part 1 - Enable the Escalation Scheduler Part 2 - Create Case Escalation Rule Part 3 - Create Rule Entry Part 4 - Define Escalation Action for the Rule Entry It may so happen that sometimes, a case is not attended by ...Setting up Assignment Rules
Setting up Assignment Rules Record Assignment Workflow Limitations Assignment rules help you automatically assign the records to users in the CRM. The assignment rule is applicable only for the leads, contacts, cases and records in custom modules ...Configuring Workflow Rules
Configuring Workflow Rules Create Workflow Rules in Zoho CRM Part 1 - Enter the basic details of the rule Part 2 - Specify the rule trigger Part 3 - Create a workflow condition Part 4 - Associate instant and scheduled actions Associate Actions to ...Setting up Data Sharing Rules On this page
Setting up Data Sharing Rules Managing Default Data Sharing Process Creating Data Sharing Rules By default, access rights to CRM records is set as private so that the record owner and his/her manager can oversee the CRM data. However, using the Data ...Setting Email Notifications
Setting Email Notifications Email Notifications are among the actions associated to a workflow rule. They are email alerts that are sent to leads/contacts and users in the organisation. When you associate an email notification to a workflow rule, the ...