Setting Case Escalation Rules
Setting Case Escalation Rules
It may so happen that sometimes, a case is not attended by the person to whom it is assigned. The Case Escalation feature allows you to configure a rule by which the case can be escalated to other members in the operational hierarchy. You can use Case Escalation Rules, to set the criteria, depending on the distribution rules of an organisation.
Availability
Permission Required
Users with configure case escalation permission in their profile can access this feature.

Note
- At a time, you can activate only one escalation rule.
- If a newly created rule is set as active then the existing active rule will get deactivated.

To set the case escalation rule
- Enable the Escalation Scheduler
- Set up Case Escalation Rule
- Create Rule Entry
- Define Escalation Action for the Rule Entry
Part 1 - Enable the Escalation Scheduler
The Escalation Scheduler should be enabled prior to creating the Case Escalation Rule.
- Go to Setup > Automation > Case Escalation Rules.
- In the Case Escalation Rules page, click Enable Escalation Scheduler.
To disable Case Escalation Scheduler, click Disable Escalation Scheduler
Part 2 - Create Case Escalation Rule
- Go to Setup > Automation > Case Escalation Rules.
- In the Case Escalation Rule Name page, click New Case Escalation Rule.
- In the Create Case Escalation Rule Name page, enter the Case Escalation Rule Name.
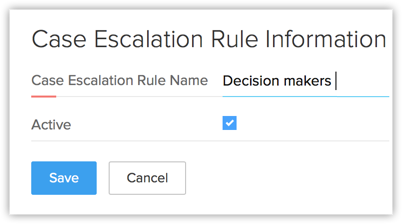
- Select the Active check box.
- Click Save.
Note
- Activating any Rule, automatically deactivates the existing active Rule
- After creating case escalation rule, you need to create the rule entry.
Part 3 - Create Rule Entry
- Go to Setup > Automation > Case Escalation Rules.
- In theCase Escalation Rule Name page, select the case escalation rule name from the list.
- Click Rename or Del link to rename or delete the corresponding rule respectively.
- Click Create Rule Entry.
- In the Rule Entry page, specify the criteria for the rule.
- Select your organisation's Business Hours . Note, that you should have already defined the business hours.
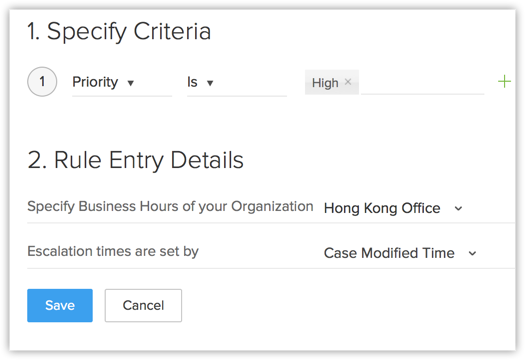
- Select the option from the list based on which the Escalation Time is set.
- Click Save.
Note
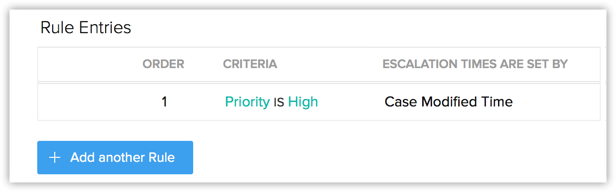
- Once the Rule Entries are created, you can click Reorder and specify the escalation order of the rules.
Part 4 - Define Escalation Action for the Rule Entry
- Go to Setup > Automation > Case Escalation Rules.
- Click on the active Rule Name.
- In the Case Escalation Rule page, click the Rule Entries' criteria from the list.
- In the Rule Entry page, the rule entry details are displayed.
- Click New Escalation Action.
- In the New Escalation Action page, do the following:
- Select the Age of Escalation Actions from the list.
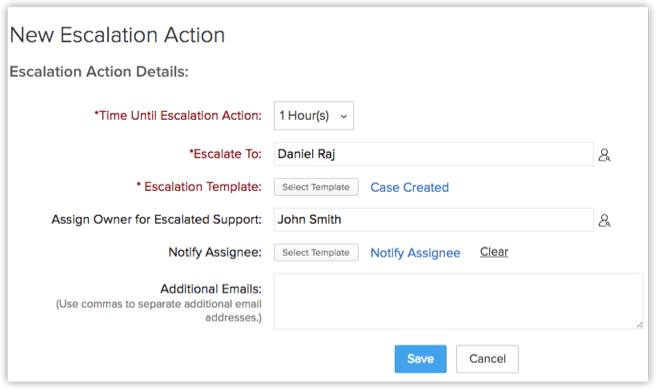
- Select the person to whom the case needs to be escalated from the Escalate To pick list.
- Select the Escalate Template from the list.
- Select the owner for the escalation case from the pick list.
- Select the email template from the list used to Notify Assignee.
- Enter the Additional Emails, if any.
- Select the Age of Escalation Actions from the list.
- Click Save.
Related Articles
Setting Scoring Rules
Setting Scoring Rules Supported Modules Set up Scoring Rules View Scores Delete Scoring Rules Scoring rules help you prioritise leads, contacts, accounts, and deals based on record properties like fields, and customer touch points such as calls, ...Setting up Assignment Rules
Setting up Assignment Rules Record Assignment Workflow Limitations Assignment rules help you automatically assign the records to users in the CRM. The assignment rule is applicable only for the leads, contacts, cases and records in custom modules ...Setting up Data Sharing Rules On this page
Setting up Data Sharing Rules Managing Default Data Sharing Process Creating Data Sharing Rules By default, access rights to CRM records is set as private so that the record owner and his/her manager can oversee the CRM data. However, using the Data ...Configuring Workflow Rules
Configuring Workflow Rules Create Workflow Rules in Zoho CRM Part 1 - Enter the basic details of the rule Part 2 - Specify the rule trigger Part 3 - Create a workflow condition Part 4 - Associate instant and scheduled actions Associate Actions to ...Setting up Web Forms
Setting up Web Forms Creating a web form involves three steps Building the form - Drag and drop fields to build a form and format it easily with the WYSIWYG editor. Specifying the form details - Add details such as form name, landing page URL ...