Sending and Receiving Mail
Sending and Receiving Mail
Get the sales context to your email communication by sending and receiving emails from right within the CRM.
With the Mail Add-on, you can send Emails to your Leads, Contacts and Deals modules. You need not switch to your email service to communicate with your contacts. With the Mail Add-on, you can integrate your favorite mail client with the CRM and the CRM becomes one-stop for all your business communication.
Sending Email
Through Leads, Contacts or Deals Module
- Click the [Module] tab.
Module refers to the Leads, Contacts, Accounts, etc. tabs. - In the [Module] Home page, select the record from the List View.
- In the Record Details page, go to Emails Related List and click Send Mail.
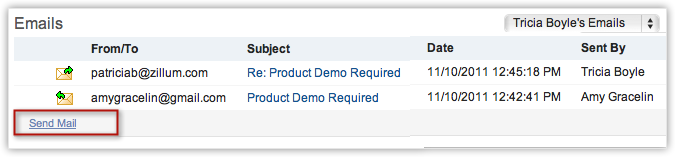
- In the Compose Mail page, enter the email message, attach files, and specify additional email addresses in CC & BCC fields.
- Click Send.
The email will be sent to the recipients with a copy of the mail stored under Emails Related List, in the sent folder of Mail and your configured mail client.
Through the Emails Tab
You will get the email tab only if you have the Mail Add-on in your CRM account.
- Click the Emails tab.
- Click Compose from the left panel.
While entering the recipient email, by specifying the first 3 letters of a name, you can search the leads or contacts in CRM.
The attachment limit while sending emails using Mail Add-on is 10MB.
The rest is the regular Email process. The compose window is similar to any mail compose editor with its set of editing and formatting options. If you have configured your outbox, then the mails will be sent after an interval of few minutes.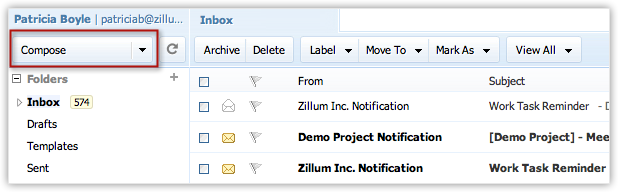
Through Gmail Account
With just a few simple steps in the settings you can send mails from your Gmail account and view them as sent items in Mail as well as in the CRM.
To get this option working for your Gmail account, configure the Mail filter for Gmail POP account:
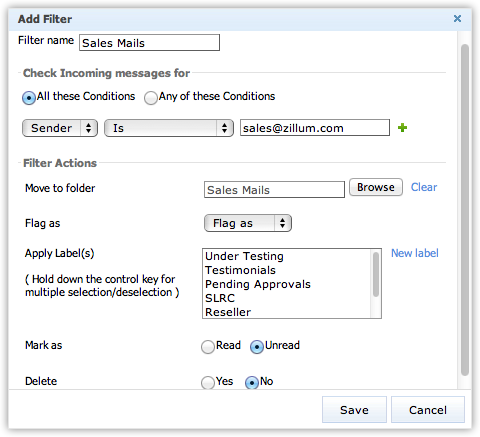
- Log in to Mail, click Settings > Mail Organisation > Filters > Add Filter.
- In theFilterspage, do the following:
- Add a Filter Name.
- For the message criteria, select Sender Is with your Gmail account (...@gmail.com).
- In the Move to Folder option, browse and select Sent.
- Click Save.
- Add a Filter Name.

- The above option works only if you have integrated Gmail with the CRM.
Bounced Emails
There are a couple of reasons why an email gets bounced and does not reach the recipient. They are categorised as hard bounces or soft bounces. Soft bounces are temporary reasons why an email does not reach a recipient. This could be because of one of the following reasons:
- The recipient's mailbox is full.
- The email message is huge.
- The recipient's server is down.
For hard bounces, the most common reason is that the email address is not valid. Other reasons when even a valid email address can hard bounce are:
- Email delivery is blocked by the recipient's email server.
- The recipient has unsubscribed from the mailing list.
While sending an email from the CRM, if you get an alert message, "Mail Address do not exist" that could be a hard bounce and possibilities are that you may not be able to send further emails to the same email address.
Schedule Emails
Let's say a lot of your customers are in a different time zone. Or you have an important meeting later in the day and you are not going to be available to take care of emails at a specified time. In that case, you can simply schedule the emails in CRM and let the system take care of sending the mails at the right time. Following are the three types of scheduling options offered by the CRM:
- Best time to email - as suggested by CRM.
- Pre-defined options for scheduling (Today, Tomorrow).
- Custom scheduling.
To schedule an email
- Go to the required module.
Email scheduling is available for Leads, Contacts and other custom modules. - Select the record and click Send Email.
- In the Email Compose window, click the Schedule Email icon.
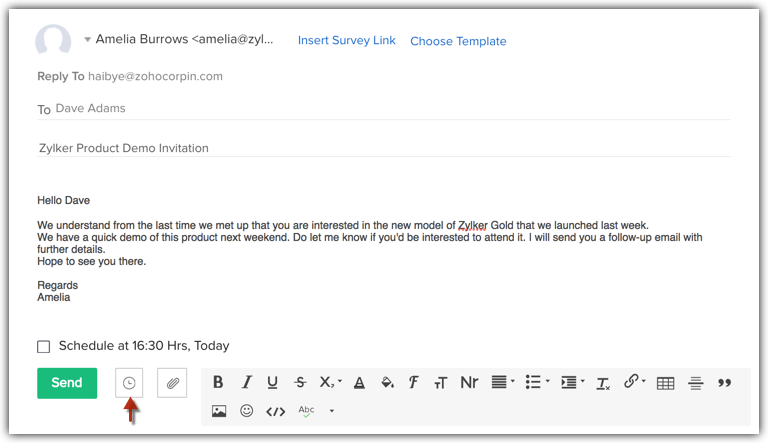
If there is a CRM suggestion on the Best time to email this contact, this time will be displayed. You could select this time and schedule it right away.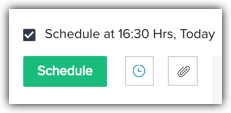
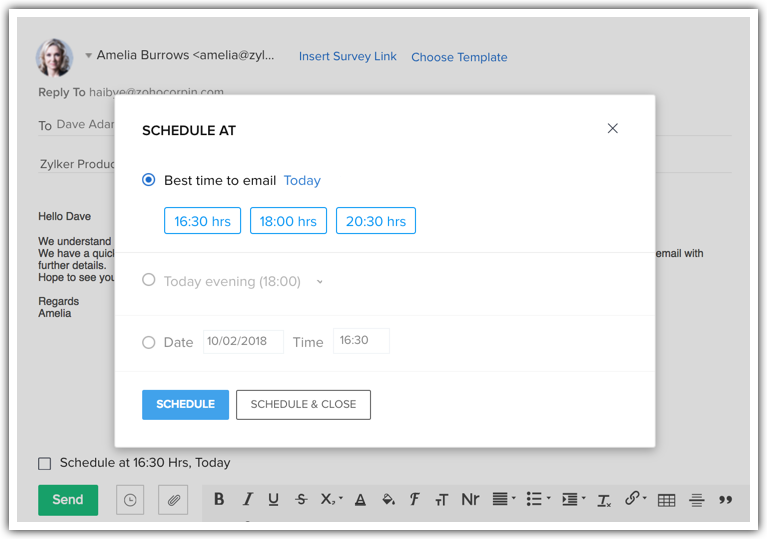
- In theSchedule Atpopup, you can select the time from the options as shown below.
- Best time to email - CRM studies the email trends with customers and offers the best possible time when the customer would most likely be available to check the email. You can choose one of the time stamps offered here to ensure that your email is immediately checked.
- Predefined options for scheduling - Here, you get pre-set options such as Today Evening, 18:00 Hrs.
- Custom scheduling: Here, you can choose a specific, date, time and time zone.
- Best time to email - CRM studies the email trends with customers and offers the best possible time when the customer would most likely be available to check the email. You can choose one of the time stamps offered here to ensure that your email is immediately checked.
- Click Schedule.
The email will be scheduled as per your choice. It will be listed under the Email Related List of the record.You can check the status of the email to see if it has been scheduled, delivered and so on.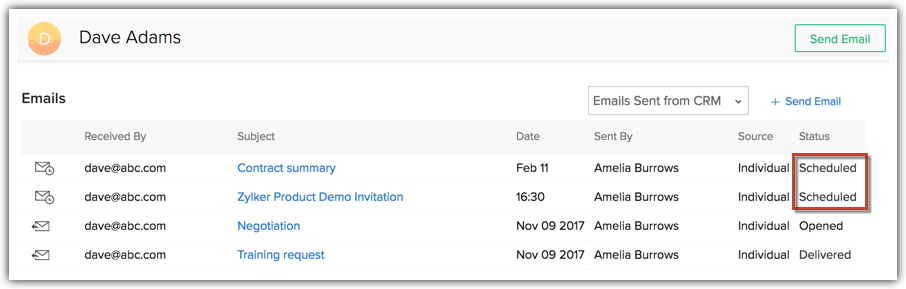
You can view the email and edit it before the scheduled time. On clicking edit, the compose window will be open where you can make changes, re-schedule or disable the check box to send the email immediately. You can even cancel the scheduled email by deleting it from your related list. Note that only the user who has scheduled the email can edit or delete the email if needed, before it is being sent. Users who have sharing permissions, will be able to view the email only.
- Best time to email as suggested by CRM is available only for the Leads and Contacts module.
- To schedule an email, a user would require the Send Email permission in their profiles.
Attach Documents
You can send email in two ways: Form the Email tab or directly from the record (in a module). While sending emails you can attach documents from your local drive, Docs and Google Docs. Please note that you can send emails only from the Leads, Contacts, Deals, Purchase Order, Sales Orders, Quotes and Invoices modules.
To attach documents
- Click the [Module] tab.
Module refers to the Leads, Contacts, Accounts, etc. tabs. - In the Module Home page, select a record.
- In the Record's details page, under Emails Related List, click Send Mail.
- In the Email Compose window, select the option through you want to upload an attachment.
- Attach form Docs is available only after you configure your Mail Add-on.
- In the Free Edition, you can attach files up to 3MB.
- In the Professional and Enterprise Editions, you can attach files up to 10MB.
- Mail Add-on users in any Edition can attach files up to 10MB.
- You can attach a maximum of 5 attachments from the Docs in a single email.
Receiving Emails
When you receive an Email, the Mail servers fetch it into the Mailbox. The same mail is then fetched into CRM. The received mails that are related to the particular lead, contact or deal will then get listed under the Emails section in that Lead's, Contact's or Deal's page respectively. Mails related to the main contact associated to the Deal are listed under the Email section in Deals page.
Important Notes:
- After configuring your Mail Add-on as an Account with record-level sharing option, you need to enable sharing option for each Lead, Contact or Deal.
- Even while configuring your Mail as private account, you can view mails of other users provided they have enabled.
- Leads, Contacts and Deals with no Email address will not display any mails in their Email section.
- Changes made in the Email address (for Leads or Contacts) will fetch only the mails linked to the new Email address. Mails linked to the previous Email address will no more be available in the CRM.
- Change in the Mailbox (Email address configured for the CRM) will not display the Emails of the previously configured Mailbox. These Emails will however be available in mail.
- Emails for the deactivated users will not get displayed in the Leads, Contacts or Deals page. However, the Emails can be viewed in the individual's mail account.
- While searching the mails of a particular contact, archived emails from your account will also be listed.
Related Articles
Sending Mass Emails
Sending Mass Emails Send and Schedule Mass Emails Set Trigger Action in Mass Email Add Follow-up Emails to Mass Emails Edit, Stop or Delete Emails View Email Statistics One of the most important activity in business is communication with the ...Managing Mail Merge Templates
Managing Mail Merge Templates Create Mail Merge Templates I. Create Mail Merge Template From Scratch II. Create Template from Pre-designed Template Add Subforms in Templates Add Related List Items in Templates Organize Mail Merge Templates Create ...Synchronizing Google Mail with the CRM
Synchronizing Google Mail with the CRM You can synchronize customer-specific Emails between Google Apps and the CRM by configuring the POP3 in the CRM. Specify the Email address and password to configure your G Suite' Email in the CRM. After ...How to sync Outlook calendar to Zoho Mail
Go to Zoho Mail Settings and click Calendar > Synchronise > Outllook Calendar > allow and autheticate.Dealing with bounce warnings
Dealing with bounce warnings About Bounce Warnings How to avoid email bounces About Bounce Warnings If you have received a bounce warning, it means that your email bounce rate has exceeded acceptable limits. It can be frustrating to discover that ...