Modifying Special Fields
Modifying Special Fields
There are certain fields in the CRM, which are not common to all modules. They are available and applicable only to particular modules depending on the purpose of their function. These special fields are:
- Terms & Conditions Fields
- Tax Rates Fields
- Stage Probability
- Contact Roles
Customise Terms & Conditions
This field provides you an option to define the text for terms and conditions while creating Invoices, Quotes and Orders.
To customise Terms & Conditions
- Log in to the CRM with Administrator privileges.
- Go to Setup > Customisation > Modules and Fields.
- Select the required module from the Modules list view.
The Layout Editor is displayed. - Scroll down to the Terms and Conditions section and click the Settings icon on the Terms and Conditions field.
- Click Edit Properties.
- In the Multi Line Properties popup, specify the Value.
- Click Save.
Depending on the module for which the Terms & Conditions are created, the text will automatically be displayed in the page (Invoice / Quote / Order).

- The Terms & Conditions field is available only for the Invoice, Quote and Order modules.
- This field is displayed only for new records and does not roll up for the existing records page.
Customise Tax Rates
The Tax Rate field allows defining different types of tax rates for the products you sell to your customers. Once the tax rates are added, you can select the tax type and rate while creating a quote, order, or invoice for the customers. For instance, Sales Tax = 10.5 %; VAT = 1%; etc.
To add Tax Rates
- Log in to the CRM with Administrator privileges.
- Go to Setup > Customisation > Modules and Fields.
- Select the Products module from the Modules list view.
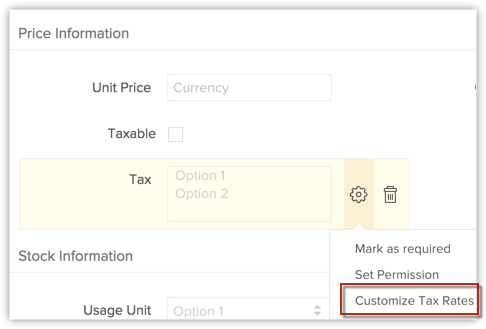
- Scroll down to the Price Information section.
- Click the Settings icon on the Tax field and select Customise Tax Rates option.
- In the pop-up window, click the Add or Delete icons to add new taxes or delete existing taxes, as required.
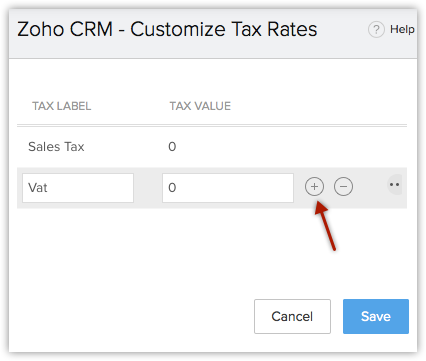
Click and drag the rows around to rearrange their order. - Click Save.
To use Tax Rates
- Click the Invoices tab.
- In the Invoice Home page, click + button.
- In the Invoice Home page, click + button.
- In the New Invoice page, specify the customer and product details.
- In the Product Details section, click the Edit icon beside Tax. (after subtotaling the line items).
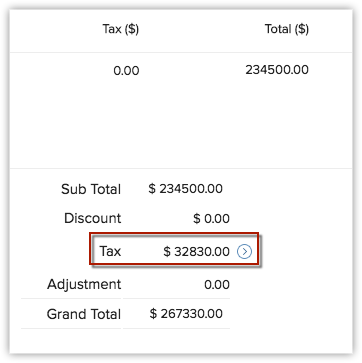
- In the pop-up that appears, add or modify the tax rates.
- Click Apply.
Map Stage-Probability values
Defining the criteria for Sales Stage is important to identify the performance of an organisation-wide Sales pipeline. Stage probability can be determined based on two important factors - Forecast Type and Forecast Category. These two values are useful in describing the stage of a deal.
In the Stage-Probability mapping page you can perform the following operations:
- Create different types of Sales stages according to your organisation-wide Sales process.
- Associate Probability values to the Sales stages.
- Associate Forecast types (Open, Closed-won, or Closed-lost) to Sales stages.
- Associate Forecast categories (Pipeline, Closed, Omitted, Best Case, Committed)
- For a better sales pipeline analysis assign different probabilities to sales stage values.
- For each stage assign probability in the range of 0 to 100.
- You may consider using probability value as 100 when the deal is closed-won and 0 for deal closed-lost.
To map stage and probability values
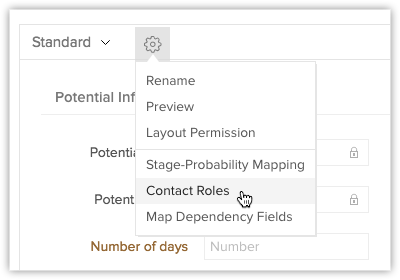
- Log in to the CRM with Administrator privileges.
- Go to Setup > Customisation > Modules and Fields
- Click the Deals module from the Modules list view.
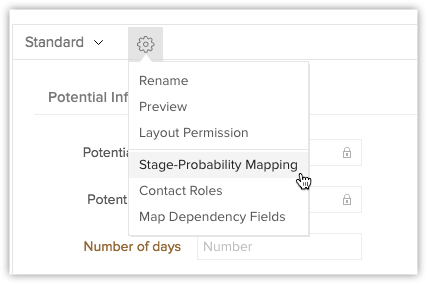
- Click the Module Settings icon and select Stage-Probability Mapping.
- In the Stage-Probability Mapping page, do the following:
- Add the sales Stage (s) and the corresponding Probability of closing the sales deal by clicking on the Add icon.
- Delete sales Stage (s) and assign the existing Probability to another Sales Stage value by clicking on the Delete icon.
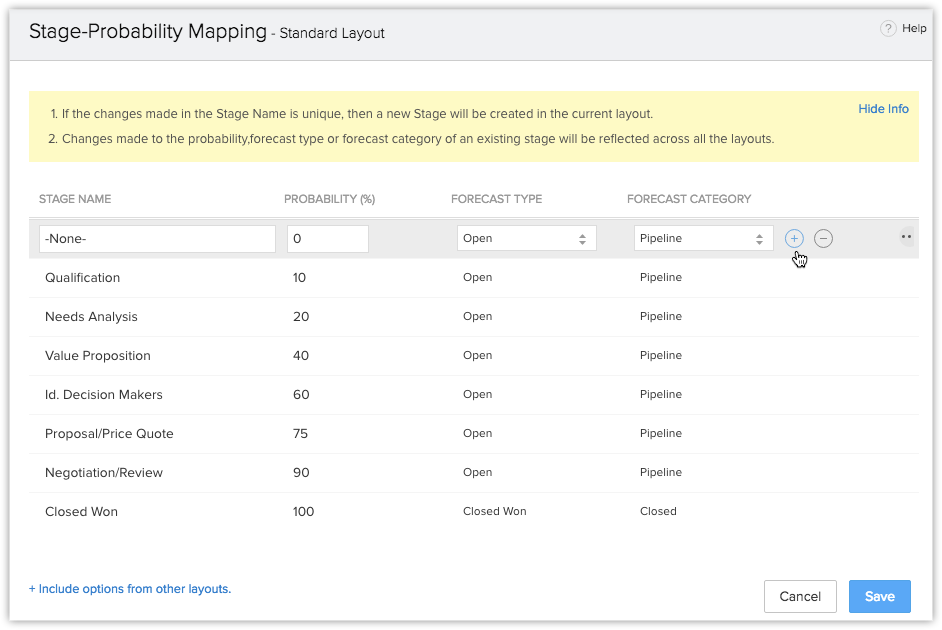
- To modify the existing Sales Stages, double click inside the desired Stage Name and enter the new name.
- Click and drag the rows to rearrange the order of the stages.
- Add the sales Stage (s) and the corresponding Probability of closing the sales deal by clicking on the Add icon.
- Click Save.
- For a better sales pipeline analysis assign different probabilities to sales stage values.
- For each stage assign probability in the range of 0 to 100.
- You may consider using probability value as 100 when the deal is closed-won and 0 when the deal is closed-lost.
Customise Contact Roles
While prospecting, there is a need to contact different people (contacts) to finalise the sales deal. Contact Roles help in knowing the role of the contact in the prospective organisation so you always have the right discussion with the right person. For instance, explaining details about the product price and discounts is always better with the Financial Manager whereas explaining product features should be discussed with the Product Manager.
Some of the contact roles such as, Decision Maker, Product Management, Purchasing and other roles are available. However, the contact roles can be customised according to specific business processes.
Users with the Field-level Access permission can access this feature.
To customise contact role values
- Log in to the CRM with Administrator privileges.
- Go to Setup > Customisation > Modules and Fields.
- Select the Deals module from the Modules list view.
- Click the Module Settings icon and select Contact Roles.
- In the Edit Contact Roles page, do the following:
- Click Add or Delete icons to add a new role or delete an existing role, as required.
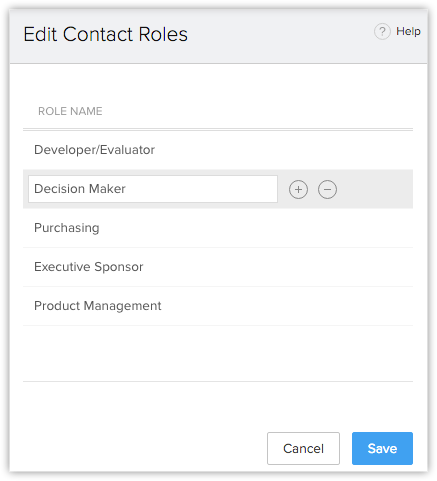
- Modify the existing roles from the Contact Role text box.
- Click and drag the rows to sort their order as required.
- Click Add or Delete icons to add a new role or delete an existing role, as required.
- Click Save after updating the contact roles.
To add contact roles to contacts
- Click the Deals tab.
- In the Deals Home page, select the required deal.
- In the Deal Details page under Contact Roles section, a list of contacts associated with the deal are displayed. Click Add Contact Roles link.

- In the Contact Roles Mapping page, Select the check box(es) of the contacts that you want to add.
To associate all the contacts , select the select all check box.
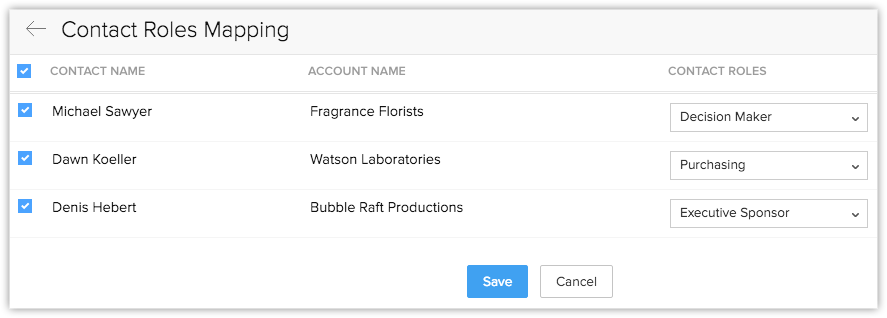
- For each contact select the role from the Contact Role drop-down list.
- Click Save after associating roles to all the contacts.
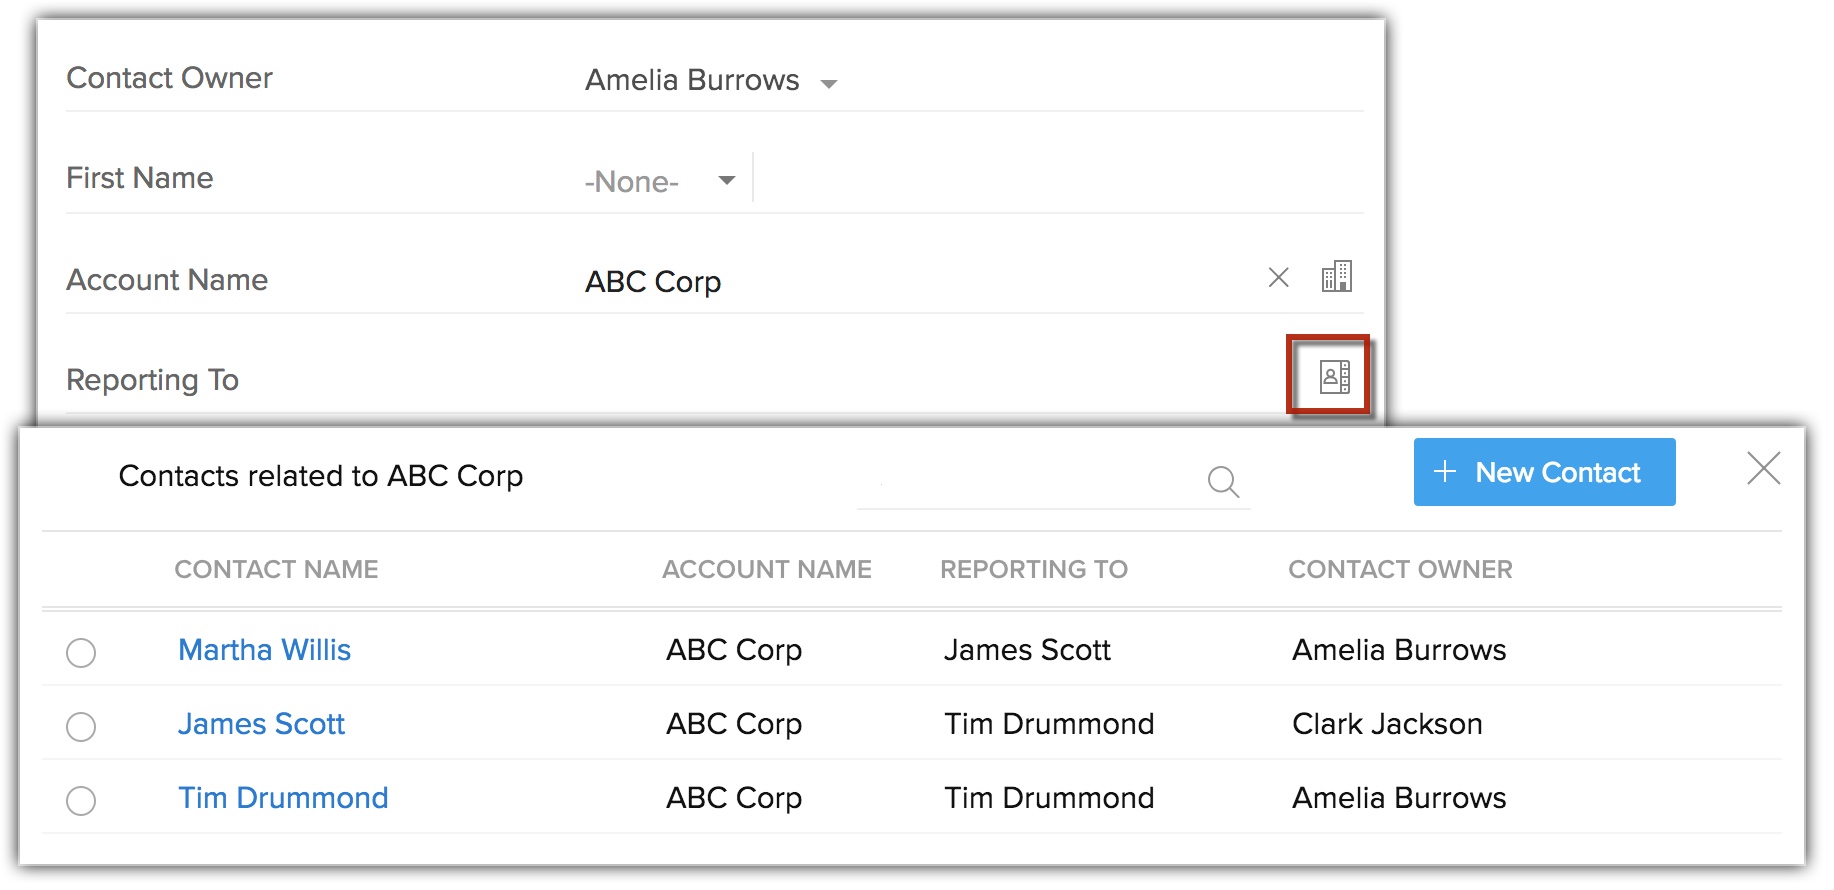
Add Reporting Manager for Contacts
Managing any sales deal involves several rounds of discussions and multiple meetings with contacts. However, there can be instances when the primary contact person is either unavailable or unable to attend the meetings. Such unforeseen scenarios may sometimes lead to incessant delays in the sales processes. To avoid such situations, you can mention a reporting manager for the primary contact who can act as an alternate point of contact in the former's absence.
In the CRM's Contacts module, you can assign a reporting manager to a contact using the "Reporting to" field. This field is a lookup field and you can view only the contacts that are associated to an account.
However, there are instances when the contact's will not be displayed in the Reporting to field, below are 2 examples highlighting the same:
- If the account name is changed then the contact's associated to that account will not be displayed anymore. For example, if account name ABC Corp is changed to Zylker Inc., then the contacts associated to ABC Corp will be removed from the reporting to field.
- If the contact is transferred to another account the contact's name will be removed from the reporting to field. For example, if Martha Willis is moved from ABC Corp to Zylker Inc. her name will be removed from the contacts related to ABC Corp account.
- The reporting to field will not be displayed under map fields during import.
- In case the account name is edited or changed either manually or through API, the reporting to field will not display the set contact name
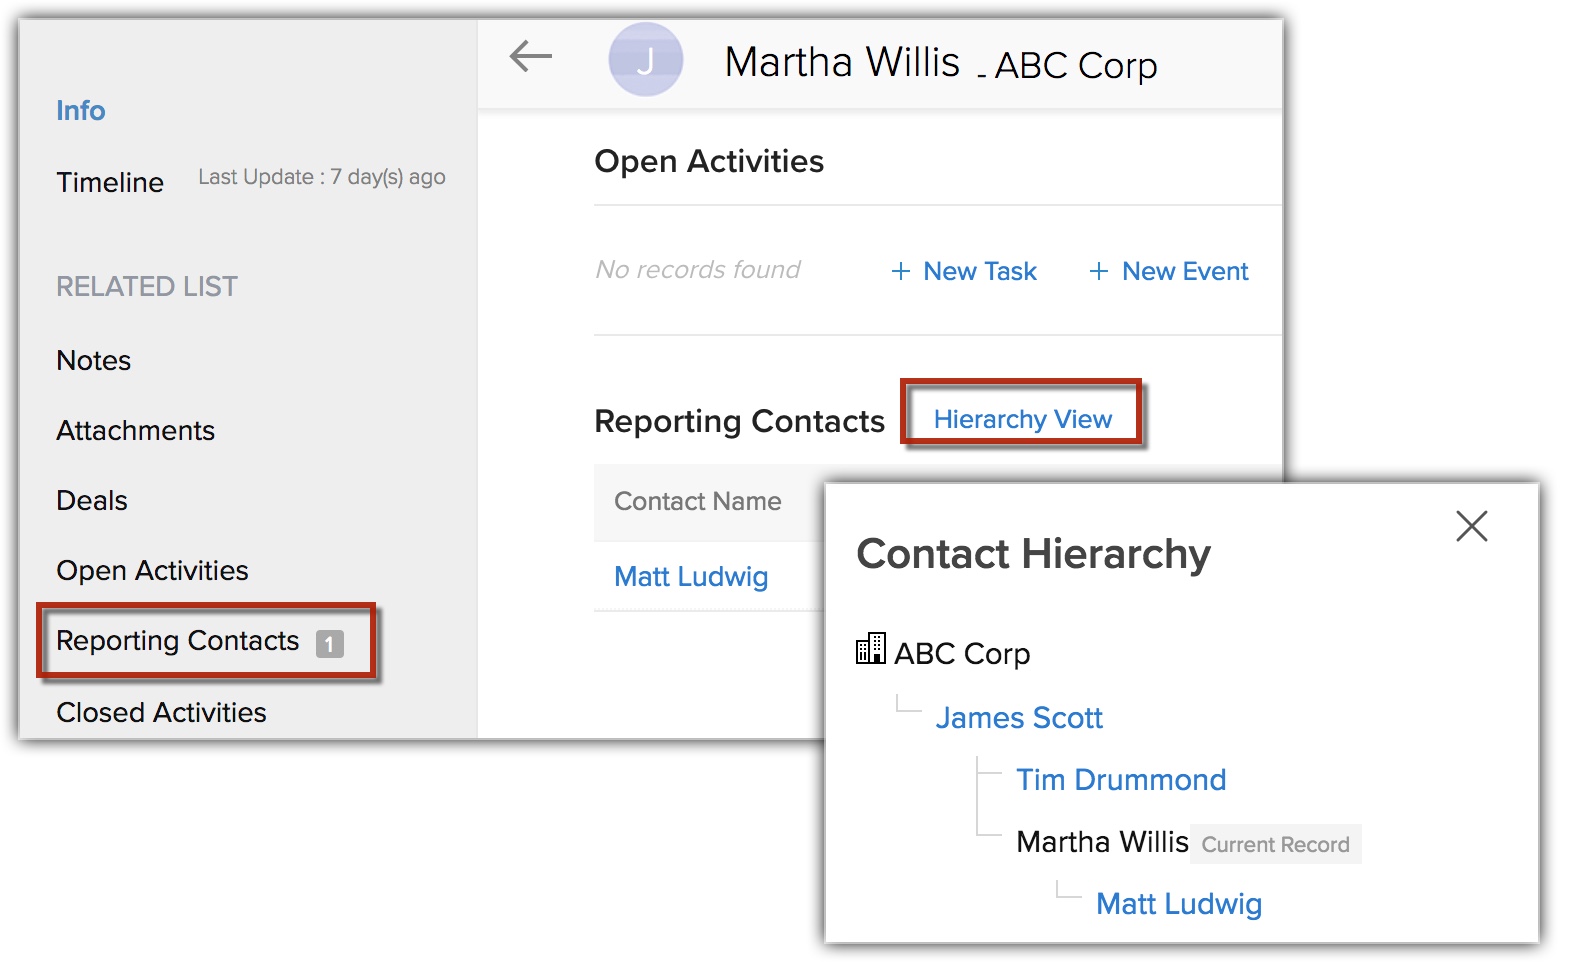
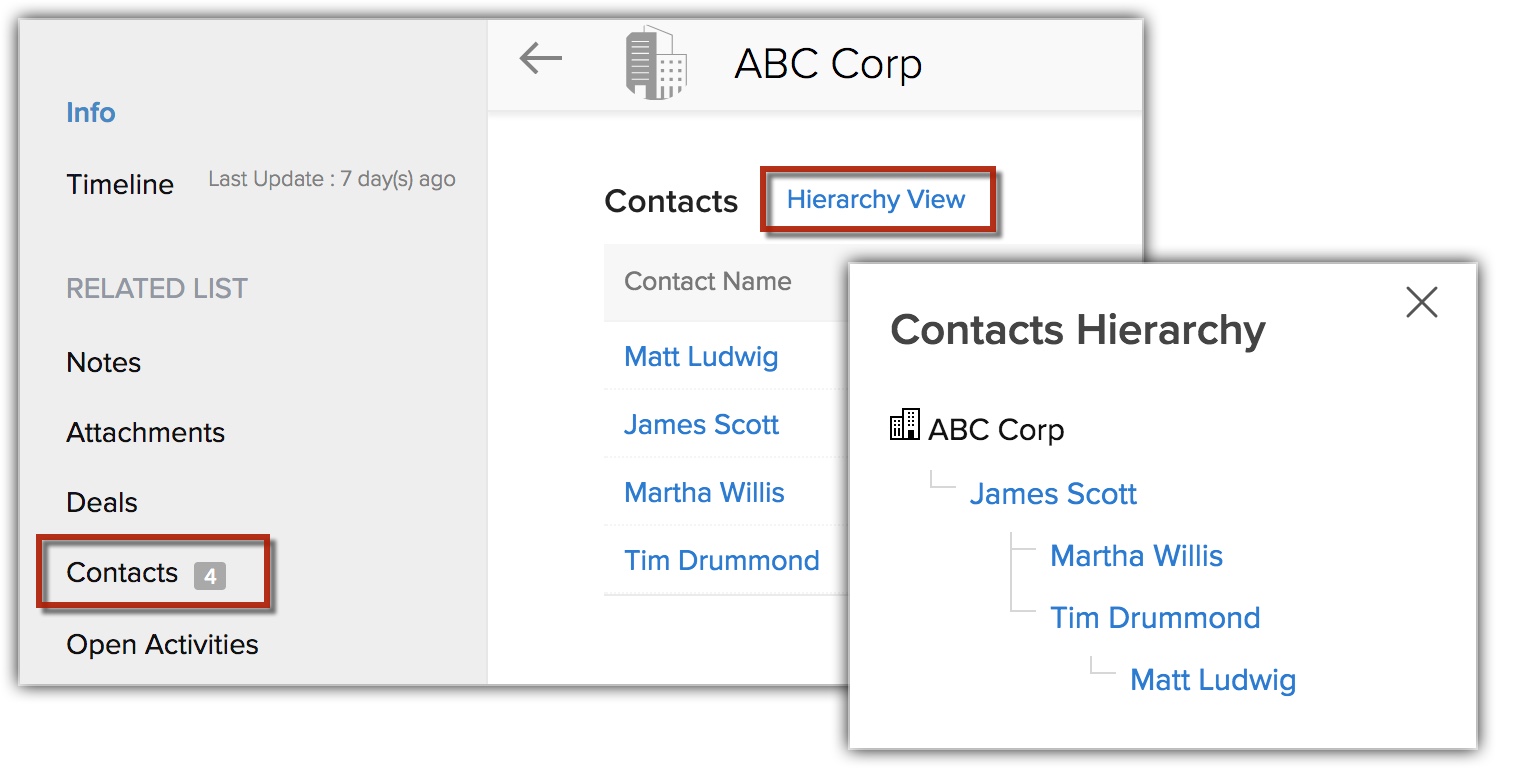
View Contact Hierarchy
You can view the direct reports of a contact and the overall reporting structure right within the related lists of a record in both Accounts and Contacts modules.
In Contacts module - A related list named "Reporting Contacts" is created that displays the direct reports and the reporting hierarchy structure of the contacts.
In Accounts module - You can view the contacts hierarchy from the "Contacts" related list.
Related Articles
Building Formula Fields
Building Formula Fields The CRM formula fields enable you to define fields that can populate dynamically calculated data based on the values returned from other standard or custom fields. For instance, an insurance company may need to determine, if ...Standard Fields in Vendors
Standard Fields in Vendors Following are the list of defined standard fields available in the Vendors module: Field Name Description Data type Maximum Limit Vendor Owner Select the name of the user to whom the Vendor details is assigned. Lookup ...Marking Personal Fields
Marking Personal Fields Manage Personal Fields View Personal Fields under Data Privacy Section Personal Data Handling GDPR defines personal data as any information relating to an identified or identifiable natural person (i.e. the data subject). ...Standard Modules & Fields
Standard Modules & Fields Leads Accounts Contacts Deals Campaigns Forecasts Cases Solutions Products Price Books Quotes Sales Orders Invoices Vendors Purchase Order Tasks Events Calls The standard modules in the CRM: Leads Accounts Contacts Deals ...Adding, Modifying, and Re-inviting Users
Adding, Modifying, and Re-inviting Users Adding Users Modify Users Re-Invite Users Users with the Manage Users permission in their profile can access the users' list and perform tasks such as adding users, modifying user details, and viewing the apps ...