Managing Web Tabs
Managing Web Tabs
Web tabs help you to open web pages like company-wide announcements, web applications, etc. inside the CRM. All the the CRM users across the organisation can view these web tabs. By default, the web tabs functionality is available only to the users with Administrator privilege. However, you can also activate this functionality for other users.
Activate Web Tabs
Using the Web Tabs functionality you can create web tabs and access web applications. By default, only users with Administrator privilege can create, edit or delete web tabs. However, you can activate this functionality for other users also.
- Log in to the CRM with Administrator privilege.
- Go to Setup > Users & Control > Security Control > Profiles.
- In the Profiles page, click on the profile for which you want to give access.
- In the Profile Details page, click Edit.
- Select the Customise CRM check box under Admin Permissions.
- Click Save.
Create web tabs
By default, only users with Administrator privilege can create web tabs. However,users with Customise the CRM permission enabled can also have access to the web tab functionality. You can create a maximum of 25 tabs, each with a unique name.
To create web tabs
- Go to Setup > Customisation > Modules and Fields > Web Tabs.
- In the Web Tabs page, click Create Web Tab.
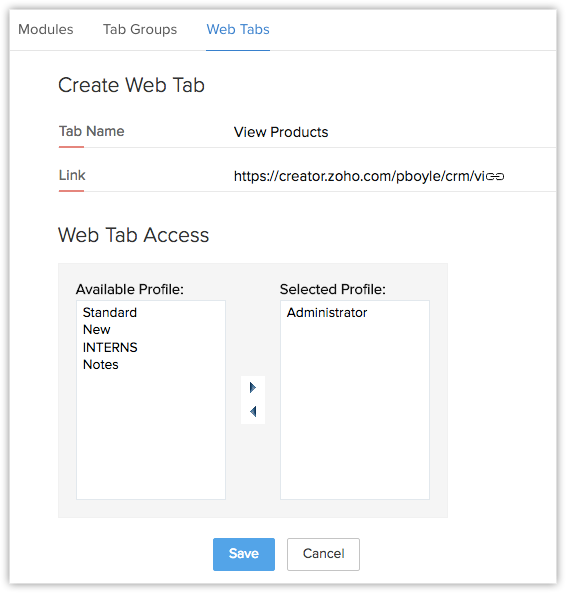
- Enter the name of the web tab in Tab Name box.
- Enter the URL in the Link box.
- Select the profiles from the list to provide access to the web tab.
- Click Save.

- The web tabs that you create will not be linked to the other modules in the CRM.
If you delete a web tab, data in the other modules will not be affected. - You cannot create tabs with the same name as that of the existing modules in the CRM (eg. Leads, Potentials, Reports, etc.).
- You may not be able to add some third-party web pages in the web tab. These websites restrict their content from loading inside another websites to avoid clickjacking attacks. They use the X-Frame-Options HTTP response header to indicate whether or not a browser should be allowed to render a page in an iframe.
Delete Web Tabs
As an administrator, you can delete the unwanted web tabs that are no more in use.
To delete web tabs
- Go to Setup > Customisation > Modules and Fields > Web Tabs.
- In the Web Tabs page, click the Delete icon corresponding to the web tab that you want to delete.
- In the confirmation dialog box, click Delete.
- Other users can delete the web tabs only if they have the Customise the CRM permission enabled.
Related Articles
Managing Profile Permissions
Managing Profile Permissions List of Permissions Delete Profile To make the process of managing profile permissions easier, the permissions have been grouped in such a way that you will have no problem in customising them as needed. You can enable or ...Managing CRM Account Settings
Managing CRM Account Setting Change Personal Information Add Social Information Change Locale Information Change Name Format & Preferences Use Signature Once you sign up for the CRM and have your own account, you can personalise your CRM account. ...Managing Lawful Bases for Data Processing
Managing Lawful Bases for Data Processing Switch on GDPR Compliance options The Lawful Bases Applying Lawful Bases with the CRM Change lawful basis for records. View Details and History View Dashboard Switch on GDPR Compliance options Under ...Web Forms - An Introduction
Web Forms - An Introduction Web forms simplify the process of capturing visitors or users information from your website into your CRM system. They are designed to automate the importing of data from websites into the CRM. Non-technical users find it ...Setting up Web Forms
Setting up Web Forms Creating a web form involves three steps Building the form - Drag and drop fields to build a form and format it easily with the WYSIWYG editor. Specifying the form details - Add details such as form name, landing page URL ...