Managing Mail Merge Templates
Managing Mail Merge Templates
Mail merge is a function that helps you to simplify repetitive tasks to create personalised documents (Forms, Letters, Address Labels, Envelopes, etc.). You can create a mail merge template that would contain the variables (merge fields) in it. Using the template, you can merge data from the CRM and create the merged documents with accurate values for the variables.
Suppose you have to send personalised letters to numerous leads or create templates for service level agreements or other legal documents. In such cases, you need not manually type the details of each lead in the letters to personalise them. Instead, you can simply create a template with the merge fields from the leads module and later merge the data to get all the personalised letters.
There are two ways in which you can create a mail merge template:
- Create a template from the scratch.
- Choose any template from the pre- designed list of templates.

- Please ensure that the popup blocker in your browser is enabled before you begin creating template.
Create Mail Merge Templates
Writer is an online word processor that allows you to create and share documents online. You can create mail merge templates in Writer and use CRM data (Leads, Accounts, Contacts and Potentials) to create mail merge documents.
To create template in Writer
- Go to Setup > Customisation > Templates > Mail Merge.
- Click + New Template.
- In the Create New Template popup, specify the following details:
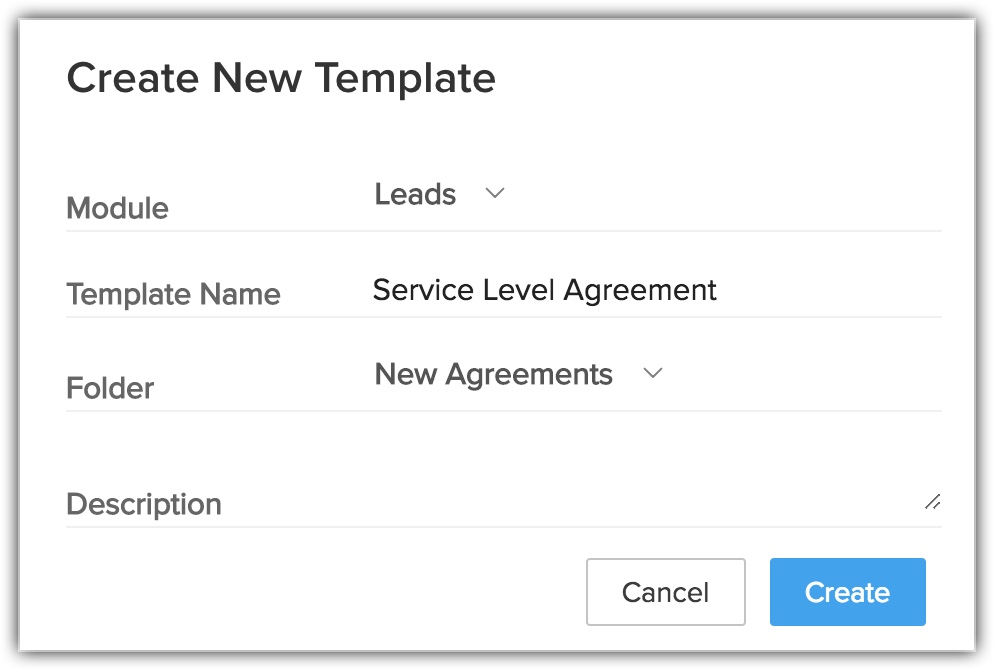
- Select the Module for which you want to create the template.
The merge fields in the template will be based on the module that you select. You can create mail merge templates for both system-generated modules as well as custom modules. - Enter the Template Name.
- Select the Folder from the drop-down list. The template will be stored in the folder that you select.
- Enter the Description for the template.
- Select the Module for which you want to create the template.
- Click Create.
You will be redirected to the Mail Merge Template Gallery, where you can proceed to create the template in two ways.
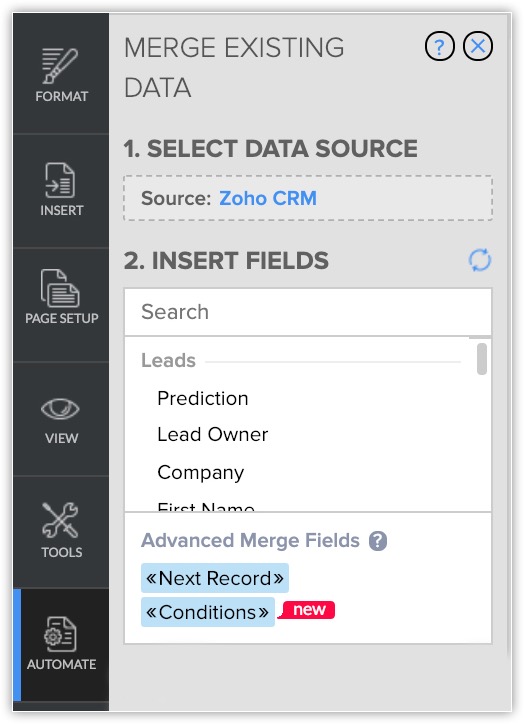
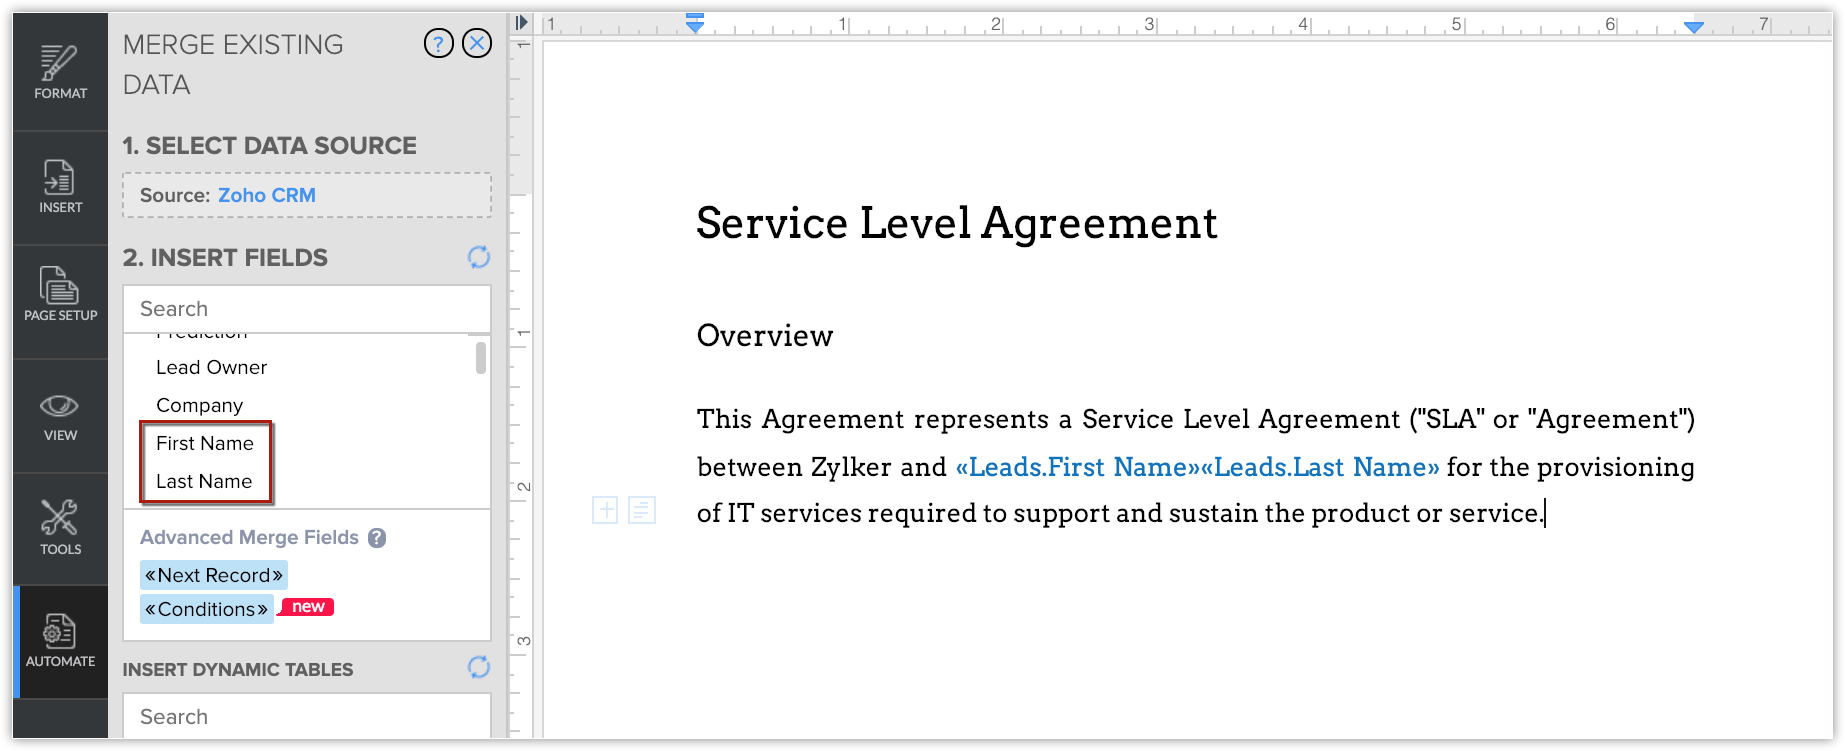
I. Create Mail Merge Template From Scratch
Building a mail merge template from the scratch makes template creation easier. The merge fields from the module you have chosen in the above step will be displayed under Insert Fields section. All you need to do is click on the required fields, that will get added to the new template.
To create a template from scratch
- Choose Blank template from the Mail Merge Template Gallery.
A document will be opened in Writer. - Select the Merge Fields from the Insert Fields section.
- Click Done.
II. Create Template from Pre-designed Template
An alternate approach to creating a template is to choose a template from the template gallery. The gallery displays pre-designed templates from various categories such as Resumes, Posters and Invitations, Letters and Covers and Creative Writing. You can select a template from any of these categories based on your business requirement.
To create a template from the gallery
- Choose a template from the Mail Merge Template Gallery.
- Click Select.
A document will be opened in Writer. - Select the Merge Fields from the Insert Fields section.
The fields will be inserted in the specified place in Writer template. - Click Done.
Add Subforms in Templates
Certain business scenarios raise the need to include a subform which say for example, contains additional information of a main product such as warranty, guarantee details, or accessories purchased, etc. You can add the subform in your template and send it to your customers instead of manually adding that information. Choose the appropriate subform merge fields, which will be added to your template automatically.
To add subforms in a template
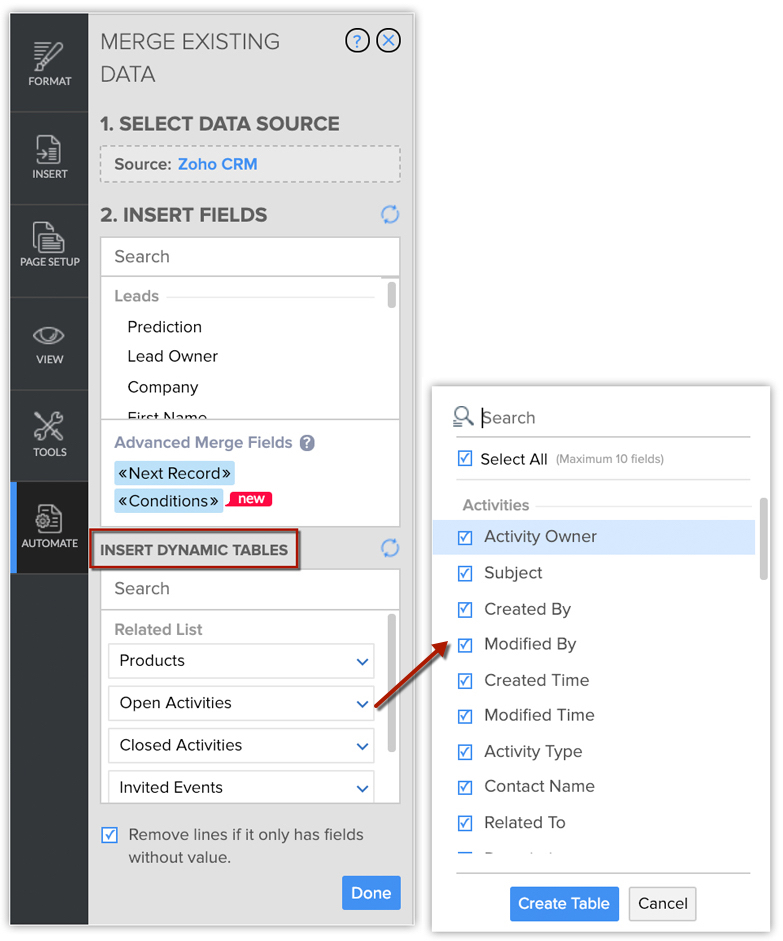
- Go to Insert Dynamic Table in Writer document.
- Select the subform that you would like to add in the template.
A pop-up displays the list of fields in the subform. - Select the fields that you want to add in your template.
- Click Select all to select all the fields at once.
- Click Create Table.
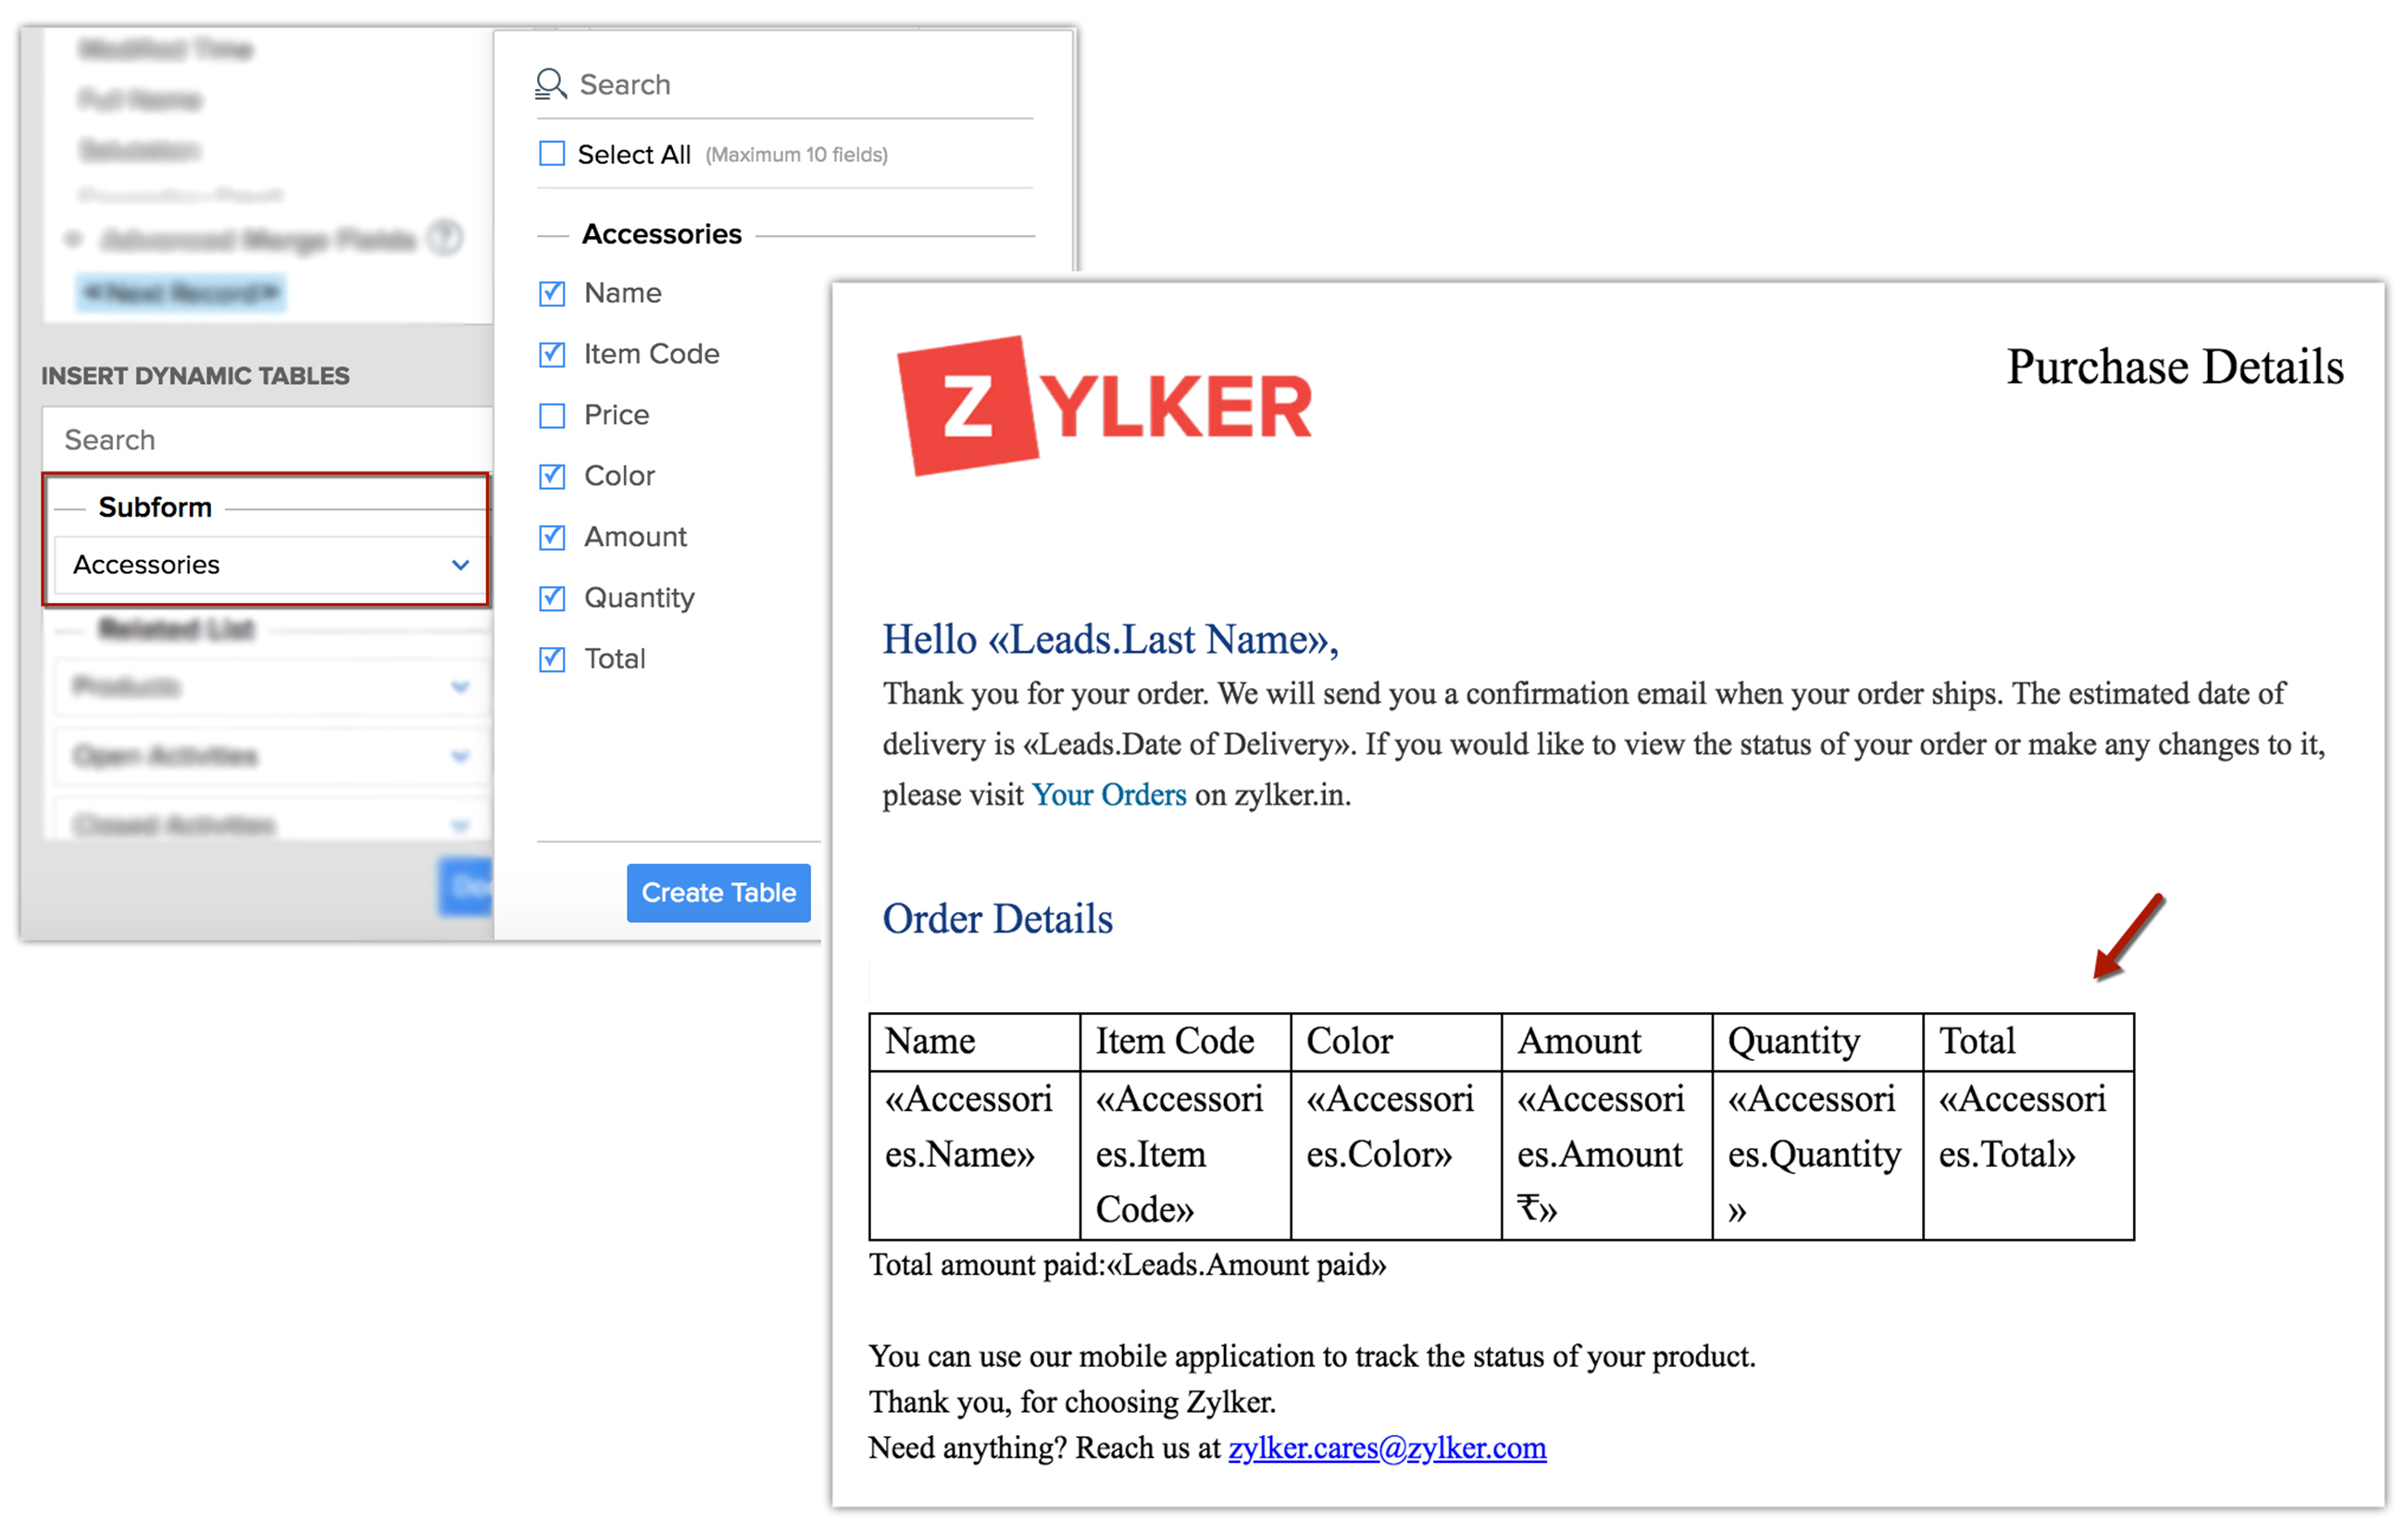
- You can add a maximum of 10 fields from a subform in the template.
Add Related List Items in Templates
At times, you may want to include information from a module's related list like open activities or open campaigns or say related lists fields like product code, voucher number etc. in the template. So, instead of entering these details manually, you can simply select the desired related list merge fields that will automatically get added into the template. Every related list item that is added into the template is displayed in the form of dynamic tables.
Below are few examples of the related list items that you can add to a template:
- You can create a template for the Accounts module and include the list of contacts that are associated to any particular account by choosing the Contacts module from the related list.
- You can create a template for the Contacts module and include the list of open activities of each contact by selecting the Open Activities from the related list.
- You can create a template for the Deals module and insert the associated products of each deal by simply selecting the Products module from the related list item.
To add related list modules to a template
- Go to Insert Dynamic Table, in the Writer document.
- Choose a related list Module and click the Arrow.
- Select the Fields that you want to include in the template.
- Click Create Table.
- Each related list item will be inserted as a separate table in the template.
- You can choose up to 10 fields under each related list item.
- In each template, you can add up to 3 dynamic tables (Subforms and Related List).
- After merging, only the first 100 related list items will be fetched and displayed in the document.
Organise Mail Merge Templates
When you have created numerous templates for different business requirements, it is the best practice to keep the templates organised and stacked under appropriate folders for easy identification. In the following section we will discuss about organising the templates.
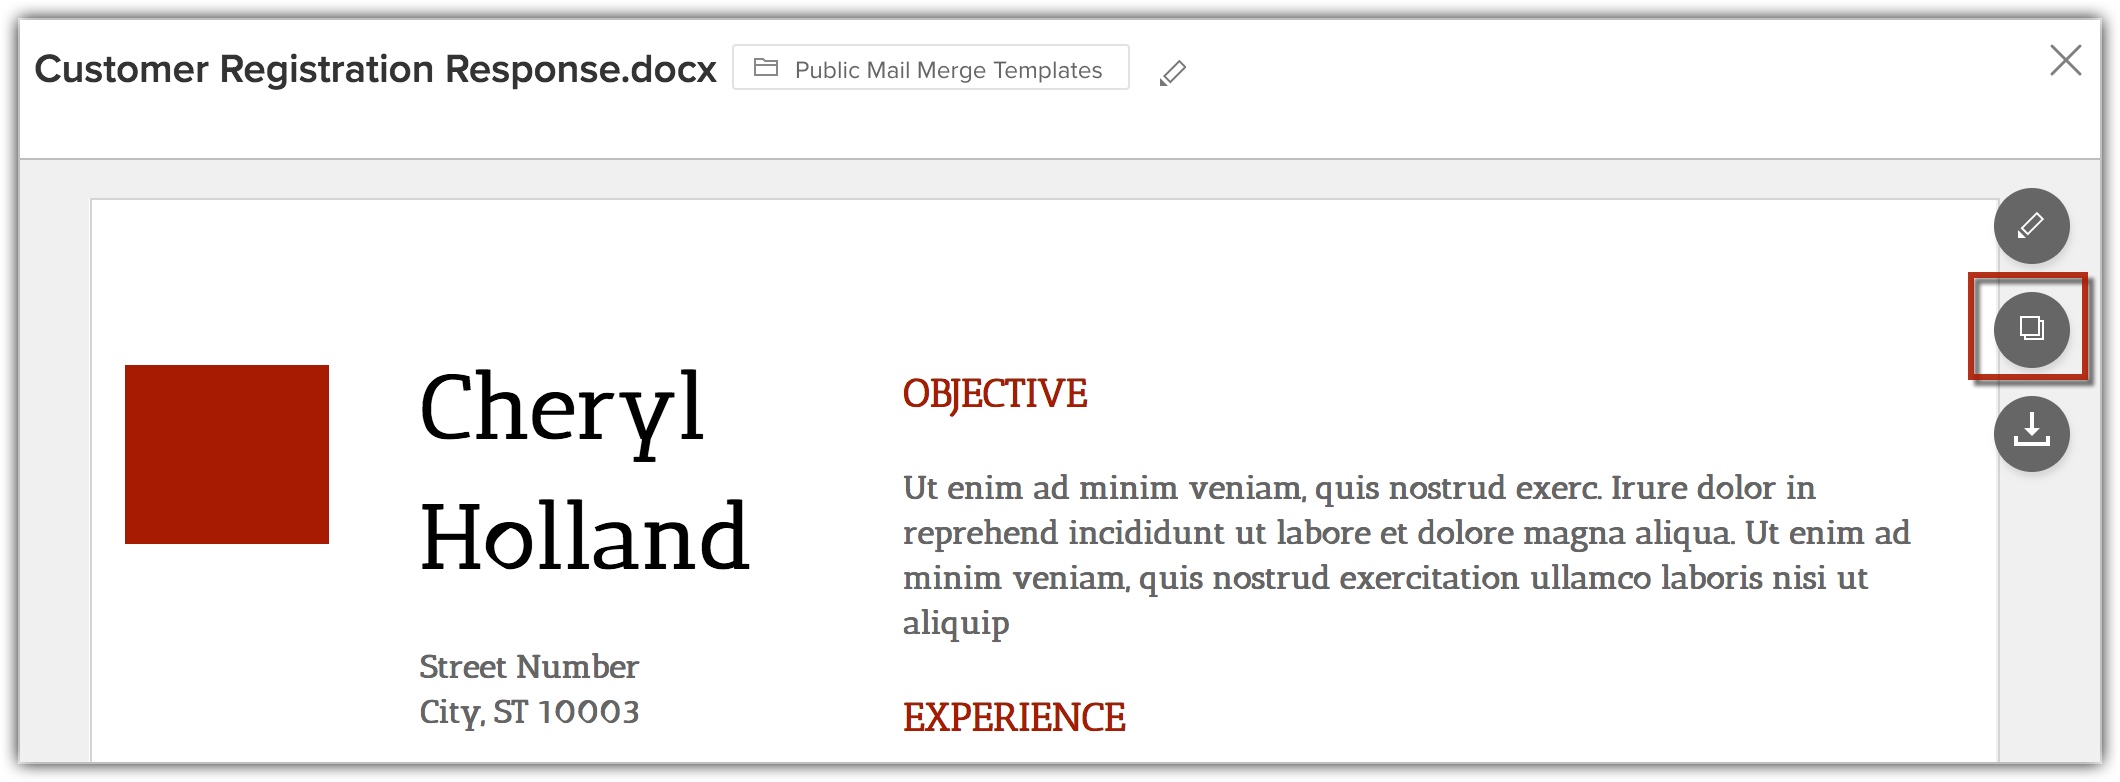
Preview Templates
You can preview each template that you have created right from the templates list page. The preview option gives you a closer look at how the template will appear in its final form.
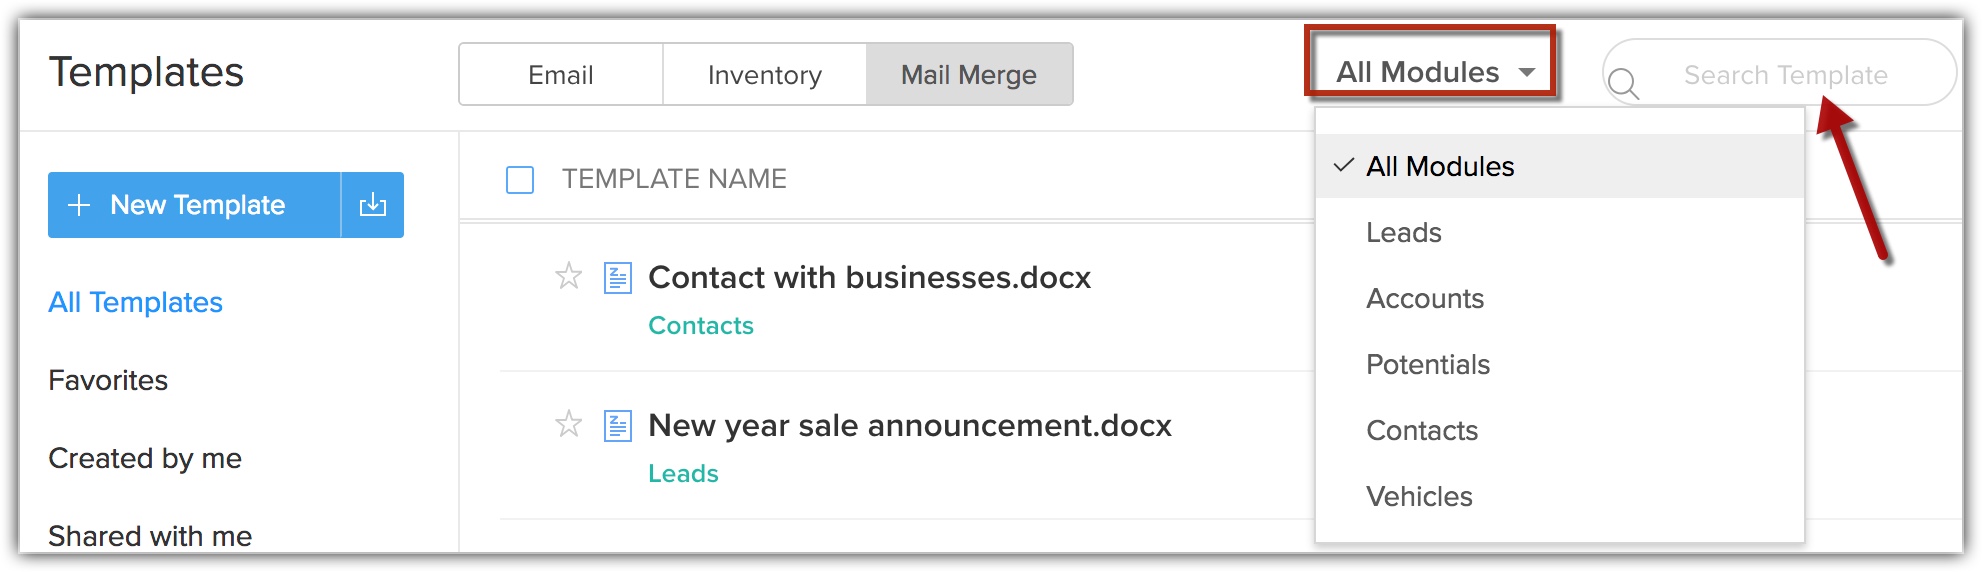
Sort and Search Templates
Sorting lets you reorder and arrange the templates by bringing them to the top of the list for easier access. By default the templates are listed by the "modified time". The recently created or modified template is listed on the top.
Also, instead of browsing through the entire list of templates you can search for the required template in two ways:
- You can search by entering the template name in the search bar provided.
- You can use the module filter and choose to view the templates that are related to a particular module.
Clone Templates
There can be chances when you want to make slight modifications to a particular template before sending it to a customer. In such a case, rather than creating a whole new template, you can clone the old template, make the necessary changes and send it. In the preview section, you can select the template and click the clone button to duplicate the existing template.
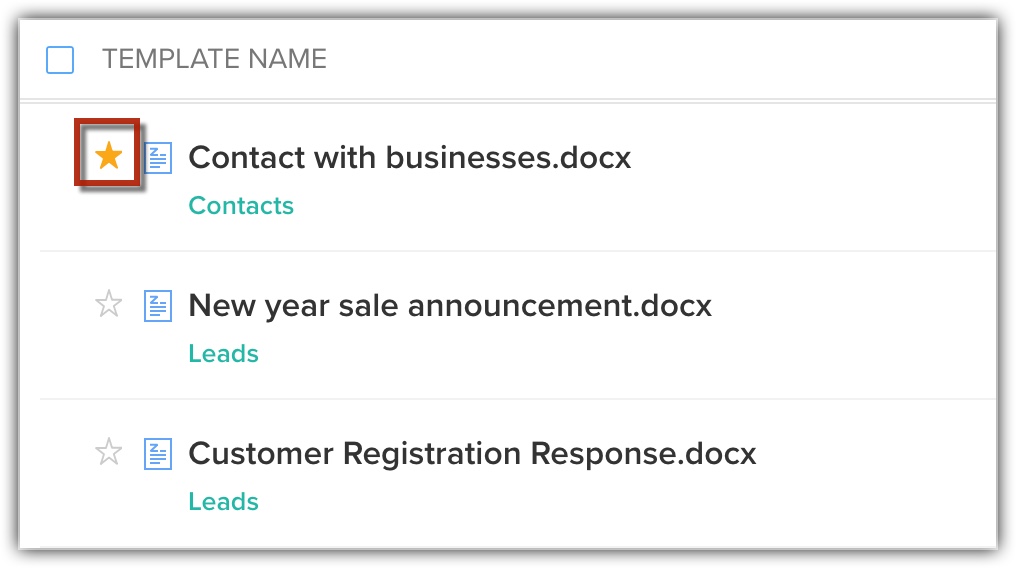
Mark Templates as Favorites
You may have a bunch of templates that you frequently use and might want to highlight them for easy identification. For this purpose you have the option of setting templates as favorite by clicking on the star before the template name.
Move or Delete Templates
There may be instances when you no longer wish to use a particular template, you can simply select the template and click on the Delete button.
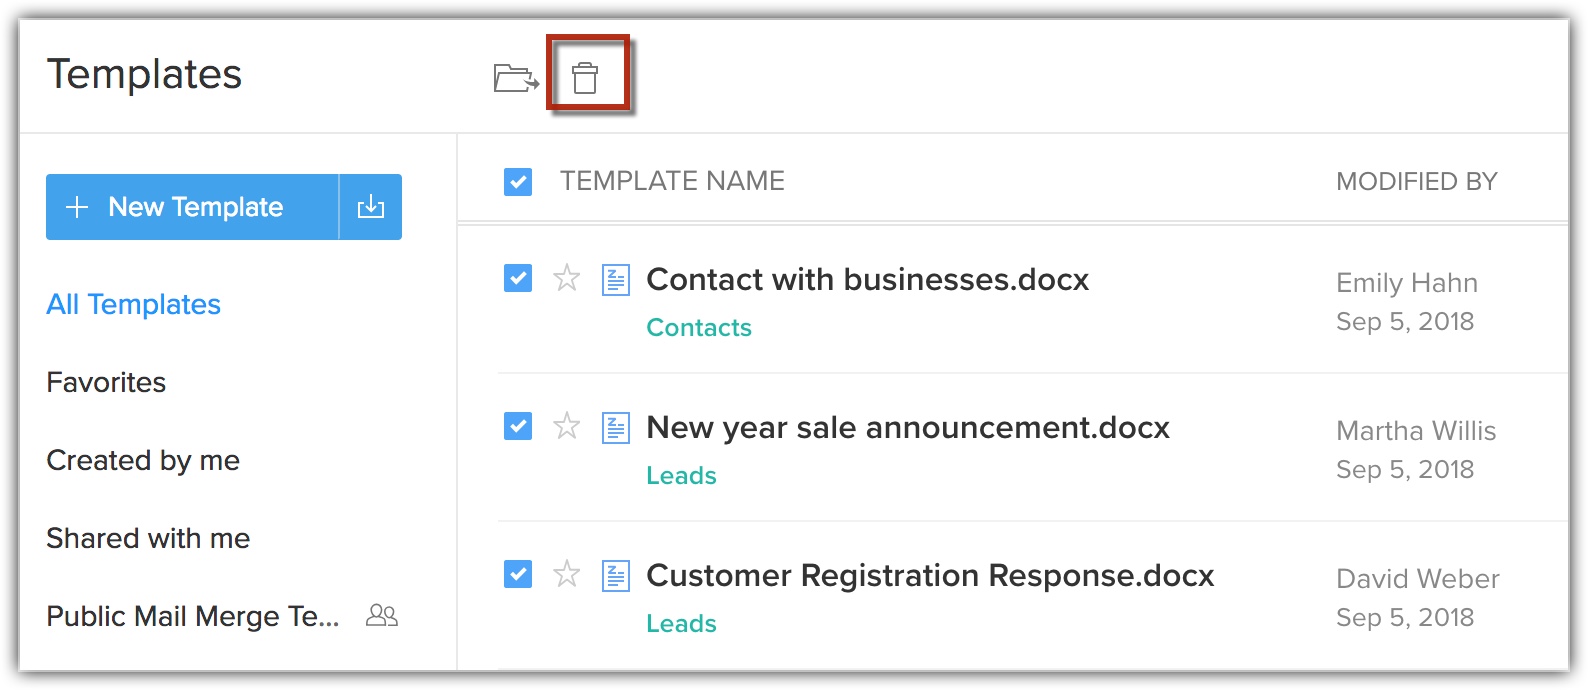
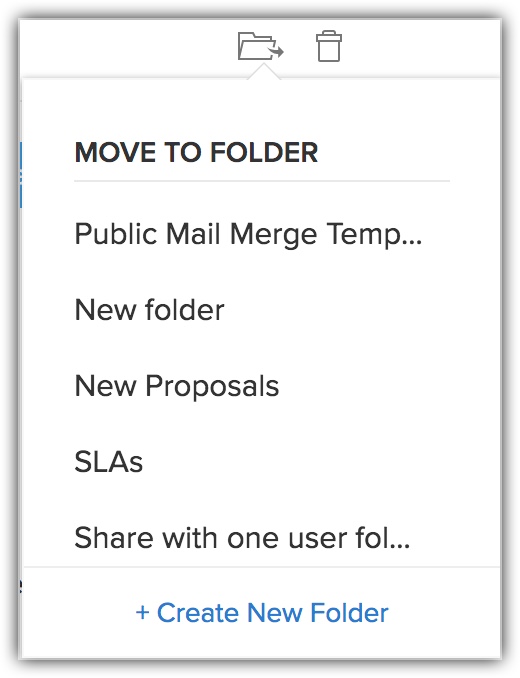
Similarly, you can move a template from one folder to another based on requirement. This will be helpful in instances where you have to share a few templates with someone. You can move the needed templates to a folder and share. You can select the template(s) and click on the Move to Folder button and choose the appropriate folder form the drop-down list. You can also create a new folder and move the template to it if you want.
Create Template Folder
You can group similar templates under a template folder. Template folders are useful when you have many templates, you can easily categorise to manage the different mail merge templates that you have created.
To create a template folder
- Create a New Template.
- Click Save.
- You will be asked to save it to a folder. To create a folder, click Create New Folder.
- Enter the name of the folder and with whom you want to share it.
You can either share it with all the users or specific users or just yourself.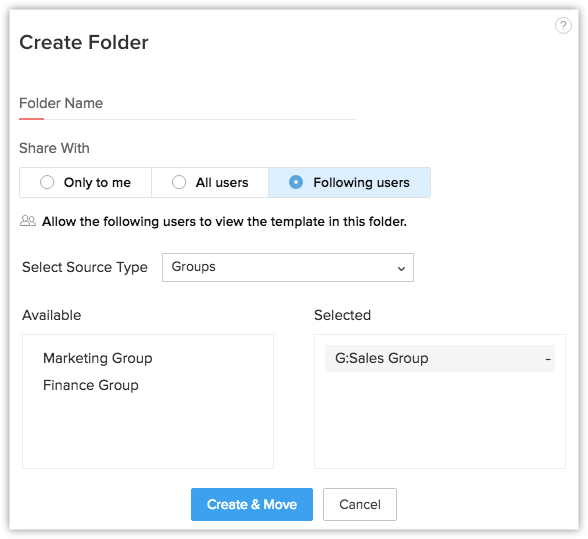
- A new folder will be created and the template will get added to it automatically.
Import MS Word Templates
Mail Merge templates can also be created in Microsoft Word and you can import those templates in the CRM. To use this functionality, you need to purchase the CRM plug-in for Microsoft Office. Note that, for merging the data, this feature is only supported in Internet Explorer 6 and above.
To import MS Word template
- Go to Setup > Customisation > Templates > Mail Merge Templates.
- In the Mail Merge Templates page, click Import Template.
- In the Import Template window, specify the following details:
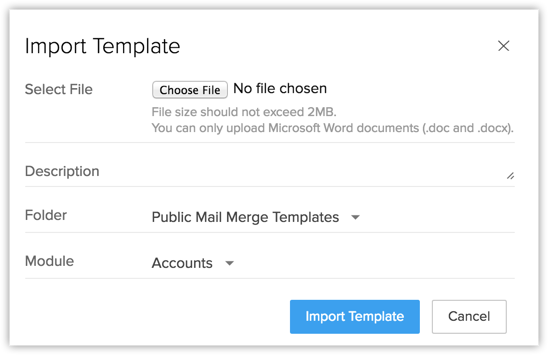
- Click Browse to choose the Microsoft word file that you want to import.
- Enter the Description for the template.
- Select the Folder from the drop-down list. The template will be stored in the folder that you select.
- Select the Module for which you want to create the template.
The merge fields in the template will be based on the module that you select.
- Click Browse to choose the Microsoft word file that you want to import.
- Click Import Template.
Send Mail Merge Documents via Email
Once you have created and saved your mail merge templates in CRM, you can merge the documents with CRM records and email them to the desired customers' at any time. The following has to be specified to email merged document.
- From Address/Reply To: The CRM offers you the flexibility of choosing different email addresses for the From/Reply To email fields. Which means, you can have emails sent from your personal email ID, but have the responses sent to your organisation email ID, if you so wish. Simply select the appropriate email IDs in the From/Reply To email fields. You can choose from the following options:
- your account email address
- organisation email address
- email address of the record owner
- your account email address
- Email field: Choose which email ID you want to send the mail merge document to - the person's primary or secondary address or an associated CRM user's email as well as any other custom email field.
- Subject: Enter a desired Subject line for the email.
- Send Email As: You have the option of sending this mail merge document inline or as an attachment.
- Inline: The template content will be part of the email body.
- Attachment: The mail merge document will be sent as an attachment with the email. You can choose to send the attachment as a PDF or MS Word file.
- Inline: The template content will be part of the email body.
- Attachment Name: If you choose to send the email as an attachment, enter a name for the attachment.
- Enable Set Password checkbox and enter the password in the text box to protect your attachment.
- Enable Set Password checkbox and enter the password in the text box to protect your attachment.
- Message: Enter a message to the recipient. This will be displayed in the body section of the email.
- Additional Attachment: If you have additional attachments to send, you can browse for the required files and attach them here. There are two ways of adding attachments.
- Common Attachment - The attachment you add here from your device or Docs will be the same for all recipients.
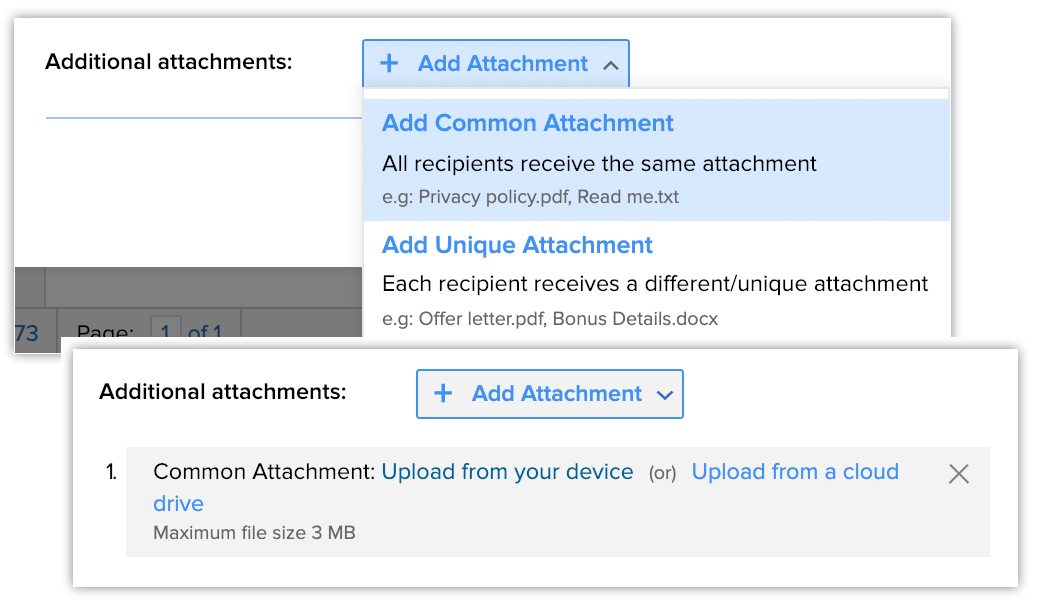
- Unique Attachment - The attachments you add here will be unique for each recipient. You have two ways of adding unique attachments.
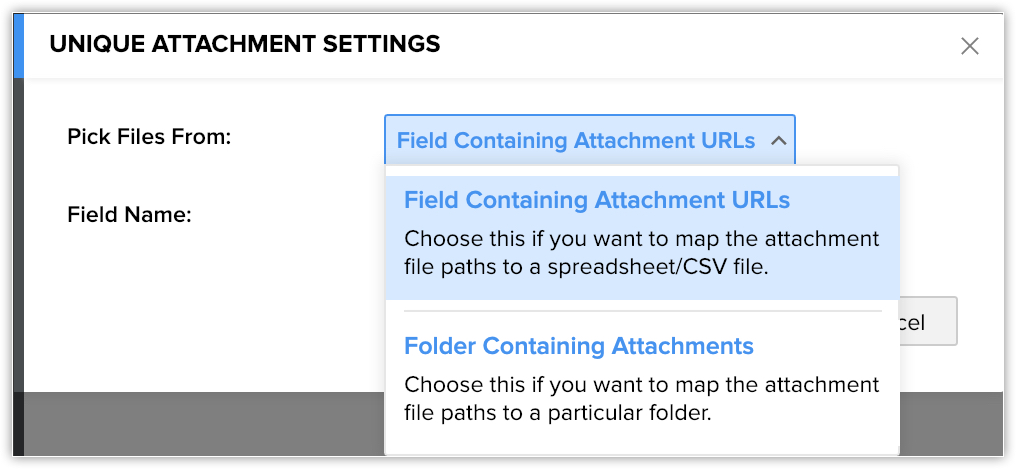
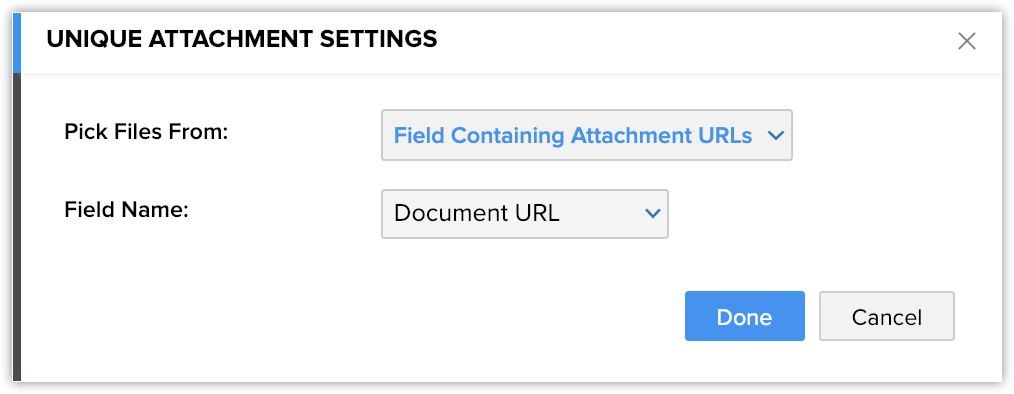
- Field containing Attachment URLs - If the URL of a file is present in a field in the CRM, you can choose the appropriate field and the file will be added as an attachment.
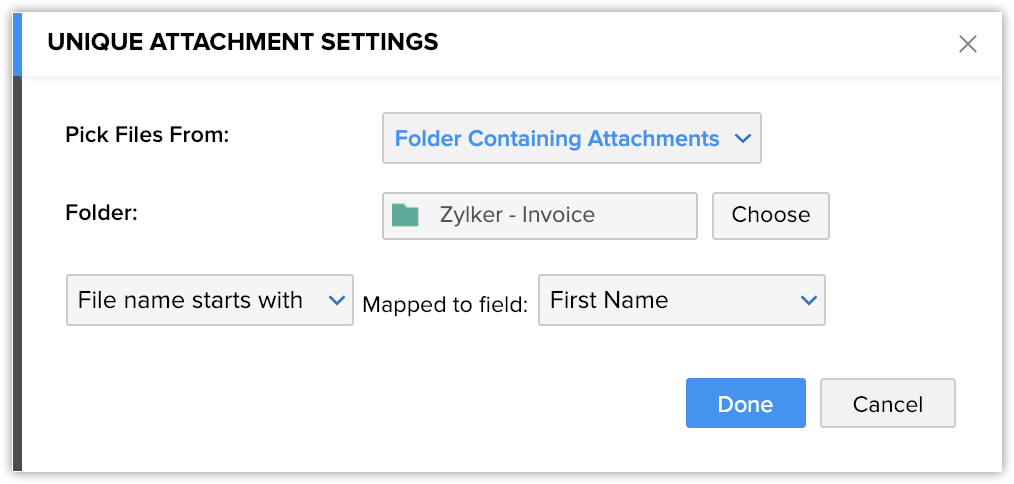
- Folder containing attachments - This allows you to attach the file from a folder present in Docs. Let's say you have a folder named Zylker - Invoice in Docs, which has all the invoice copies with the file name same as the Contact's First Name. You can choose to map the appropriate file to the contact from the drop-down list. In that case, choose File name starts with and under the Mapped to field drop-down list choose First Name.
- Field containing Attachment URLs - If the URL of a file is present in a field in the CRM, you can choose the appropriate field and the file will be added as an attachment.
- Common Attachment - The attachment you add here from your device or Docs will be the same for all recipients.
To send mail merge documents via email
- Go to the required module (Leads/Contacts/Accounts/Deals/Custom modules)
- Select the record.
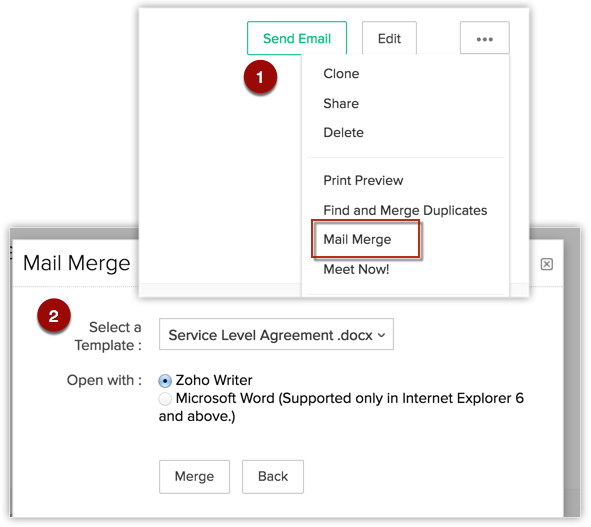
If you wish to send the document to a bunch of customers select the desired records in the Module List View. - Click the More icon and click Mail Merge.
- In the Mail Merge popup, select the required document and click Merge.
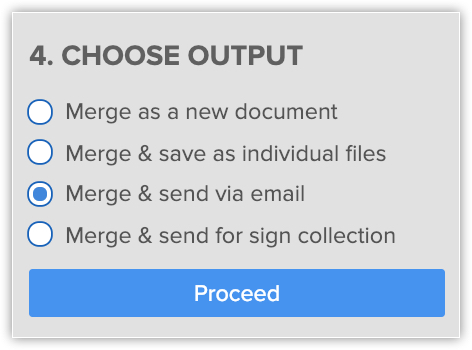
- On the left, under Choose Output section, select Merge & send via email and click Proceed.
- In the Email Merged Document popup, do the following:
- Select the From Address.
- Choose the Email Field.
- Enter the Subject for your email.
- Choose how you want to send email.
- Enter the Attachment name.
- Enable the checkbox to set password for the attachment.
- Enter the Message.
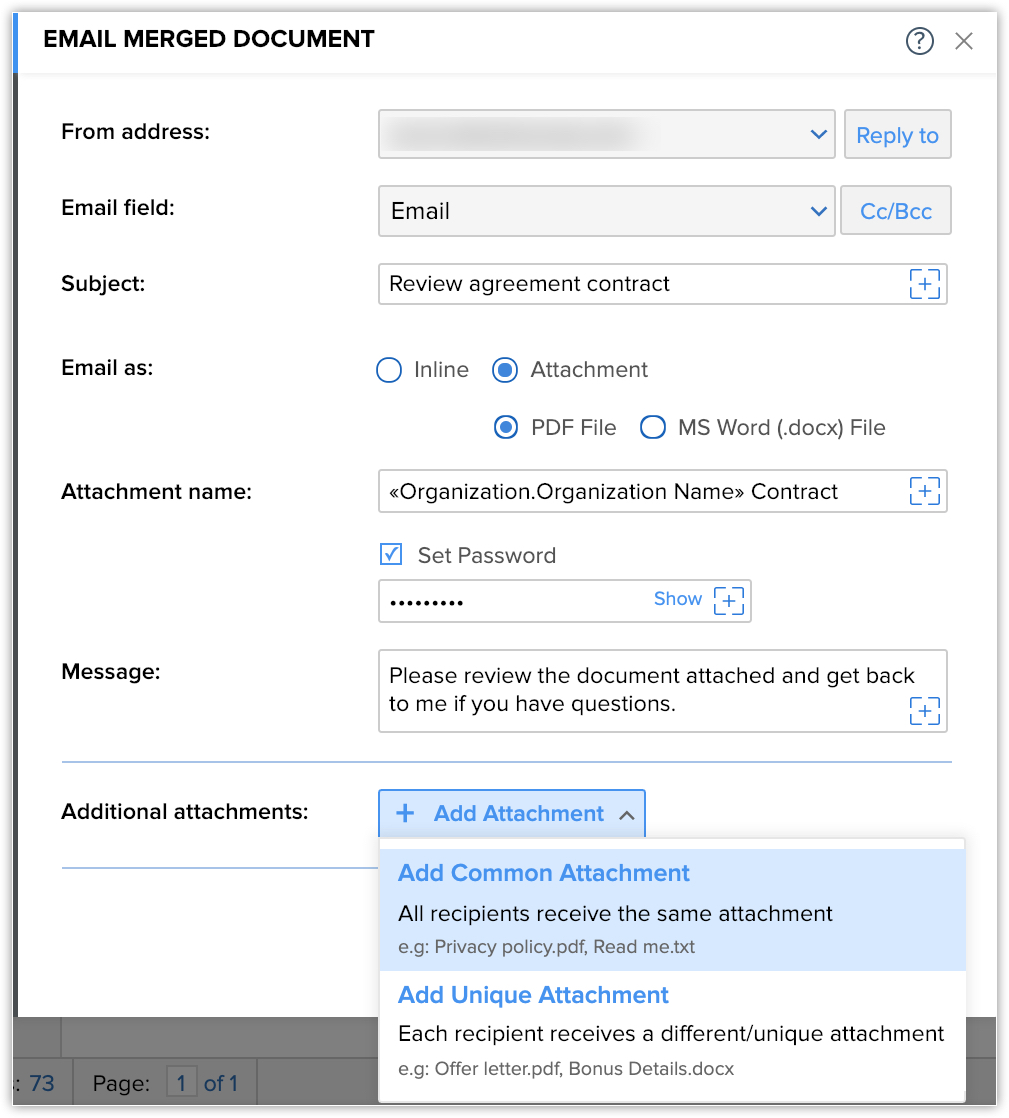
- Add additional attachments if required.
- Select the From Address.
- Click Send.
The merged document will be sent to the chosen email IDs.
- You can send a maximum of 1000 mail merge emails from a CRM Organisation account per day.
- You can insert appropriate merge fields by clicking the + icon.
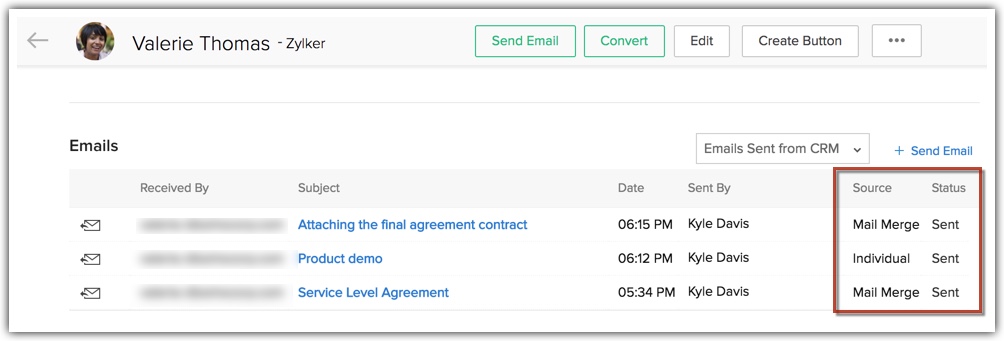
Track Sent Mail Merge Emails
Once you have sent your mail merge documents via email, they can be tracked under the Emails Related List of the associated records (leads, contacts etc). You will check this related list to see the list of emails you have sent to a particular lead/contact and their status. Mail Merge Emails will also feature under this related list.
To view the Emails related list
- Go to the respective module, say Leads.
- Click the record in question.
- Scroll down to the Emails related list.
- Make sure to select "Emails Sent from CRM".
- You will find the list of emails, the source type and the status.
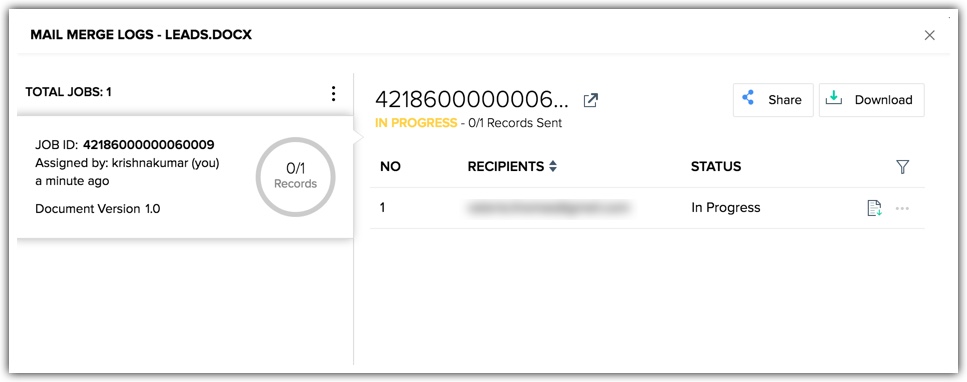
View Mail Merge Logs
At any point, you can track status of the sent mail merge documents using the Mail Merge Logs. The logs will give you details such as the "job" in progress, who is sending the email, document version and so on.
To view mail merge logs
- Go to the mail merge document/template in Writer.
- Click Tools > Mail Merge.
- Click View Mail Merge Logs found right under the Complete Merge section.
Click the Filter to sort the templates based on their status - such as In Progress, Completed and Failed.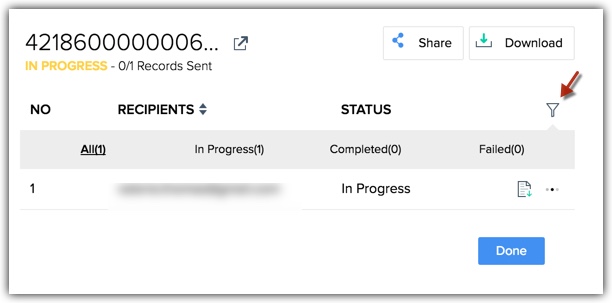
What's the difference between tracking mail merge template status under Emails Related List and Mail Merge Logs?
In the Detail page of a record, under the Emails related list, you will see the status and details of all sent emails associated to that particular record. They could be mails sent individually, mass mail, workflows or mail merge templates. For example, you can see all emails sent to James under the Email Related Lists. Mail Merge templates sent to him will also be listed here and you can track the status.
Whereas, in the Mail Merge Logs, you will see the status a particular mail merge template that's been sent to one person or many people. Example, you have sent a template called Service Level Agreement to 5 people. Mail Merge Logs will show the status of that particular template and its delivery status with respect to each recipient it is sent to.
- Email Related List is recipient-based.
- Mail Merge Logs is template-based.
Related Articles
Managing Autoresponders
Managing Autoresponders Autoresponders are the solution to send automated replies and follow-up emails to the prospects and customers. Once you receive a response from the lead or contact, you have to manually exclude the contacts from the mailing ...Managing Profile Permissions
Managing Profile Permissions List of Permissions Delete Profile To make the process of managing profile permissions easier, the permissions have been grouped in such a way that you will have no problem in customising them as needed. You can enable or ...Managing Subforms
Building a Subform Subforms - An Overview Scenarios Building a subform Edit subform properties Check subforms field limits Deleting a subform Add Subforms in Mail Merge Templates Create reports and dashboards based on subforms Points to remember ...Standard Merge Fields
Standard Merge Fields The following are the standard merge fields that can be used in templates in order to retrieve relevant data. Inventory Template Tags While creating a template, you can use various tags from Users, Organization, Accounts, ...Creating Email Templates
Creating Email Templates Create an Email Template Sample Email Template Organize Email Templates Communicating with customers is an important activity in any business scenario. The CRM provides Email Templates to send one message to multiple ...