iOS Specific Features
iOS Specific Features
Supported CRM Modules
From your iPhone, you can access a set of the CRM modules and the data in them which will be stored in a local database on your phone. This ensures that you can access the important data even in the offline mode when no network connection is available. The following modules are supported in the CRM for iOS:
| Leads | Contacts | Accounts | Deals | Tasks |
| Events | Calls | Products | Cases | Solutions |
| Vendors | Price Books | Quotes | Sales Orders | Purchase Orders |
| Invoices | All custom modules (Max: 15 custom modules) | Dashboards | - | - |

- The modules supported in the mobile app, will be based on the edition of the CRM that you are subscribed to.
Spotlight Search
Spotlight Search helps you find the information that you are looking for right from your home screen.
To enable Spotlight Search
- In the CRM app, go to Settings > Privacy and Security.
- Toggle the button for Spotlight Search ON.

To perform Spotlight Search
- Swipe down from the middle of the Home screen on your device.
- Tap the Search field, then type in what you're looking for.Search results are displayed in real time as you type.
- Tap ShowMore to see more results or tap Search in App to find more search results in the app.
- Tap a search result to open it.
Proactive Suggestions
Proactive Suggestions helps you take the fastest route to pitch your sale. For example, you want to meet your customer so you check their address in the record details page. You then open an app like Uber, Ola, or Apple Maps, the address you were looking for will be suggested at the bottom of your screen. This speeds up the process by providing the information you need when you need it.
To enable proactive suggestions
- In the CRM app, go to Settings > Privacy and Security.
- Toggle the button for Proactive Suggestions ON.

Caller Identification (Caller ID)
Often, we don't like to answer calls from unknown numbers, which means that if a lead calls and you don't have their phone number in your address book, you may ignore the call and miss the chance to connect with your lead. This scenario can be prevented by Caller ID. Caller ID allows you to see who the caller is, if their number is associated with a contact in your CRM.
To enable Caller ID
- Go to Settings > Privacy and Security.
- Toggle the button for Caller ID ON.
- Phone numbers in the CRM should be stored in international format for Caller ID to work.
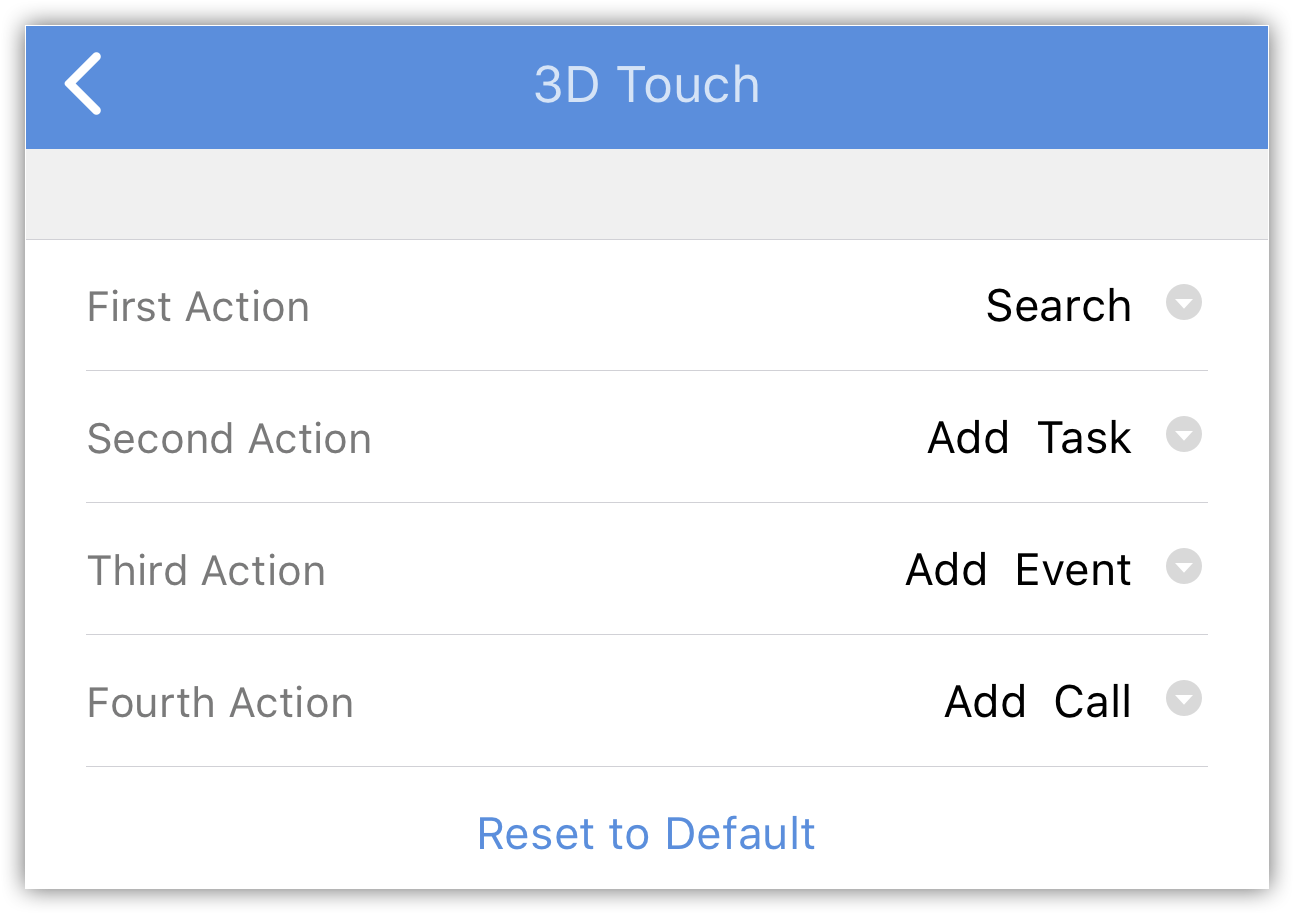
3D Touch
3D Touch allows the user to take certain actions directly from their home screen. With the force touch feature, you can search for and call contacts, add tasks, and more from the CRM icon on your home screen. You can also customise these pop-up actions.
To customise 3D Touch
- In the CRM app, go to Settings > 3D Touch and choose the action you want to add to your home screen
- Tap Reset to Default to go back to default settings.
Widgets
Imagine how handy it would be to see all the day's activities on your home screen at a glance. Widgets provide miniature application views that can be embedded on your home screen and give you periodic updates on your activities, tasks, etc. They also act as shortcuts for the app.
To add a widget
- Swipe right on your home screen.Your existing widgets will open.
- Scroll down and tap edit, and a list of all available widgets will appear.
- Select the CRM widget and tap DoneYour widget is added to your home screen.
Haptic Feedback
Imagine you are at a music show, your friend spots you there and calls you to let you know. You can't hear your phone because of the loud music playing. So, your friend comes to you and taps your shoulder to gain your attention. That tap is similar to haptic feedback. It uses vibration to discreetly give you the information you need. You may have noticed small vibrations when scrolling through the date picker or toggling a switch, going beyond visual cues to provide feedback.
To disable haptic feedback
- Go to your mobile Settings > Sounds & Haptics.
- Scroll down and disable the System Haptics toggle.
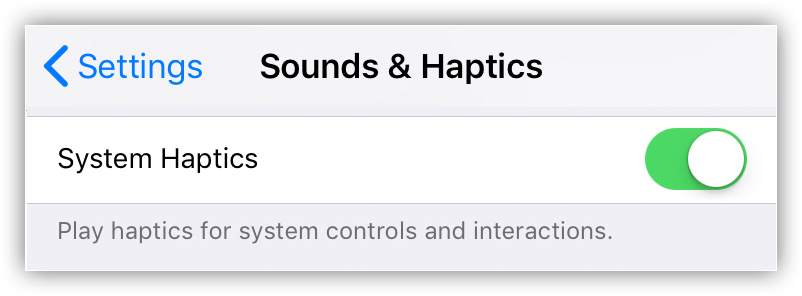
- Haptic Feedback is supported for iPhone 7 and higher.
Privacy and Security
The information you collect from your users is delicate and it is important to keep it safe from prying eyes. Confidentiality is key tin the modern era. The CRM has personalised settings to help you protect your data by adding an extra layer of security.
When dealing with a customers' data, a high level of security is required. The CRM provides an App Lock feature to keep data secure. You can add a PIN or a fingerprint to prevent unauthorised access.
To activate app lock
- Go to Settings > Privacy and Security > Passcode lock > Turn Passcode on.
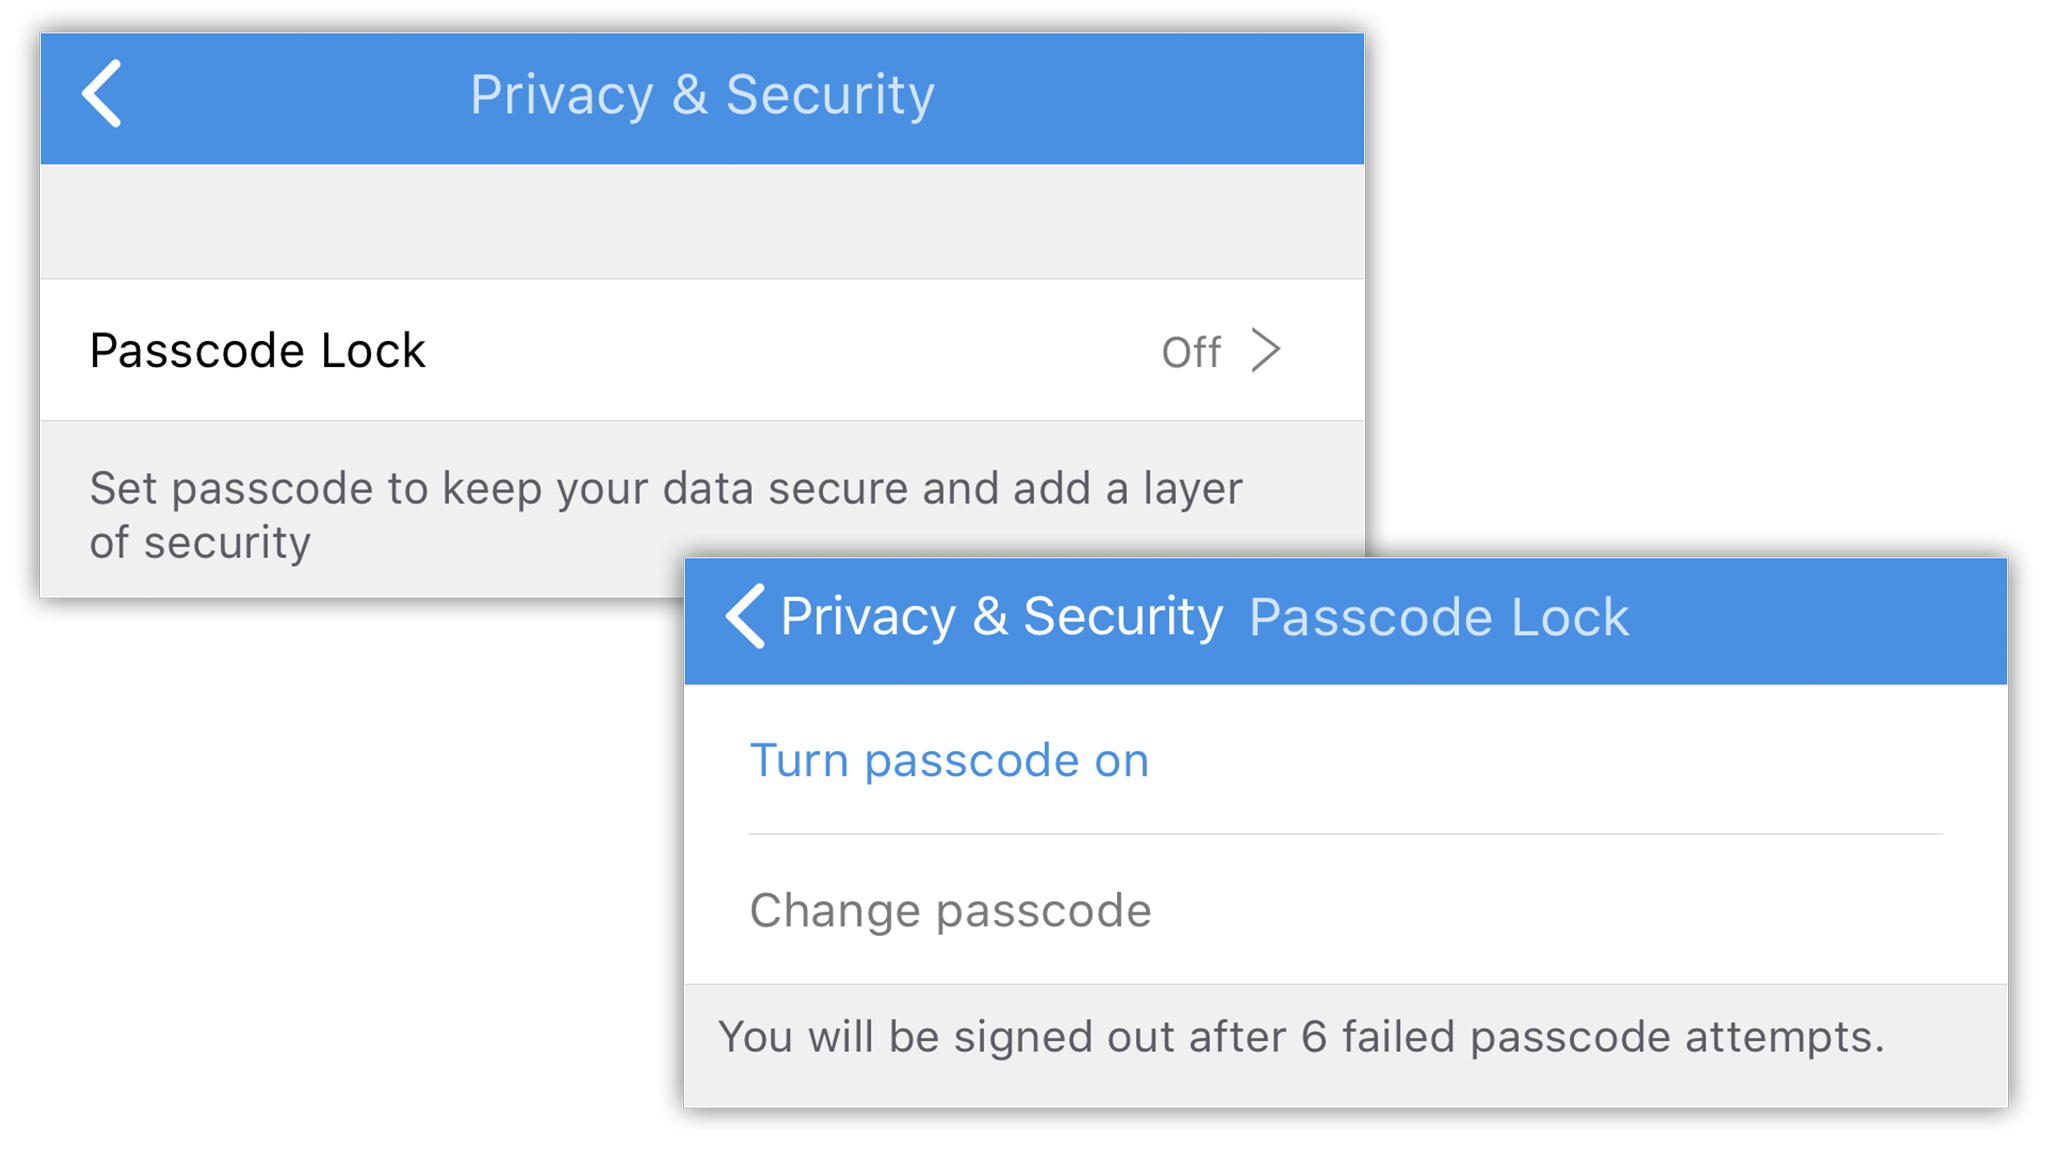
- Enter the pin of your choice
- Enable or Disable the Touch ID feature by tapping the toggle key.
- You will be signed out after 6 failed PIN attempts
Send SMS
Along with calling options, you also have the option to send SMS to Leads and Contacts.
To send SMS
- Tap the Leads/Contacts module.All the records in the selected module will be listed.
- Tap the record to which you want to send a text message.
- In the Record Details page, tap the
 (More) icon.
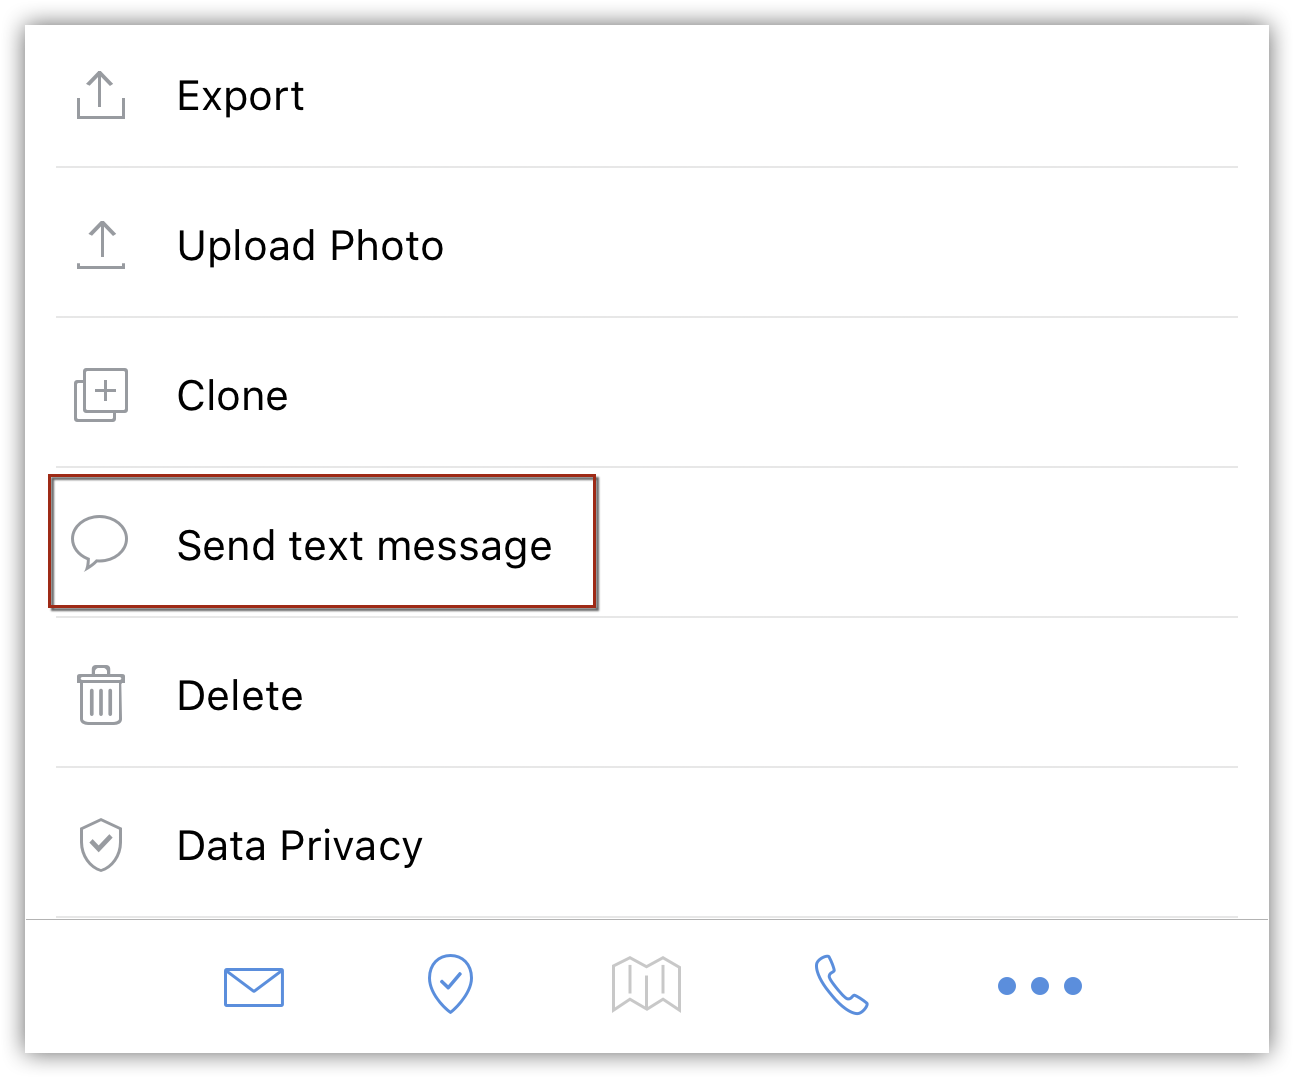
- Tap Send text message to compose and send.
Make Calls
You can make calls to your customers easily by selecting the record in the CRM and initiating the call. Once the call is complete, you can also log the call.
To make a call
- Go to the Leads, Contacts, Tasks or Calls module.
- Tap a record.
- In the Record Details page, tap the
 (Call) icon.
 - Tap the phone number to call the contact.When the call is completed, you can also log the call and it will be available in the Calls module.
Log Calls
After making calls to your customer, you can instantly log your calls with the log a call feature. You can log Outgoing calls.
To log an outgoing call
- Go to the Leads, Contacts, Tasks or Calls module.The records in Contacts, Leads, and Accounts modules are listed in alphabetical order.
- Tap a record to which you want to make a call.
- Tap the phone number to call the contact.When the call is completed, you will be asked if you want to log the call.
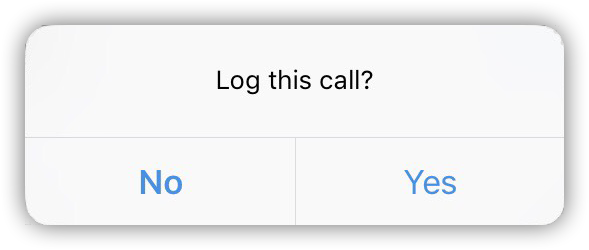
- Tap Yes to log the call.
- In the Call Details page enter the call information and tap Done.
View Map
Using Google Maps, you can locate the address of the Leads, Accounts, and Contacts.
To view map
- Go to Leads, Accounts, or Contacts module.The records in Contacts, Leads, and Accounts modules are listed in alphabetical order.
- Tap a record whose address you want to view in Apple Maps.
- In the Record Details page, tap the
 (Map) icon.
 - Tap the address location that you want to see. (Mailing Address, Billing Address, etc.)
Locate Leads/Contacts/Accounts Near You
In case you wish to meet customers near you when you are on a business trip, your mobile CRM app will instantly tell you which contacts are near you.
Using Apple Maps in your iOS device, you can find leads, contacts and accounts a few miles around your current location as well as a custom location. Please note that the necessary location service should be switched on in your device.
To locate leads/contacts/accounts near your current location/custom location
- Go to the Leads/Contacts/Accounts module.The records will be listed based on the List View that is selected.
- Against the selected List View tap the Map icon.
 All the leads/contacts/accounts near your location will be pinned on the map, irrespective of the ownership of the record or other criteria.In case you wish to look for leads/contacts/accounts around a specific location, enter the desired location in the Custom Location text box.
 The appropriate matches will be displayed on the map.
 - Tap on the More Info icon to perform various other actions like sending email, making a call, edit the details, etc.
- The Location Service settings should be switched on to use this feature.
- Only the contacts within the specified radius will be located in the map. The default radius is 10 kilometers for both your current location and custom location. You can change this radius as required.
- There are two color pins - Redpin
 is for single lead/contact/account and Violetpin
 is for multiple lead/contacts/accounts in the same location.
 - You can tap on the pin for more details on the lead/contact/account.
- When you tap on the pin and then the
 Information icon, you can view the records details and other options such as Call Lead/Contact/Account, Send Mail, Delete Record, etc. These options will be available based on the details in the record.
Check-in to a Location
When you go out with your family to a great restaurant or you are at the movies with your friends, you want to share the news with the world - and so you "check-in" to the location and share it on Facebook or Twitter. Similarly, from the CRM app for iOS, you can now check-in to the location when you meet with a client. Sales managers can immediately be notified of the check-in and therefore can keep a track of their sales reps' client appointments.
Check-ins are closely tied to Events. For example, you have an event called "Demo for Product at Kevin's office". When you check-in to a location, say Kevin's office, you can either associate the check-in to the existing event or create an event upon the check-in. The check-in is automatically attached as a note to the event. You can create check-ins for any module that has events associated to it.
To check-in to a location
- Select a record in a module.
- Tap the
 Check-in icon to check-in to an event.The existing events, if any, will show up.
 - Select an event.The check-in is associated as a note for the event.If there is no event, the app give you an option to create one. You can create an event and associate the check-in to the event.
- When a check-in is made, an update regarding the check-in is posted to Feeds automatically.
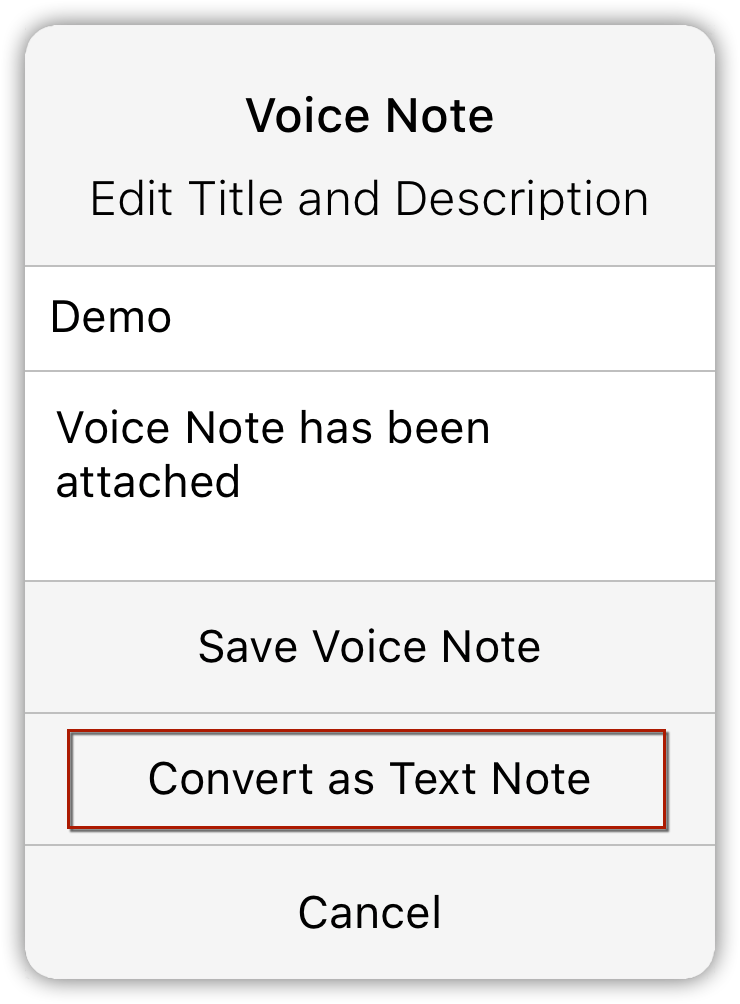
Record Voice Notes
You can record your conclusions on a recent demo for a prospect or capture your thoughts about a meeting with a client with Voice Notes. You can associate these audio files with your records and download them whenever you need. The voice notes will be counted as part of the storage limit in the CRM.
To record voice notes
- Go to the Leads, Accounts, Contacts, Potentials, Cases, Vendors, Products or Quotes module.
- Tap a record to which you want to add voice notes.
- Against Notes, tap the Voice Note icon.

- In the Voice Note pop-up, tap Record button to start and stop recording your note.
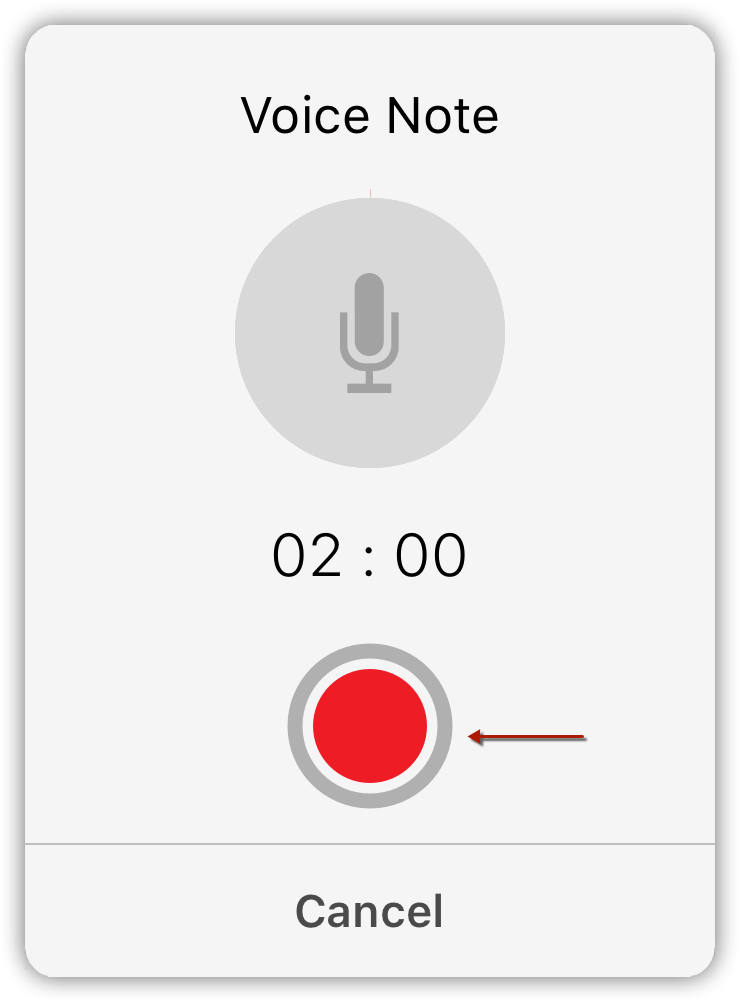
- Once you stop recording, enter the Title and Description for the voice note.
- Tap Convert as Text Note to convert it to text and Save it to the record.
Associate Related Records
You can create and associate the following to the various records from your iPhone:
To associate related records
- Go to the module (Leads, Accounts, Contacts, etc.).
- Tap a record to which you want to associate events and tasks.
- In the Record Information page, tap the Events, Tasks, Notes etc.The list of records already associated will be listed.
- Tap on the record to view and edit the details.
- Tap the Add icon against the required related list and add the details required.
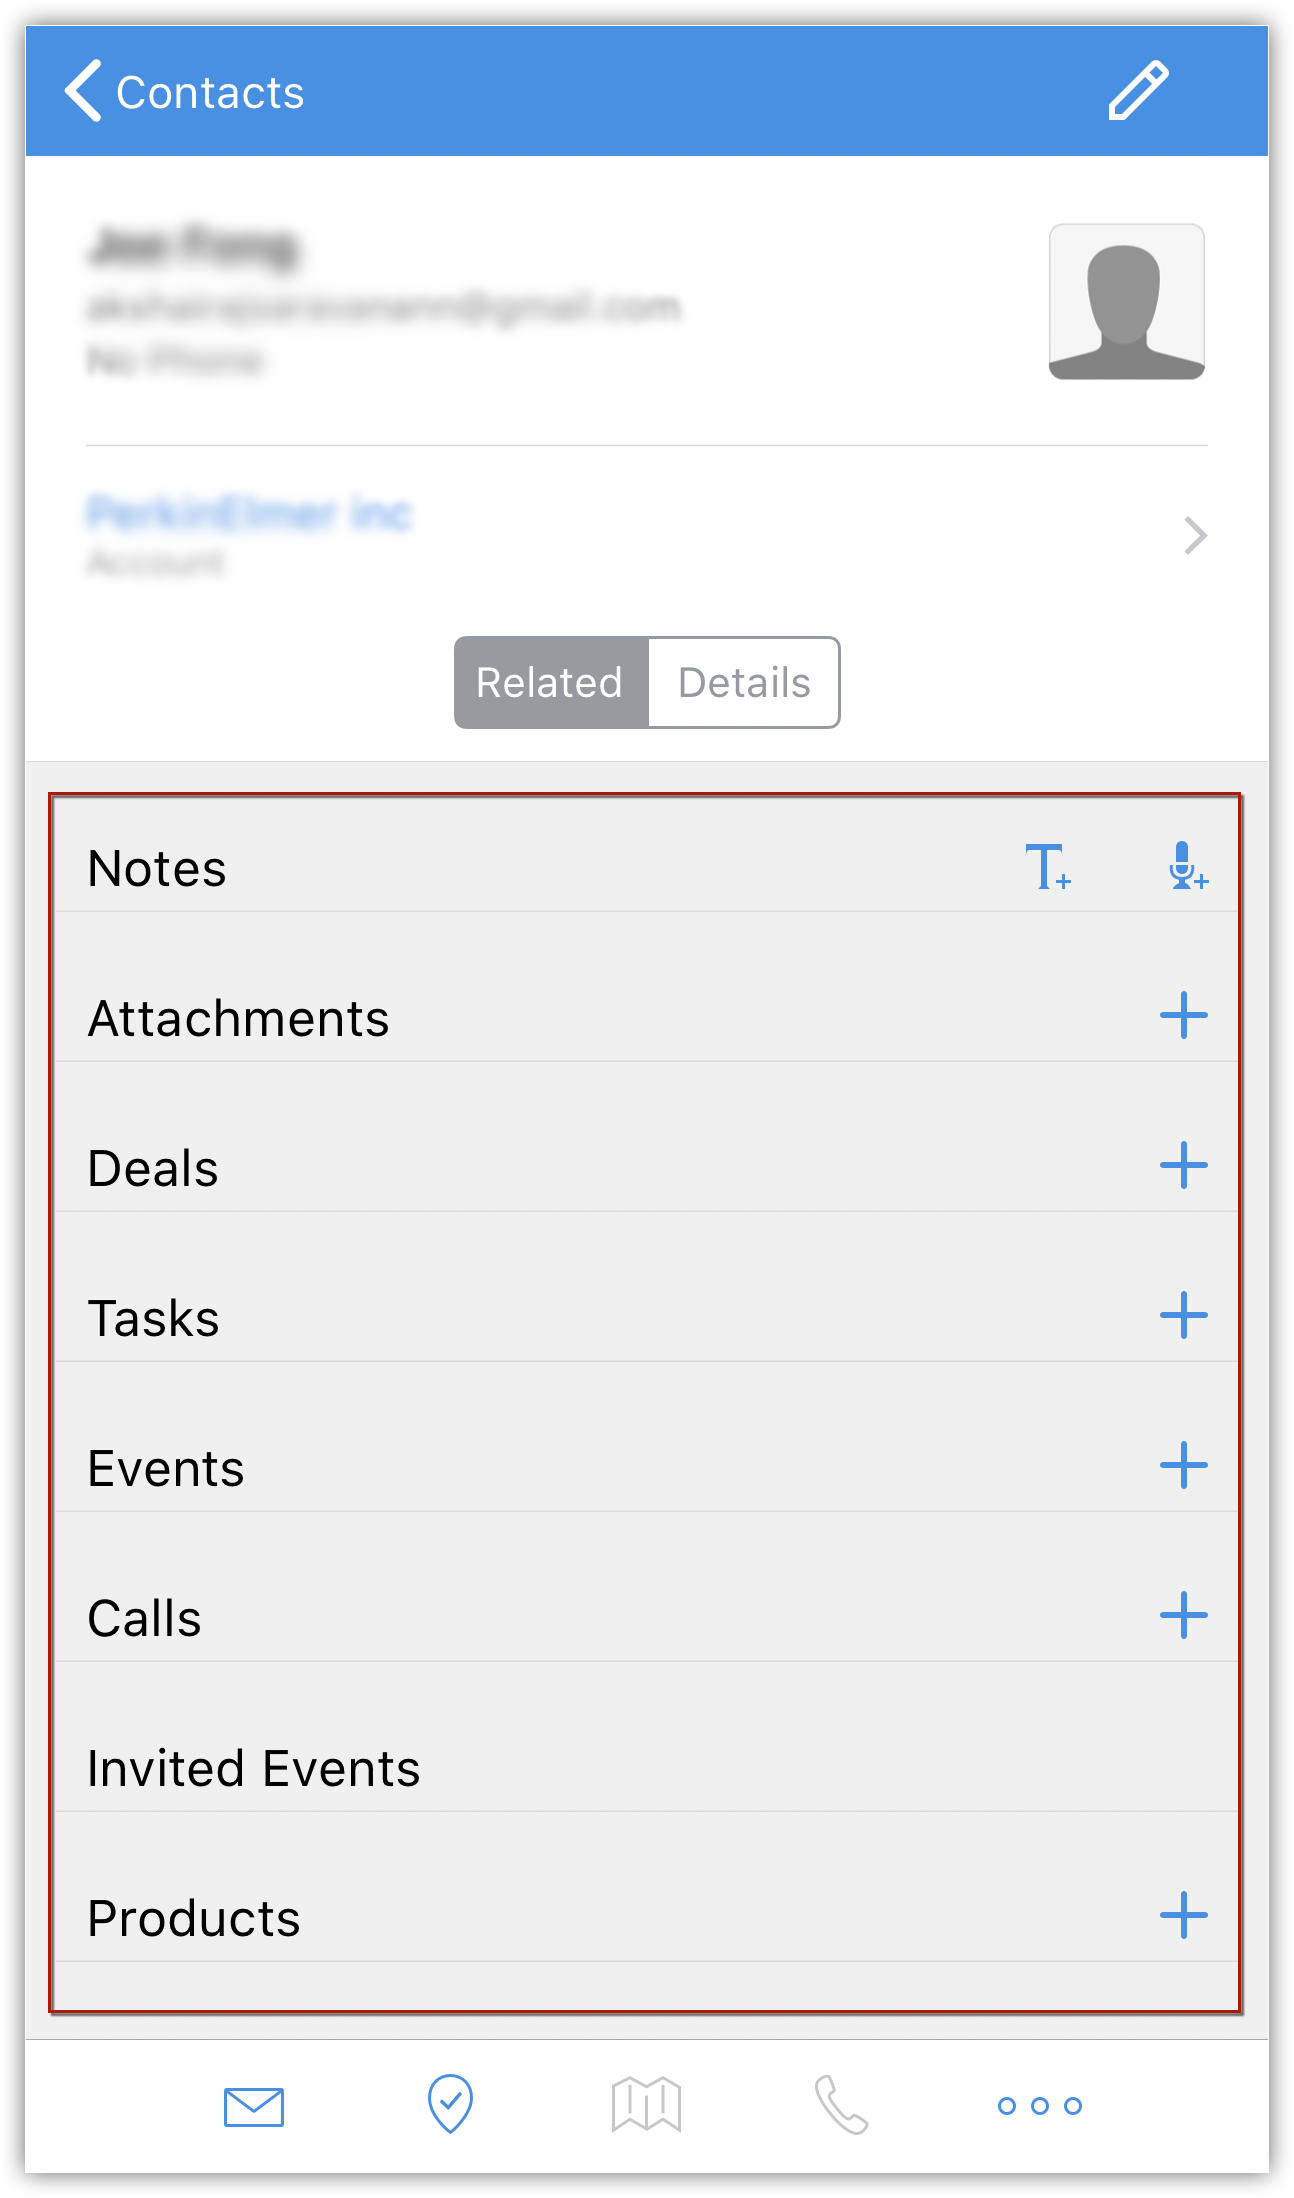
Attach Files
To attach files
- Go to the desired module.
- Tap the record required.
- Under the Related tab, tap the Add icon against Attachments.
- Tap one of the options to upload from Photo Library, Docs, iCloud.You can also attach files that exists on your device.
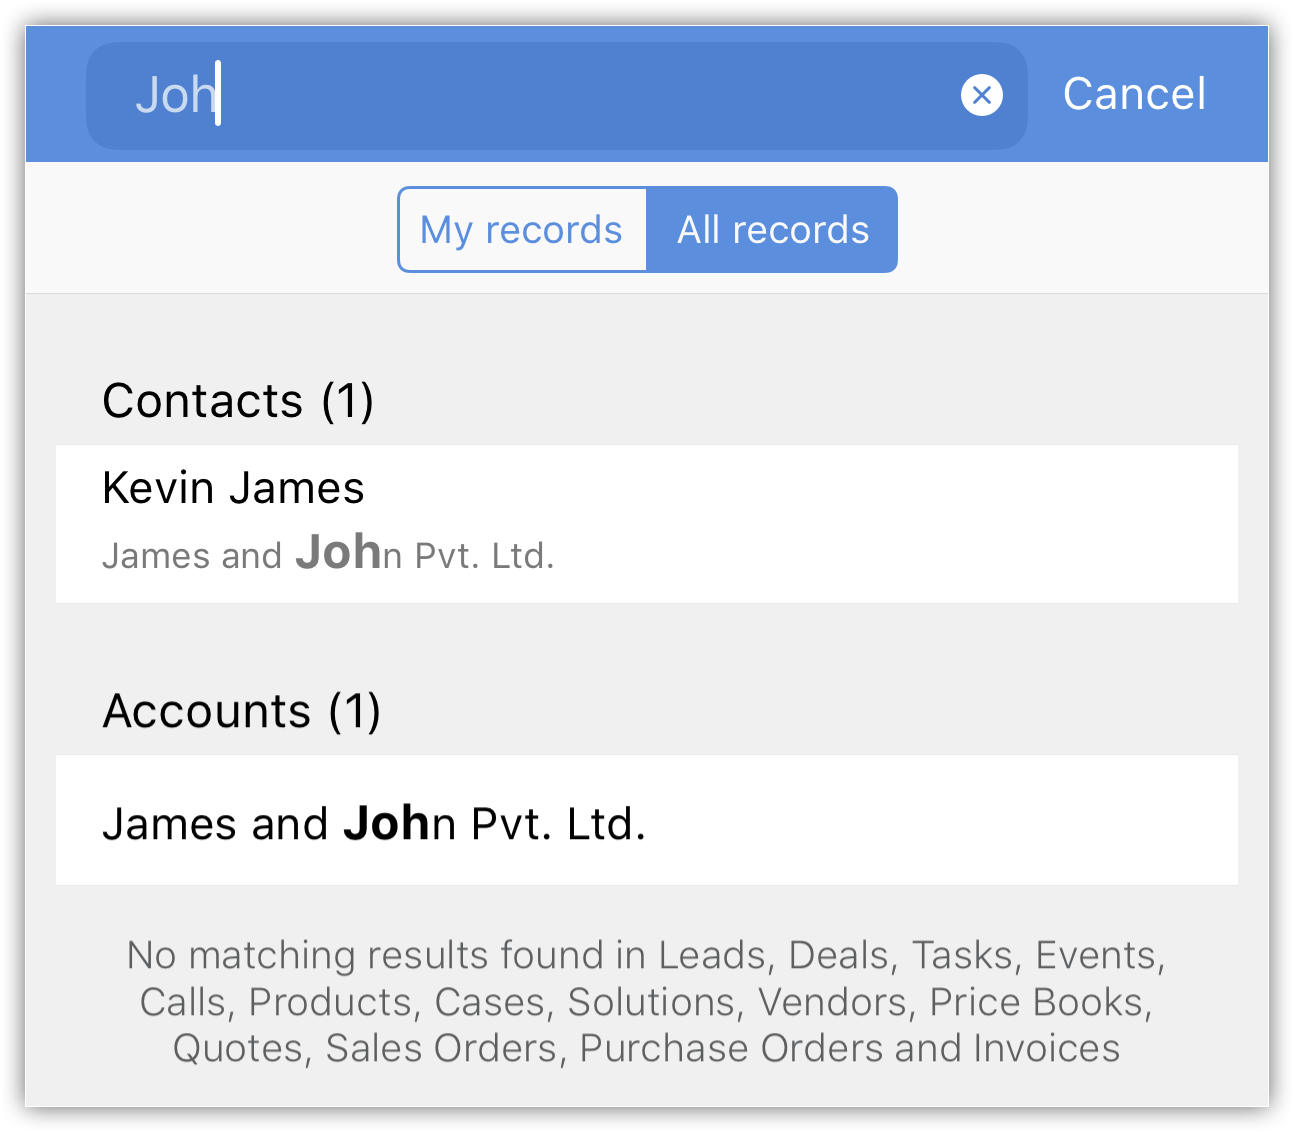
Search Records
You can search for records to quickly fetch what you are looking for. Each module has a search tool which looks for records in the particular module.
To search records
- Go to the desired module.
- Tap the Search icon.
- Enter the text in the search box.As you enter, the matching records in the module will be listed.
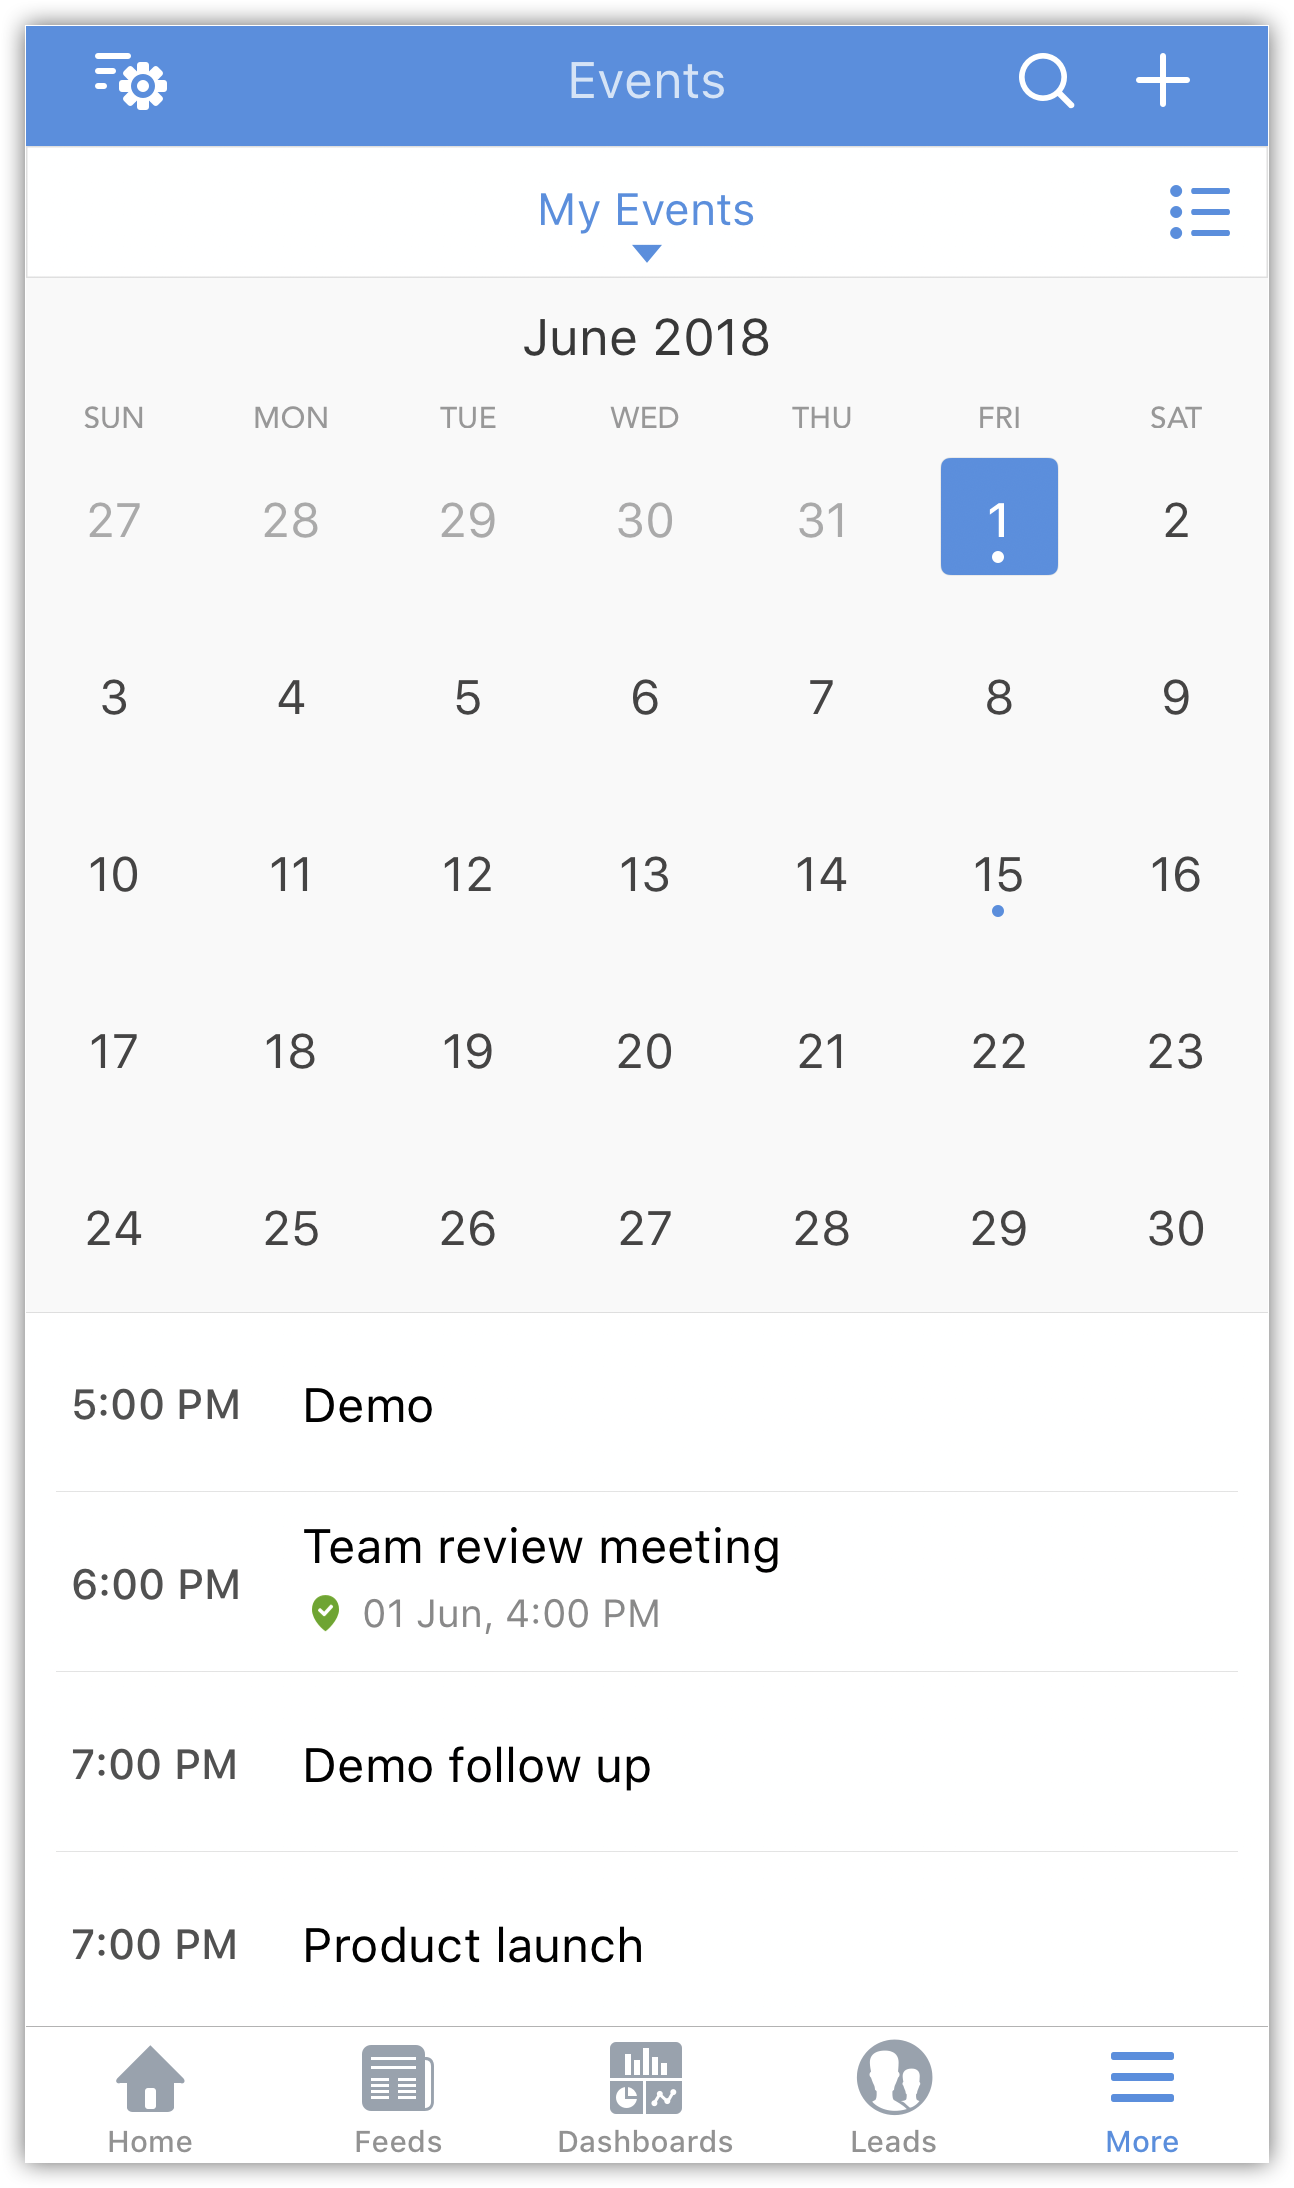
View Month & List View for Events
For the events, you can view the list of records in two types of views: List view and Month View.
To view events in month view
- Go to Events module.
- In the Record List page, toggle between the Calendar View and List View to see the events.
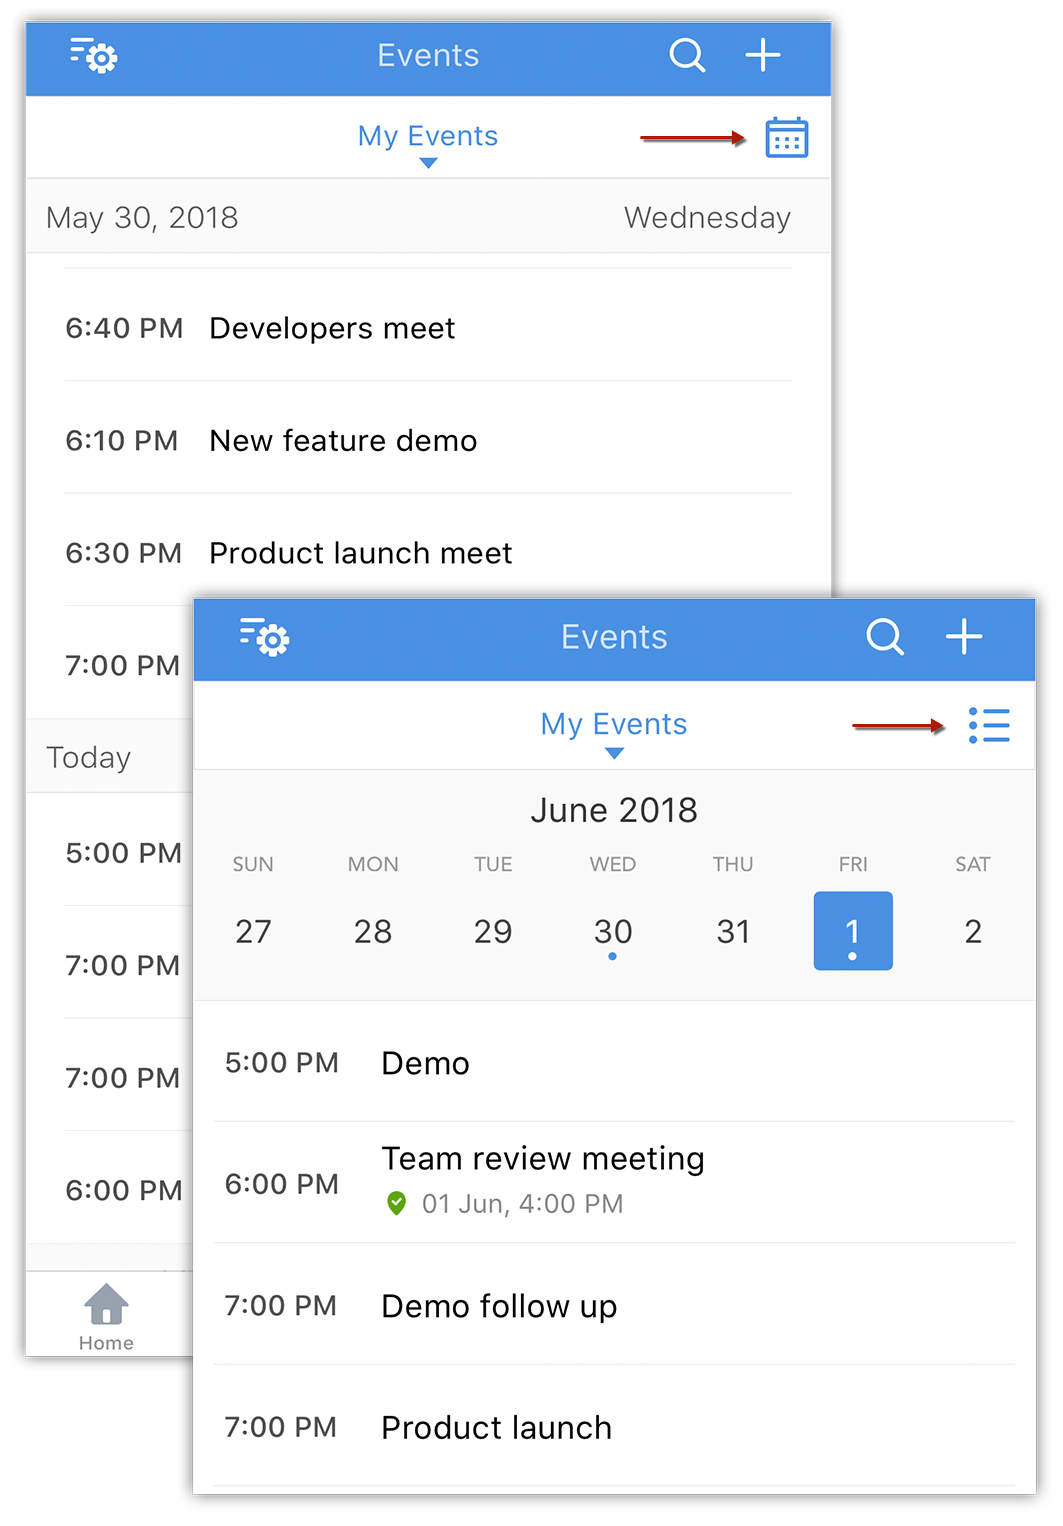
- In the Events module, tap, hold and pull down to get the month view of the events.Make sure you have switched to the Calendar view.
Send Feedback
Feedback can be sent to the Mobile development team, using the feedback form.
To send feedback
- In the CRM app, tap the
 (More) icon.
 - Go to Settings > Submit Feedback to compose and send your feedback.

Troubleshooting and Support
For any troubleshooting and support you can reach the Mobile team using the feedback form (mentioned above) and submit your questions. You can also email your questions to support@construcitonbos.com .
Related Articles
Android Specific Features
Android Specific Features Supported CRM Modules From the CRM app on your Android device, you can access the CRM modules and work on them right from your phone. This ensures that you can access the important data even when not connected to the ...Using the CRM Mobile App for iOS
Using the CRM Mobile App for iOS Organise CRM Home Screen The CRM for iOS welcomes you with an attractive Home screen that displays the Activities for the week. You can prioritise your work for the day based on the activities displayed. You can also ...Key Features of the CRM app
Key Features of the CRM app The CRM app offers various features which allows you to easily manage your data on the go. Listed here are some of the mobile centric features in the CRM application. Check-in to a location Check-in to a location when you ...Results (Map and table features)
Navigating the results When you have entered the required search criteria (or clicked into a saved search), the results will appear on the map: To view the map only (after the search criteria have been entered), select the 'Results Only' button in ...Setting Up Calendar Synchronization via CalDAV
Setting Up Calendar Synchronization via CalDAV Gone are the days when you had to log in to the CRM every time you wanted to check your work schedule for the day. You can now receive alerts about the next staff meeting on your iPhone or even your ...