Data Migration - An Introduction
Data Migration - An Introduction
The Data Migration wizard in the CRM ensures that your data is migrated accurately and helps you reduce much of the manual work. It automatically maps import files to CRM modules and import file columns to the CRM fields. In the case of modules that are not already available, the CRM creates them and maps the relevant files to them. It gives you a clear indication of the number files that are mapped, unmapped and any that are not supported.

Migrate Options
There are a few options to migrate. The CRM provides a custom-made setup to migrate from Salesforce, other The CRM accounts, the Contact Manager, Pipedrive, Highrise, Insightly and any other CRM.
You can migrate from Pipedrive, Highrise, and Insightly via API. All you need is the instance URL to get going. The Contact Manager, on the other hand, is fairly simple as it does not require any configuration and data is migrated in a click.
Before you migrate
We recommend that you go through the following guidelines for an overview of the migration process.
- The files should be in CSV formats.
- The file size can be a maximum of 4 GB. The number of files that you can migrate at one time is limited to 200.
- You can upload a ZIP file which should have the following structure:
- Data files from Salesforce : The .zip file that you upload should have all the files in CSV format and one folder named Attachments. This folder will contain the source files used as attachments in Salesforce records. One of the CSV files will list the record and attachment mappings. This will be used to retain the records' association with the attachment files.
- Data files from the CRM or any other CRMs : There are two folders in this case. The Data folder should have all the data files, including the CSV file that contains information on the record and attachment mappings. The Attachments folder should contain the source files used as attachments in the CRM account.
- Data files from Salesforce : The .zip file that you upload should have all the files in CSV format and one folder named Attachments. This folder will contain the source files used as attachments in Salesforce records. One of the CSV files will list the record and attachment mappings. This will be used to retain the records' association with the attachment files.
- The above-mentioned folder structure is crucial for the the CRM system to identify and map attachments to the records during migration. In some cases, when you unzip files, extra folders are created. Make sure to delete them and maintain the structure mentioned.
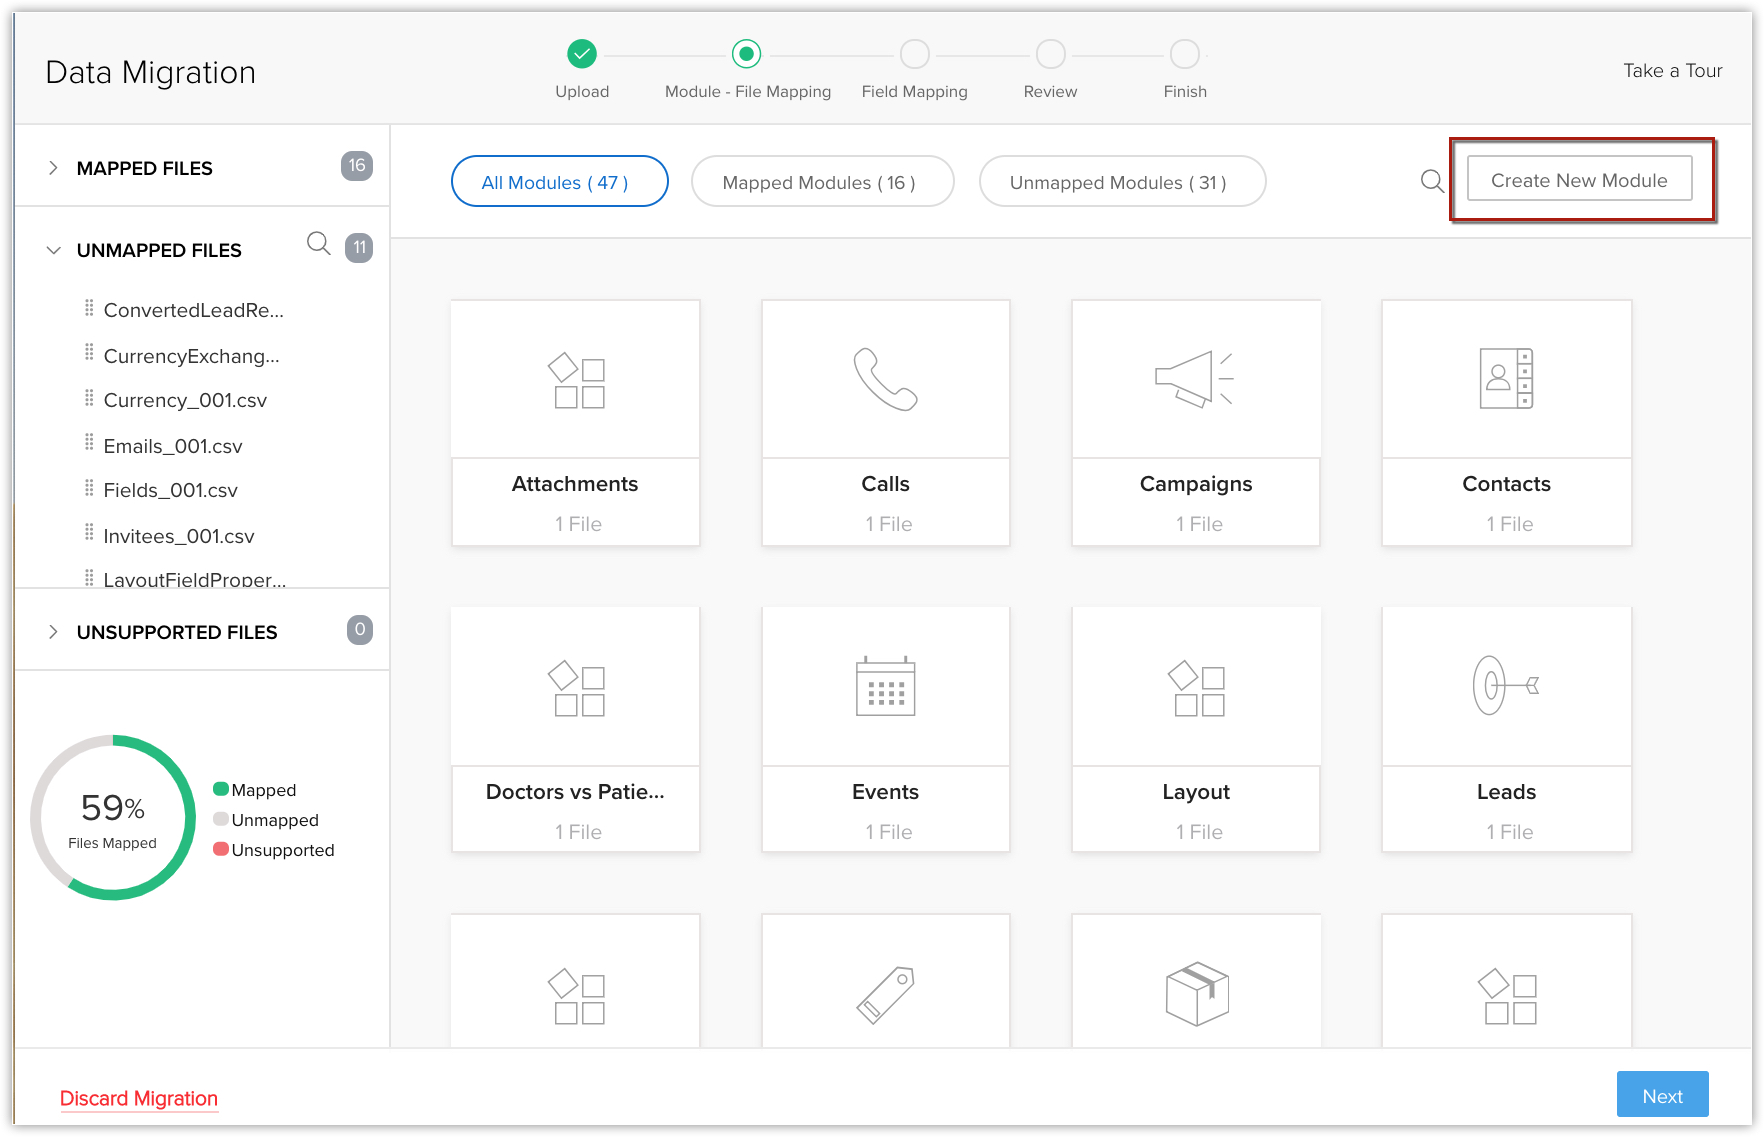
- Tabs or modules cannot be migrated as a whole into the CRM but you can always migrate the data from those modules. During the migration, the CRM identifies the data and suggests custom modules that can be created to accommodate the data.
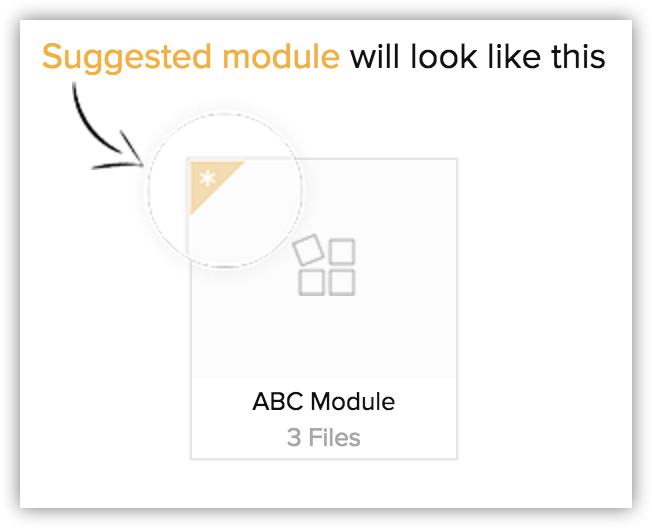
- If you have unmapped files, you can create a module of your choice and add the appropriate file to that module.
 You can also create this as a linking module. For example, you are creating a new module called Doctors and you want to link it with the Patients module. You can do so, right from this window.
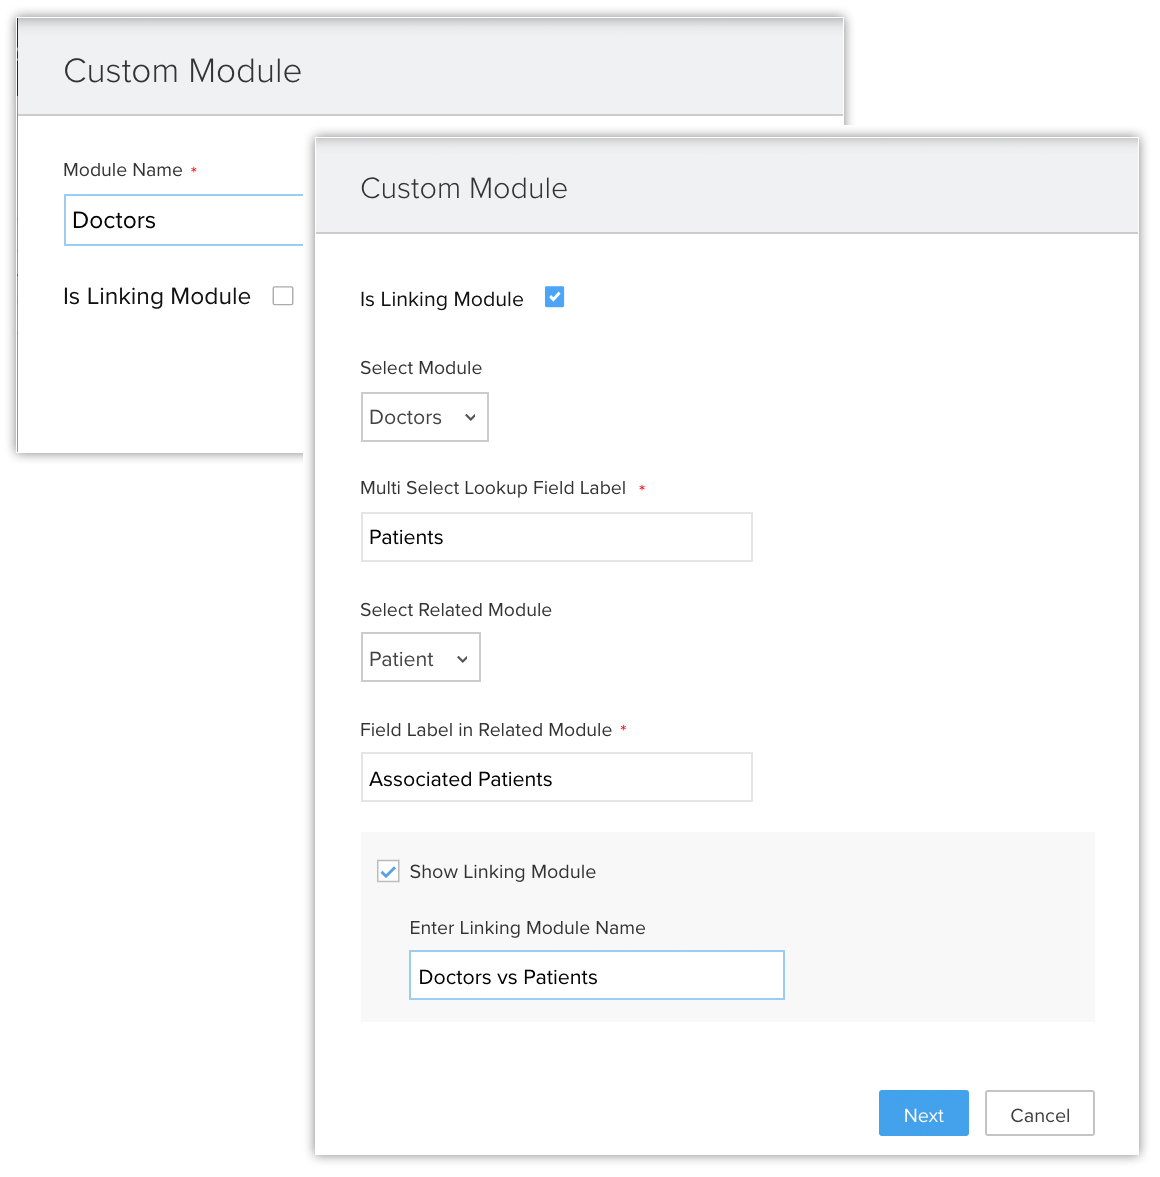
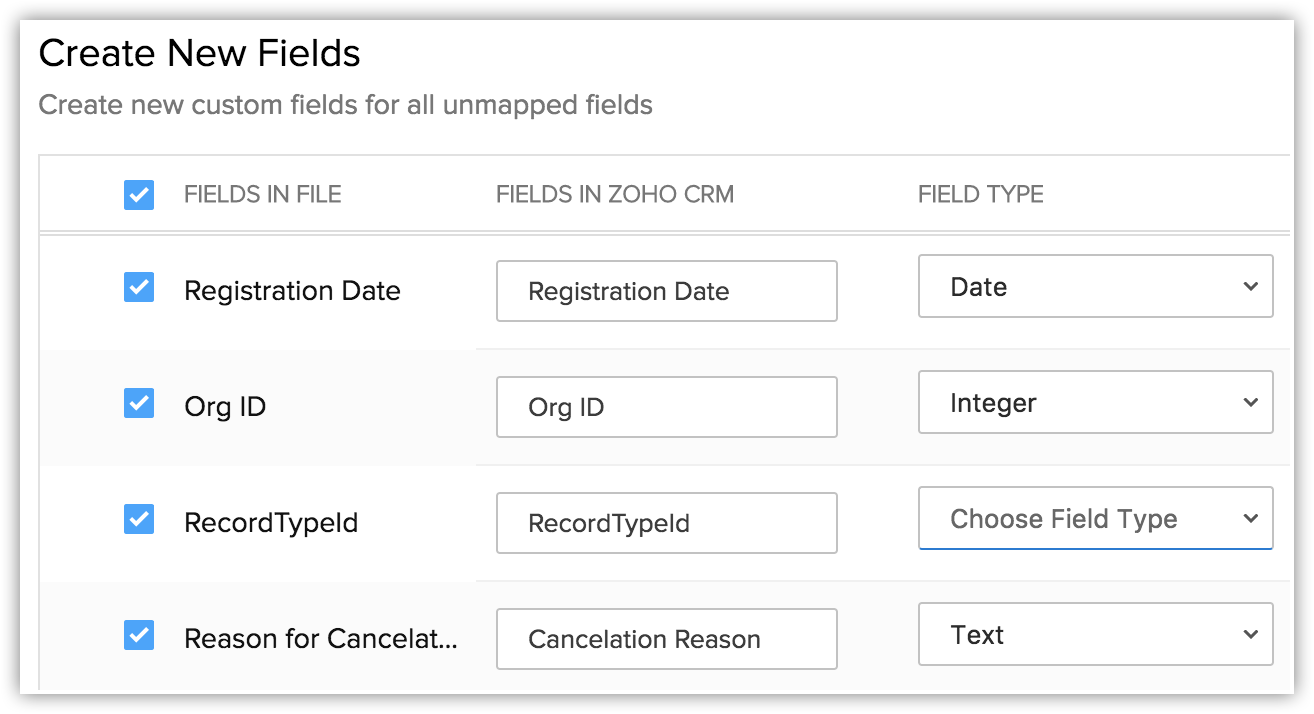
- The CRM will suggest custom fields that are available in the import file but not in the CRM. If required, you can create these fields before the migration.
- Based on the application from which you are migrating data, you may skip a couple of modules that are not relevant.
- When user data is migrated, only the first 2000 records will be imported.
- Two or more files can be mapped to a module. In this case, the column header should be the same in all the files; only then you can map them to a single module.
Migration checklist
- File format : The supported formats are Excel (XLS, XLSX), Comma Separated Value (CSV), and Business Card or vCard Format (VCF) . Unexpected errors may occur if the XLS/XLSX files contain any special controls such as combo filters or images embedded in it.
- Checkbox fields : The values for checkbox type fields in the import file should be either "True" or "False”. Imported data from checkbox fields are converted in the CRM as follows:
- If checkbox is selected, True or 1
- If checkbox is not selected, False or 0
- If checkbox is selected, True or 1
- Characters not allowed : Any data for the file to be imported should not contain the following characters:
- Double quotation marks("): use only as a field delimiter
- Vertical bar (|)
- Angle brackets (<>)
- Double quotation marks("): use only as a field delimiter
- Multi-select pick list fields : The values should be separated by semi-colon in the import file.
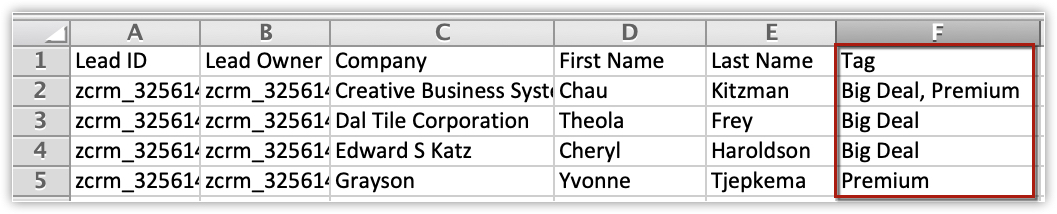
- Migrating Tags : Tags should be present in your file as comma separated values. If a record has more than 10 tags, only the first 10 tags will be migrated and each tag can have a maximum of 25 characters.
- Migrating Subforms : Subforms from any module can be migrated. Let's say, Students module has two subforms: 1. Educational Details 2. Achievements. So, while migrating, you must map the respective file with the Students module and the related subforms. The module-file mapping will display the name of the subform along with the module name (Educational Details-Students). Before migrating you must ensure that the parent module and appropriate subforms are already mapped.
- Migrating Users : You will not be able to migrate users who already have a separate the CRM account. Only when the users close their separate account with the CRM, they can be imported in your company's CRM account.
- Update Mandatory Fields : In your import file, you need to have data for all the mandatory fields in the CRM. For example, "Last Name" is a mandatory field in the CRM. Make sure that the "Last Name" column in your Leads import file has values. For the records that do not have a last name, you need to specify the values as 'not provided', 'none', etc. Any records that lack values for the mandatory fields will be ignored while importing.
- Drop-down List : All data values displayed in the drop-down lists must exist in the corresponding the CRM fields.For instance, if you plan to import account information that contains a value for the industry type drop-down list, before you import the account information, make sure all the industry values in the source file already appear in the drop-down list. If the values do not exist, you must either change the values in the source file to match the existing values in the CRM, or have your administrator add the new values.
- Field Names : Make sure the first row of data (records) in the source file contains the column headings or field names rather than the actual data values. These heading field name values help identify the data when you map the new data to the existing fields in the CRM.
- Blank rows in the import file : More than 10 blank rows in the file might indicate the end of the file. Data after the blank rows will be ignored during import. Make sure not to leave blank rows in between rows of data.
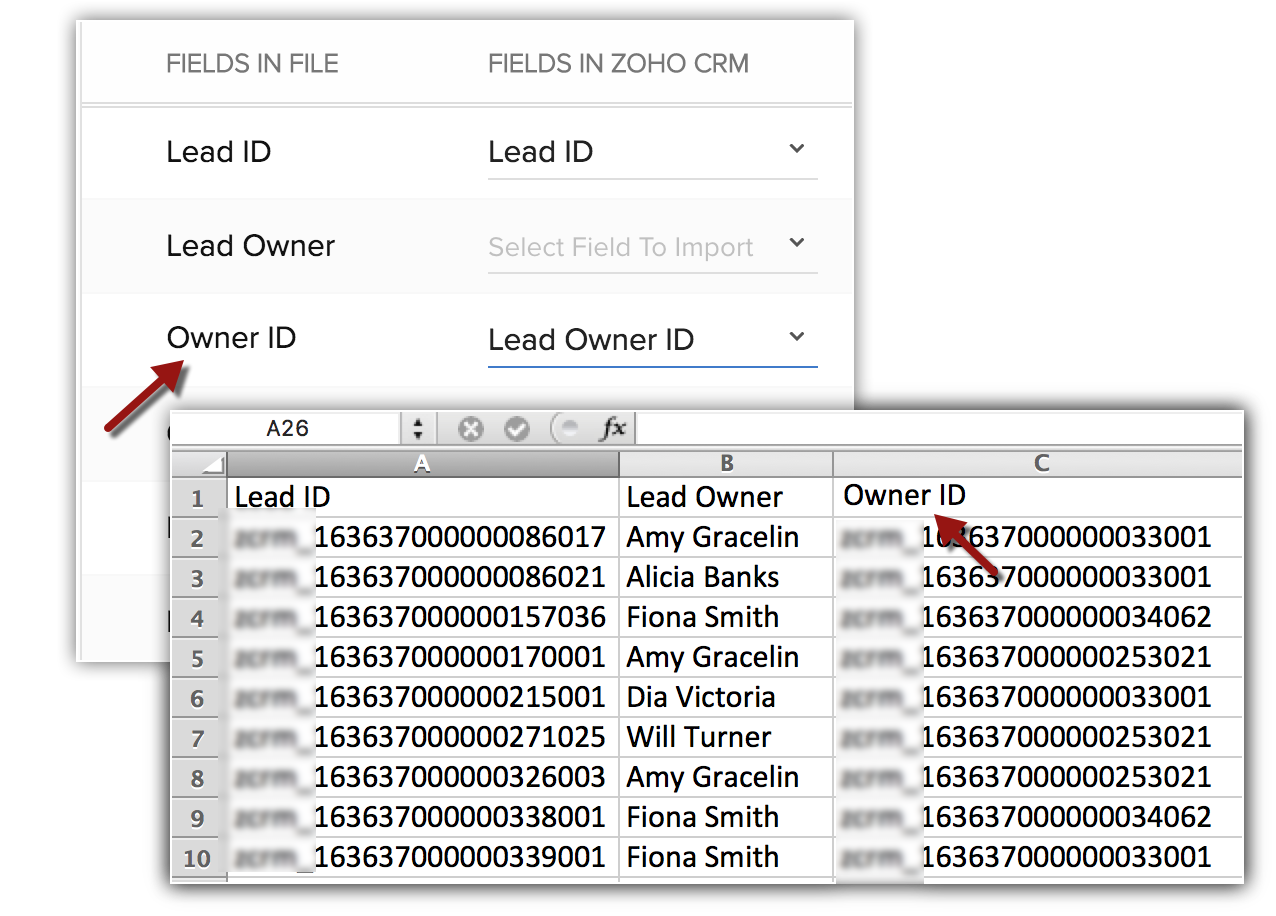
- User data : Always migrate the User details into your CRM first. Then make sure the record's Owner ID field is mapped with the Record Owner ID in the CRM. For example, when you migrate leads, map the Leads Owner ID field from the file with corresponding field in the CRM.

- Data migration, it is not possible to check for duplicates, skip, or overwrite records in CRM. The data will be migrated as it is.
The modules along with their defined mandatory fields are mentioned in the table below. Please make sure to map these fields when you import. There maybe other mandatory fields too in each module, but you can always customise and mark the fields as non mandatory, if required.
| Modules | Mandatory Fields | Modules | Mandatory Fields | Modules | Mandatory Fields |
| Leads |
| Cases |
| Products |
|
| Accounts |
| Solutions |
| Vendors |
|
| Contacts |
| Sales Orders |
| Price Books |
|
| Deals |
| Quotes |
| Invoices |
|
| Campaigns |
| Purchase Orders |
| Calls |
|
| Tasks |
| Events |
| | |
Related Articles
Data Privacy
Data Privacy View Data Source View Personal Fields Manage Data Processing Bases A record's details are available in two sections - Info and Timeline. When you switch on GDPR Compliance in your CRM account, you will be able to view another section, ...Role Management - An Introduction
Role Management - An Introduction In the CRM, you can set up the organisation-wide hierarchy using Roles. Users at a higher hierarchy can always access all the records of at a lower hierarchy. For example, a Sales Manager can access all the Sales ...Web Forms - An Introduction
Web Forms - An Introduction Web forms simplify the process of capturing visitors or users information from your website into your CRM system. They are designed to automate the importing of data from websites into the CRM. Non-technical users find it ...User Management - An Introduction
User Management - An Introduction In the CRM, a user is one who manages records, whether their own or those shared by other users, within the organisation. In addition to accessing the CRM data, some of the users can perform administrative functions ...Managing Groups - An Introduction
Managing Groups - An Introduction In the CRM, you can create different types of groups (set of users) to manage a set of common records. Groups can be used for setting up team selling, team support, event management by a group of marketing users, ...