Creating Products
Creating Products
In the CRM, you can create products by:
- Entering data in the product details form: You can manually fill in the Product details gathered from various external sources.

- Some of the standard fields may not be visible or editable depending on your organisation business process.
- In case you want to add or modify fields, please contact your System Administrator for more details on the usage of other fields.
Create Products Individually
You can create individual products by:
- Filling in the details in the product creation form.
- Cloning the products with a few changes in the existing product details.
To create products individually
- In the Products module, click
 [ New Product icon].
 - In the Create Product page, enter the product information.
- Under Product Information, select the Product Active check box if you want the newly created product to be active.
By default, the check box is selected.
- Under Product Information, select the Product Active check box if you want the newly created product to be active.
- Click Save.
To clone products
- In the Products tab, click a particular product that you want to be cloned.
- In the Product Details page, click
 [ More icon] and click Clone.
 - In the Clone Product page, modify the required details.
- Click Save.
Associate Product with Other Records
You can create a 360-degree view of the product to display all the associated details, such as products, trouble tickets, open activities, history of the completed activities, attachments, and notes.
In the Product Details page, you can update the following:
- Price Books: To add different list prices to the product.
- Open Activities: To add tasks and events to product.
- Closed Activities: To display the closed tasks and events to product.
- Cases: To add cases to the product.
- Solutions: To add solutions to the product.
- Attachments: To attach documents to the product.
- Leads: To add leads to the product
- Contacts: To add contacts to the product
- Potentials: To add potentials to the product
- Accounts: To add accounts to the product
Generate PO for Records below Reorder Level
In a typical business scenario, there is a lag between the time at which the stock is ordered and the time at which the stock is received. To handle this case, we have a Reorder Level for the products. Reorder level of the product is the point at which a new order is to be placed for the supply of products.
The reorder level is set so that products are purchased before the company runs out of stock to sell. It is always set as a number higher than zero, based on the time taken to receive the goods. In the CRM, you can set the reorder level for each product and generate the purchase order for the products below the reorder level.
To generate PO for records below reorder level
- Click the Products module.
- In the Products Home page, click [ More icon] and click Generate PO for Record below Reorder Level.
- In the Generate PO for Record below Reorder Level page, select the Vendor from the drop-down list.
Note that only the vendors whose products are below the reorder level will be displayed here.
The products below the reorder level will be listed on selecting the vendor. - Select the check box(es) of the products for which you need to generate the purchase orders.
- Click Generate Purchase Order.
You will be directed to the Create Purchase Order page.
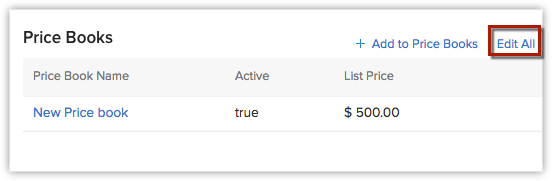
Update a Product's Multiple List Prices
A product may have multiple list prices that need to be updated often. You can edit them at any time.
To update list prices
- Login to your account and choose Products.
- Select the product for which you wish to update the list prices.
- In the Price Books Related List, click the Edit All link.
- In the Edit List Prices section, enter the new prices manually.
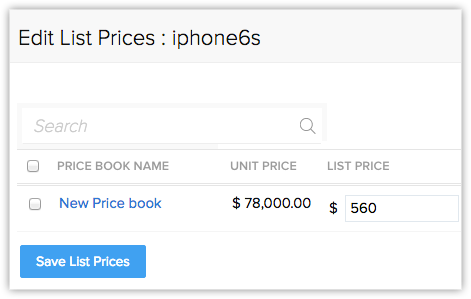
- Click Save List Prices.
Understand Stock Information Auto-Updates
The details of product quantity in the Stock Information section are updated automatically with reference to the sales order and purchase order and invoice. Following is the logic behind the automatic updates.
Quantity in Stock
Quantity in stock changes with respect to Invoice & Purchase Order
- Quantity in stock increases when a purchase order is delivered.
- Quantity in stock decreases when an already delivered purchase order is cancelled.
- Quantity in stock decreases with an invoice creation (this includes when a quote or sales order is converted to an invoice).
- Quantity in stock increases with an invoice cancellation.
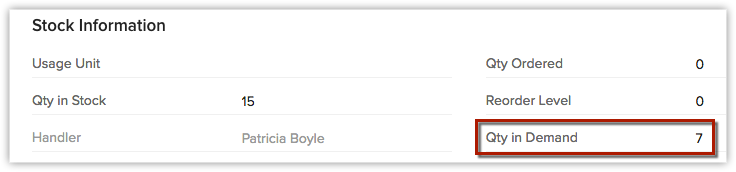
Quantity in Demand:
- Quantity in demand increases when a sales order is created.
- Quantity in demand decreases when a sales order is delivered or cancelled.
Quantity in demand also decreases when a sales order is converted to an invoice. The status of the sales order thus converted automatically changed to "delivered".
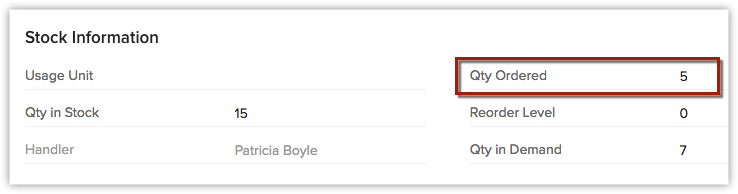
Quantity Ordered:
- Quantity ordered increases when a purchase order is created.
- Quantity ordered decreases when a purchases order is delivered or cancelled.
Example:
Following is an example that shows you how the quantity values vary at different stages for a given scenario.
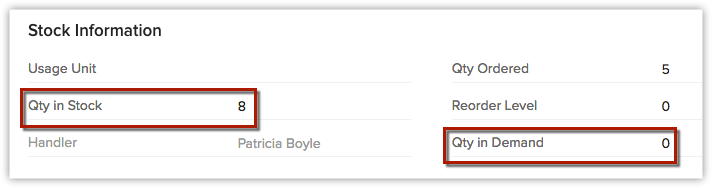
You run a furniture business. You have 15 arm chairs in stock. Your have no sales order or purchase order. In that case, your quantity in stock would be 10, while your quantity in demand and quantity ordered would be 0.
You receive a sales order (created) for 7 chairs. Now, the quantity in demand increases. The stock information would be:
You create a purchase order for 5 chairs. This will result in an increase in the quantity ordered.
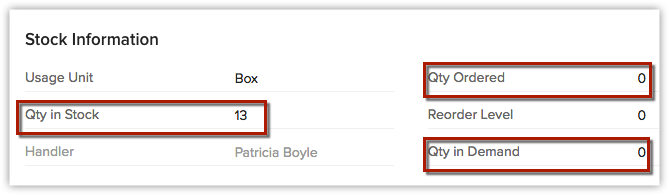
You deliver your the sales order for 7 chairs and create an invoice for the same. Here, your quantity in stock and quantity in demand decrease accordingly.
Your purchase order for 5 chairs has been delivered and your stock fills up again.
The stock flow is thus automated as you update sales order, purchase order and invoice details.
Related Articles
Creating Vendors
Creating Vendors In the CRM, you can create vendors by: Entering data in the vendor details form: You can manually fill in the Vendor details in the form. Importing vendors from external sources: You can gather data through various sources and import ...Creating Invoices
Creating Invoices In the CRM, you can create invoices by entering data in the Invoice details form. Note Some of the standard fields may not be visible or editable depending on your organisation business process. In case you want to add or modify ...Creating Quotes
Creating Quotes In the CRM, you can store quote details by manually entering the data in the quote details form. Note Some of the standard fields may not be visible or editable depending on your organisation business process. In case you want to add ...Creating Price Books
Creating Price Books In the CRM, you can create price books by: Entering data in the price book details form: You can manually fill in the Price Book details. Importing price books from external sources: You can gather data through various sources ...Creating Inventory Templates
Creating Inventory Templates From the Scratch From the Template Gallery Inserting HTML Organize Inventory Template Using inventory templates With the the CRM - Inventory Templates functionality, you can customize the Quote, Purchase Order, Sales ...