Autoresponder Scenario
Autoresponder Scenario
Here is a popular scenario, just one of the many ways in which you can use autoresponders.
The Challenge
A user has shown interest in your product and has subscribed for a 30-day free trial of your product. Your challenge here is to engage the prospect in your product and follow-up with right email messages to win the deal. This is a real-life Drip Marketing situation where autoresponders can be used.
The Scenario
- A visitor to your web site submits the web form and signs up for a 30-day trial period of your product.
- An auto-generated Thank you / Welcome email is sent to the user.
- User's (lead) details are listed in the CRM under a custom view (eg: Today's Leads).
- Autoresponder is initiated.
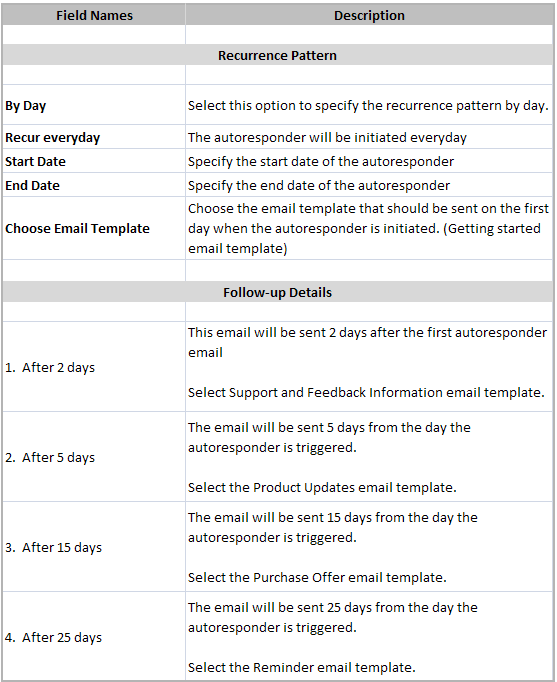
- Day 1 - 'Getting Started' email is sent to the user.
- Day 2 - 'Support and Feedback Information' email is sent.
- Day 5 - 'Product Updates' email is sent.
- Day 15 - 'Purchase Offer' email is sent.
- Day 25 - 'Reminder' email is sent.

Note
- If the user subscribes to the product and is excluded from the mailing list, then the follow-up emails that come after will not be sent.
The procedure to set up an autoresponder
- Click the Leads tab.
- In the Leads Home page, under Lead Tools, click the Autoresponders link.
- In the Autoresponders page, click Create Autoresponder.
- In the New Autoresponder page, under the Autoresponder Details section, do the following:
- Enter the Name of the autoresponder.
- Select the user to whom the records will be Assigned To.
- Select the Custom View to set up the recipient list for the autoresponder.
- Select a Folder for the autoresponder.
- Select Dynamic and specify the corresponding details (Refer to the table.)
- Click Save.
Note
- If the user subscribes to the product, during the follow-up process, the user's email address should be excluded from the mailing list. On excluding the email address, the successive follow-up emails will not be sent to the user.
The following table provides information on the options that you need to specify for the autoresponder.
Related Articles
Managing Autoresponders
Managing Autoresponders Autoresponders are the solution to send automated replies and follow-up emails to the prospects and customers. Once you receive a response from the lead or contact, you have to manually exclude the contacts from the mailing ...Customise CRM for B2C
Customise CRM for B2C In the CRM, Business-to-Business (B2B) the business process data is populated. However, customers can customise the CRM business process for Business-to-Consumer (B2C) by using the CRM Customisation tools. In a typical B2C ...Setting Field Updates
Setting Field Updates The Field Update option helps you to automatically update certain field values in the records, when the associated workflow rule is triggered. To create field updates Go to Setup > Automation > Actions > Field Updates. In ...Workflow Scenarios
Workflow Scenarios Workflow rules help automate several sales processes in your business. Following are a couple of scenarios that demonstrate the use of workflow rules in the CRM. Create a workflow rule to automate task assignment Let's say you want ...Creating Conditional Layouts
Creating Conditional Layouts How to Create a Conditional Layout Points to Remember Conditional layouts in the CRM offer an interface for you to seamlessly manage dependency between fields in a layout. Your sales data are often interdependent. ...